Panels
Table of contents
Panels provide additional space in the Data editor in which you can manipulate data. The panels are handy if you work with complex types (structures, arrays), long text data, or BLOBs. Panels appear as tabs in an additional pane in the right hand side of the Data tab:
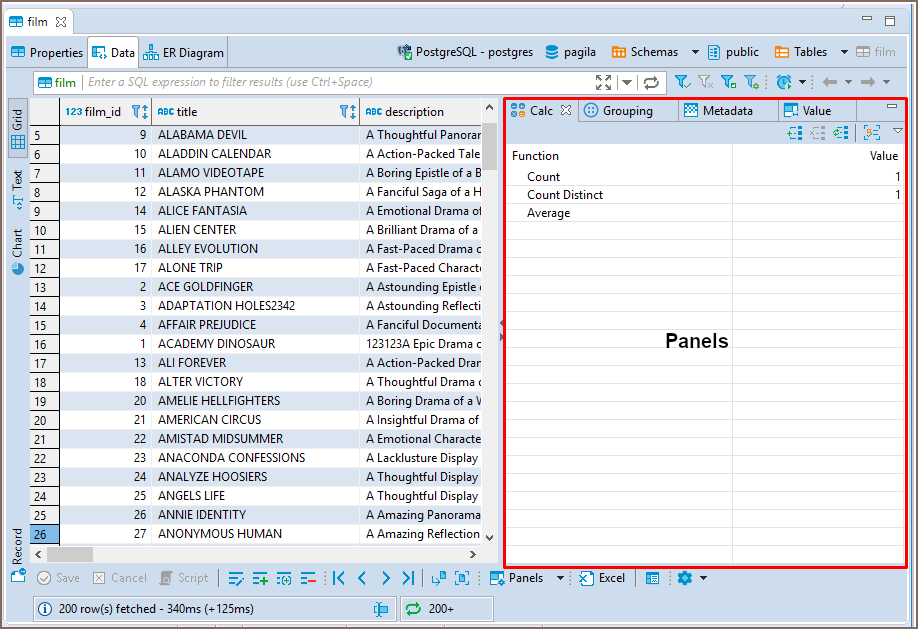
This additional pane appears only when you open one of the four panels:
- Calc
- Grouping
- Metadata
- Value viewer (default)
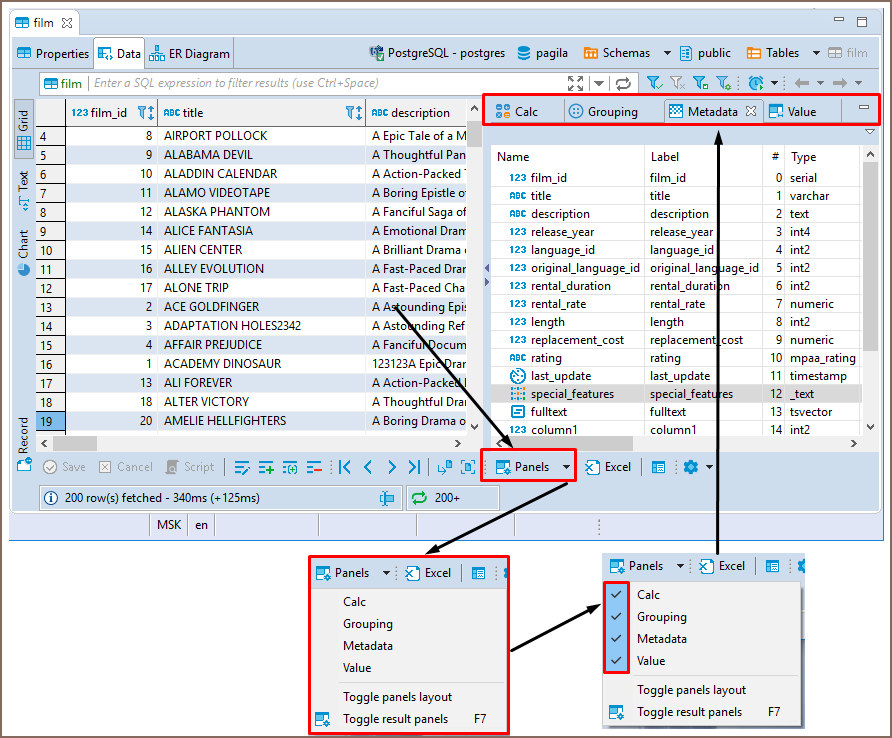
To open the panels, click Panels on the bottom toolbar. By default, the Value viewer panel opens. Alternatively, you can open the Value panel by pressing F7 on a cell. To open the other panels, click the down arrow next to the Panels button and click the name of the panel on the menu:
Panels will also open if you try to inline-edit a cell with a complex data type.
To close the panels, click the Panels button again or click the standard Close (cross) icon in the upper right corner of each panel.
You can also show and hide panels by clicking the Configure button (![]() ) on the bottom toolbar and then Toggle result panels on the Configure dropdown menu.
) on the bottom toolbar and then Toggle result panels on the Configure dropdown menu.
Value Viewer

The Value Viewer panel displays the value currently in focus and allows editing. The toolbar of the Value Viewer contains the following common buttons for all data types:
| Button | Name | Description |
|---|---|---|
| Apply cell changes | Displays the data table changes in the Value viewer. | |
| Auto-apply value | Enables the automatic display of changes made in the Value viewer in the data table. When auto-saving is enabled, the changes appear in the data table at the same time when they are made in the Value viewer. |
Note: This buttons does not save changes made to the database. To save the changes in the database, you need to use the Save button on the bottom toolbar of the Data Editor.
Additional buttons may appear depending on the specific data type being viewed (e.g., Arrays, JSON, datetime, Binary content).
Dictionary handling in Value Viewer
The Value Viewer provides specific handling for dictionaries when dealing with foreign keys. If the
table contains foreign keys, the Value Viewer will display a dictionary with values. For data types that are not
string, numeric, or datetime, only one value appear in the dictionary panel.
Working with dictionaries
When working with dictionaries in the Value Viewer, the following functionalities are available:
- Edit Value: Displays the current value, which can also be edited within the Value Viewer.
- Dictionary field: Displays the table referenced by the foreign key. Clicking on it will open a new tab with that table.
- Define Description field: Clicking on this field will open a window where you can:
- Choose dictionary description columns or set custom criteria.
- Define a custom expression for description.
- Set a column delimiter.
Search: Allows you to type dictionary value or part of description string to search within the dictionary entries.
Preferences Settings for dictionaries
You can further customize the behavior of dictionaries in the Value Viewer by accessing the preferences settings. Navigate to Window -> Preferences -> Editors -> Data Editor -> Dictionaries.
Within these settings, you can configure the following options:
- Keywords for dictionary description columns: Allows you to specify keywords that will be used for dictionary description columns.
- Maximum amount of elements on a dictionary panel page: This enables you to set a limit for the number of elements displayed on a single page within the dictionary panel.
These preferences provide additional control over how dictionaries are handled and displayed within the Value Viewer.
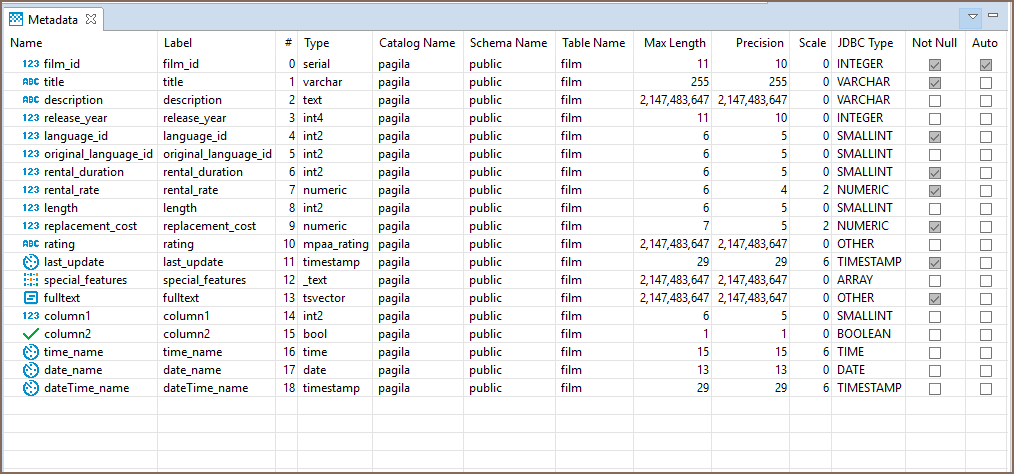
Metadata Panel
The Metadata panel displays metadata for each cell in the row containing the cell currently in focus. You can just view the metadata.
Calc Panel
The Calc panel is useful for getting basic statistics across data in several columns and rows:
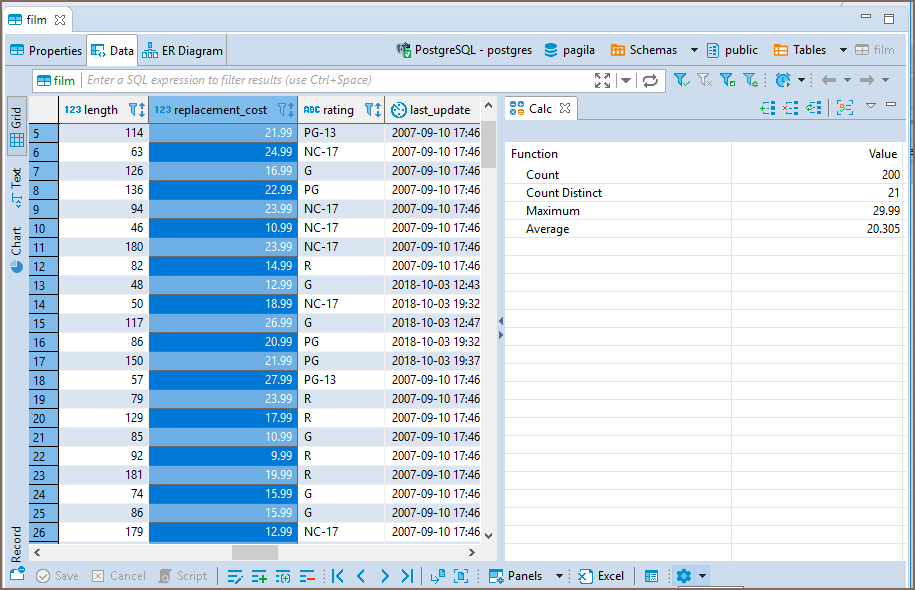
You can select several columns and rows in standard ways - by pressing and holding the left mouse button or by clicking cells while holding the Ctrl or Shift keys. The panel updates dynamically to show statistics for the selected data.
To see the data grouped by columns, click the Group by columns button (![]() ). To remove the grouping by columns and see the summary values for all columns, click the same button again.
). To remove the grouping by columns and see the summary values for all columns, click the same button again.
By default, the panel applies and displays results for two functions – Count and Count Distinct. To add other functions, click the Add function (![]() ) button on the toolbar of the panel or right-click one of the rows in the Aggregate panel and click Add function on the context menu and then click the name of the function. The following functions are available:
) button on the toolbar of the panel or right-click one of the rows in the Aggregate panel and click Add function on the context menu and then click the name of the function. The following functions are available:
- Sum
- Average
- Minimum
- Maximum
- Median
- Mode
To remove an individual function, click the function and then click Remove function (![]() ) on the toolbar of the panel, or right-click the function and click Remove function on the context menu. To remove all functions, click Reset (
) on the toolbar of the panel, or right-click the function and click Remove function on the context menu. To remove all functions, click Reset (![]() ) on the toolbar or on the context menu.
) on the toolbar or on the context menu.
You can copy the value of a particular function to the clipboard - right-click the row and click Copy Value on the context menu.
You can also copy all functions with their values - right-click in the table and click Copy All on the context menu.
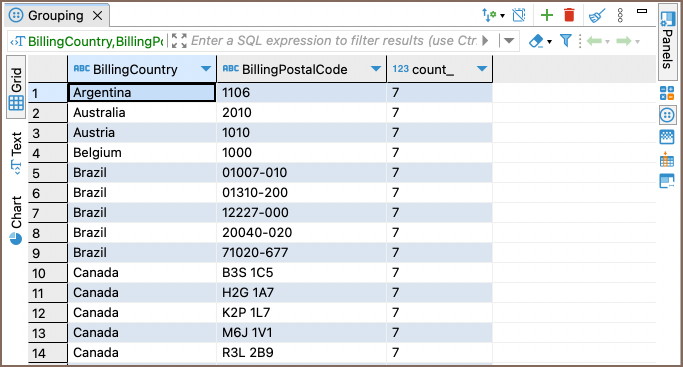
Grouping Panel
The Grouping panel provides tools to calculate statistics based on a table of a custom SQL query.
It uses GROUP BY queries to extract unique values for COUNT (default), SUM, AVG, MIN, MAX, and other analytics functions,
displaying the results in dedicated columns.
To obtain the grouping results for one or more columns of a data table, open the Grouping panel, then, in the results table, put the cursor onto the data type icon of the table header, and drag-n-drop the column(s) into the panel:
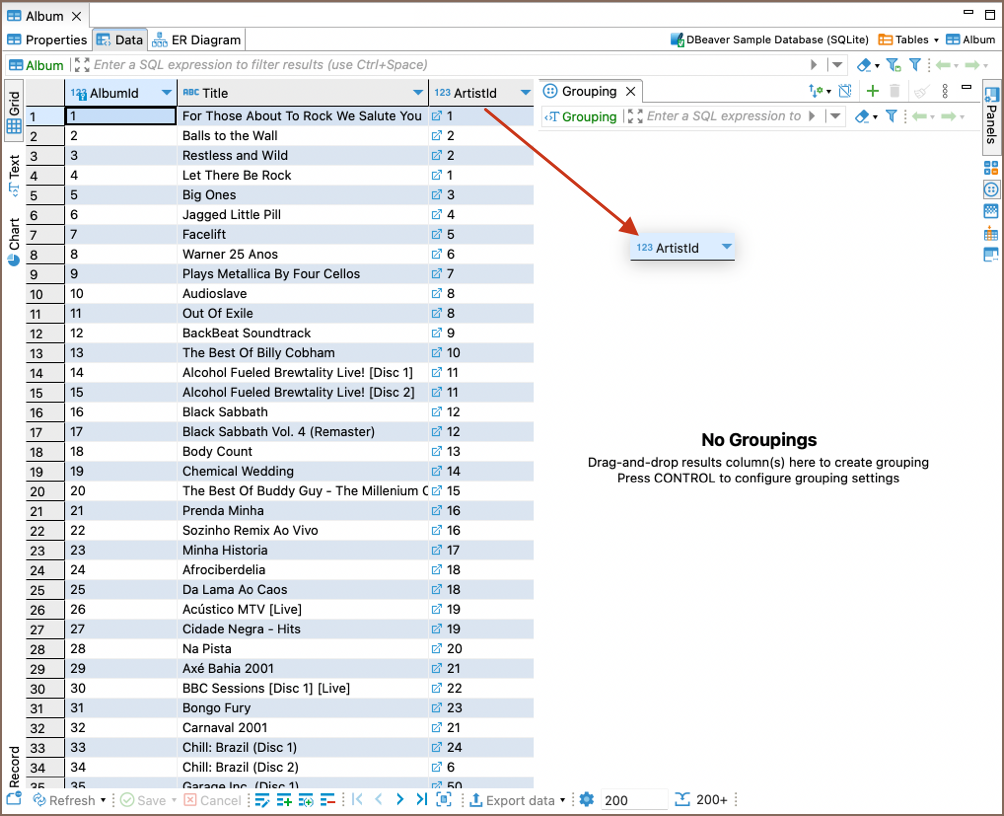
If you add several columns to the panel, DBeaver groups data in the order the columns go and calculates statistics based on the grouping.
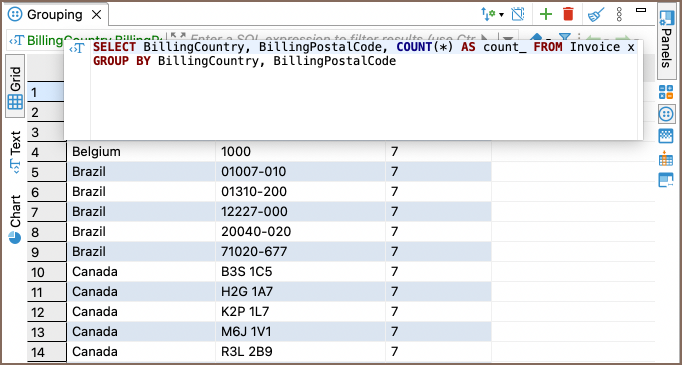
If you want to see the entire query, click on the Query button located in the top-left corner of the Grouping panel to open it.
Function management in the Grouping panel
Adding a function
By default, the COUNT function is used. You can add other functions as well.
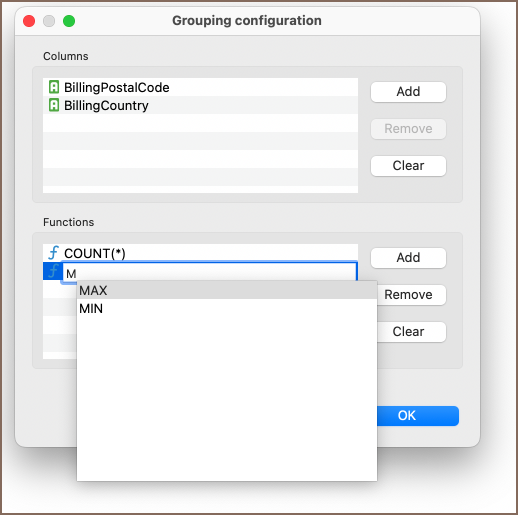
To add a function, follow these steps:
Click the Edit grouping columns button on the panel's toolbar. Alternatively, right-click the Grouping panel window and navigate to the Edit grouping columns option.
In the Grouping Configuration window, locate the Functions area. Click Add and type the function into the new row.
- DBeaver provides auto-complete options for your convenience.
- Indicate the column name in brackets. Note that
COUNTis the only function that allows using*instead of specifying a column name.
To complete the process, click OK.
Removing a function
To remove a function, in the same Grouping Configuration window, select the function and click Remove, then click OK. To remove all functions, click Clear and then OK.
Column management in the Grouping panel
Adding a column
You can also manage columns in the same Grouping Configuration window.
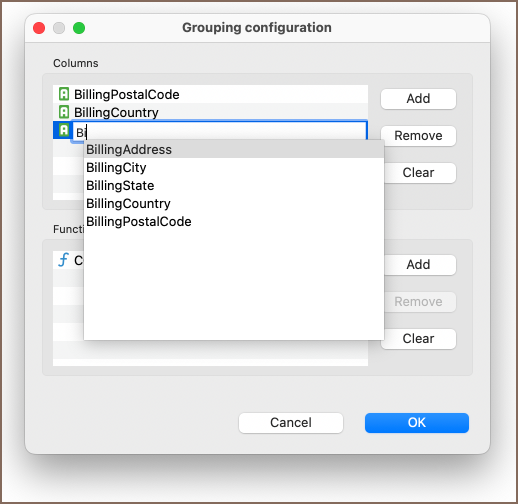
To add a column:
Click the Edit grouping columns button on the panel's toolbar.
In the Grouping Configuration window, go to the Columns area. Click Add and type the column name into the new row.
- DBeaver provides auto-complete options for your convenience.
To complete the process, click OK.
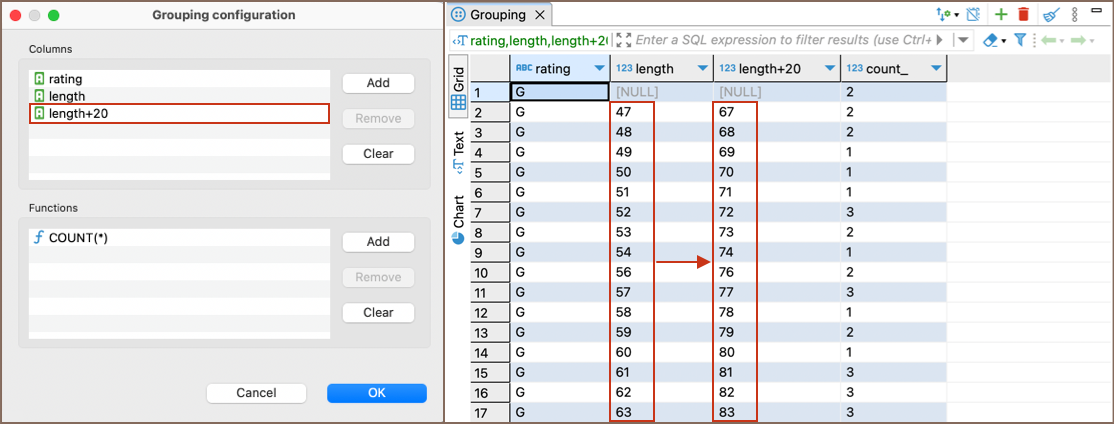
Tip: You can add a column with an expression for MySQL/MariaDB databases. The expression will be calculated in the resulting column:
Removing a column
To remove a column, in the same Grouping Configuration window, select the column and click Remove, then click OK. To remove all columns, click Clear and then OK.
Alternatively, you can remove a column by clicking the column name and then clicking the Remove grouping column button
 in the panel's toolbar.
To clear all results from the Grouping panel, click the Clear grouping
button ![]() .
.
Additional settings
Default sorting
Click the Default Sorting button ![]() to access sorting options for the grouped data. The dropdown menu provides the
following sorting criteria:
to access sorting options for the grouped data. The dropdown menu provides the
following sorting criteria:
| Option | Description |
|---|---|
| Unsorted | Leaves the data in its original order. |
| Ascending | Sorts the grouped data in ascending order. |
| Descending | Sorts the grouped data in descending order. |
Select the desired option to apply the corresponding sorting criteria to the grouped data.
Show duplicates only
Click the Show duplicates only (COUNT > 1) button ![]() to filter the
results and display only those rows where the
to filter the
results and display only those rows where the COUNT is greater than 1.
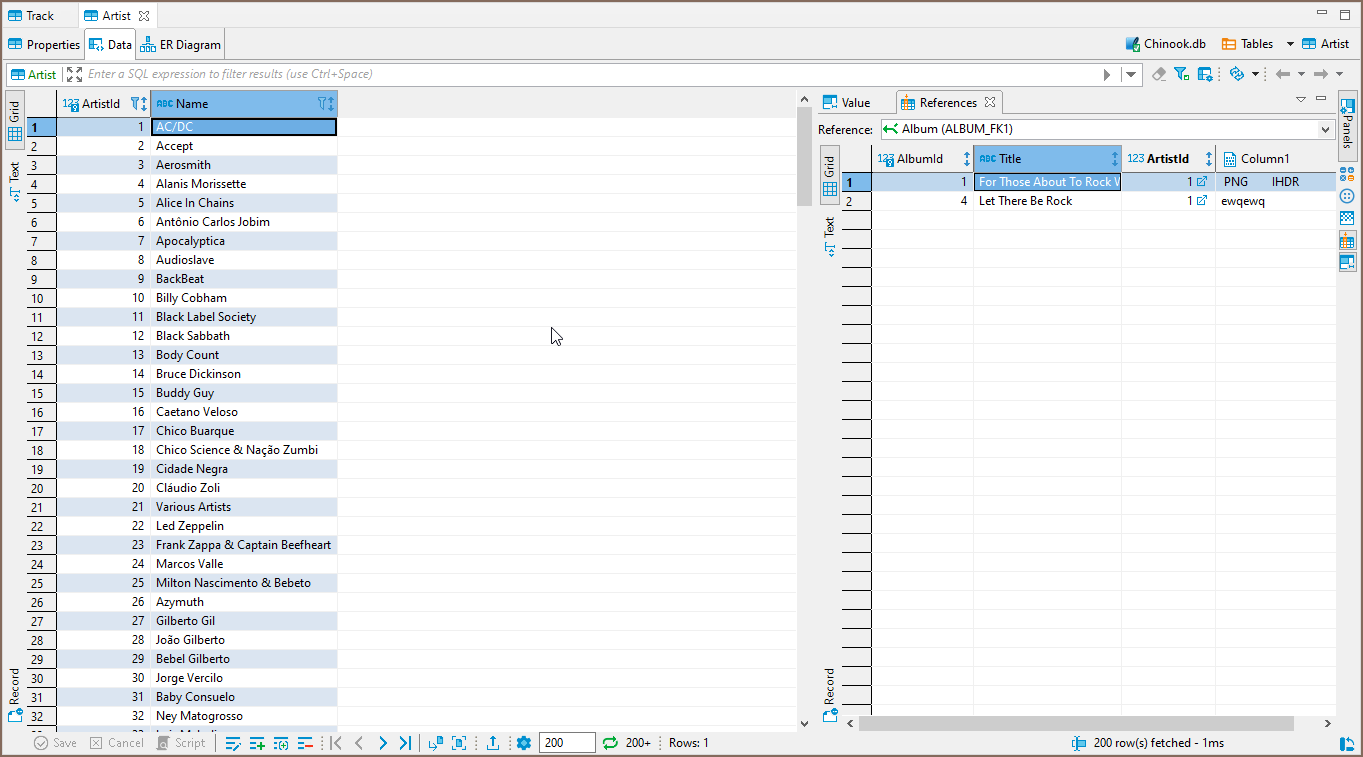
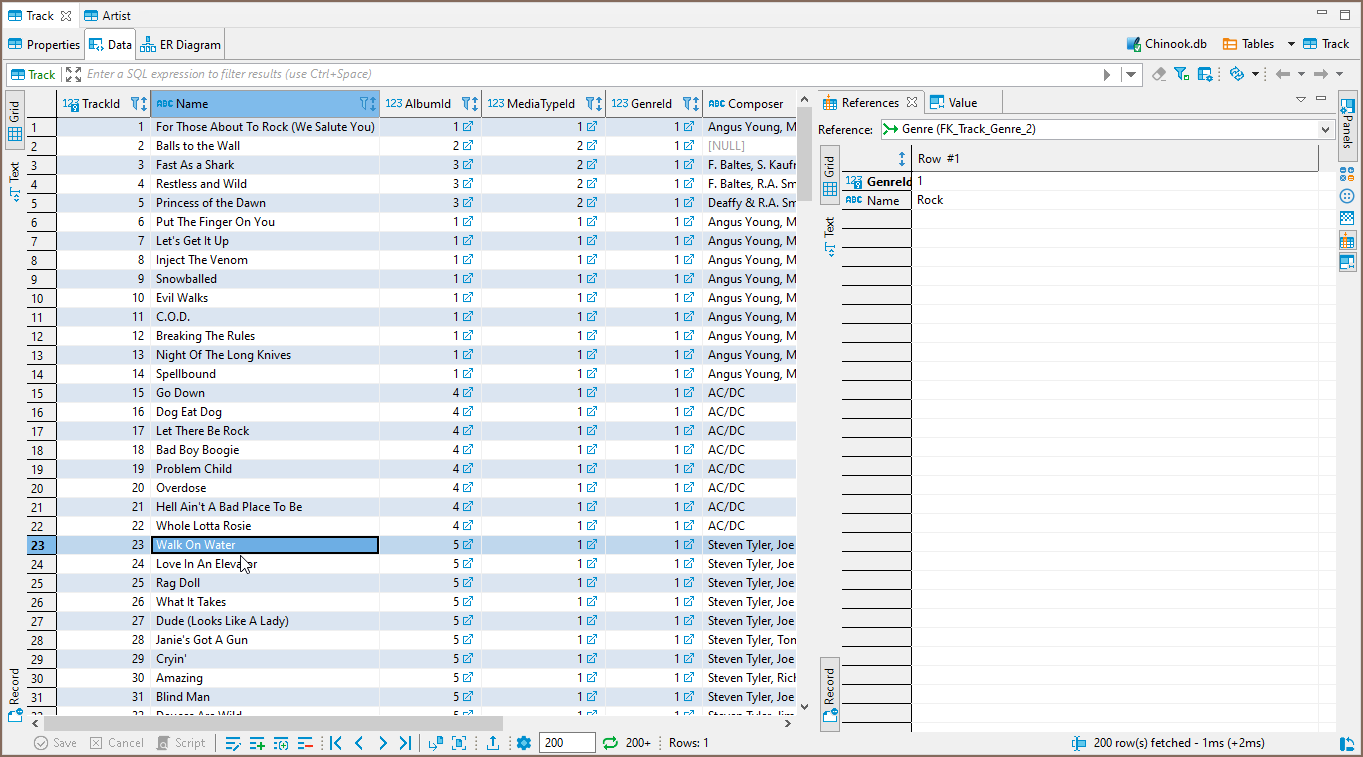
References panel
The references panel allows you to see all the related information for the chosen row from other connected tables. The information is presented in an additional data viewer window, filtered to show the information related to the currently selected row. If a table opened in data viewer has a foreign key referencing another table, or it is referenced with a foreign key by another table, all of those connected tables can be picked from a dropdown list.
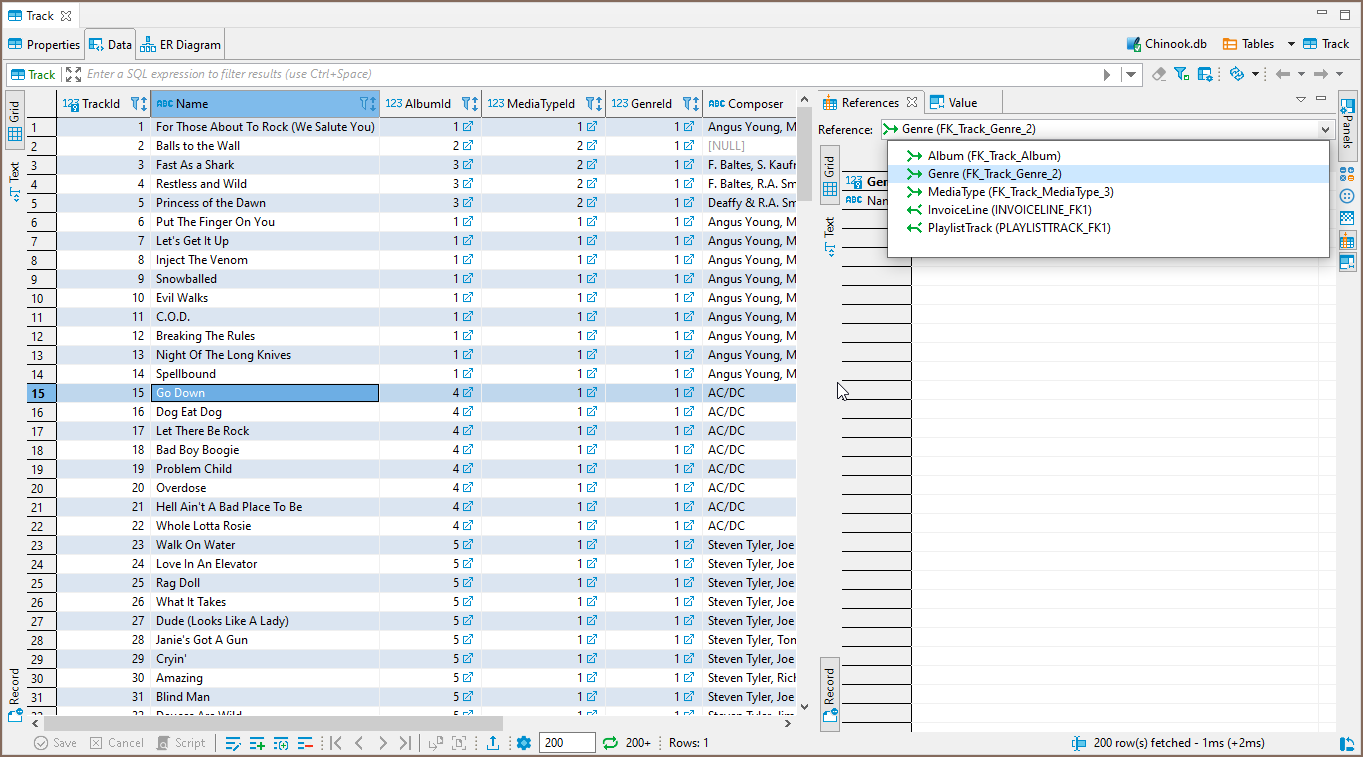
When a table that is referenced by a foreign key in the current table is chosen, the information from the row corresponding to a referenced key will be shown, in this situation the record mode is enabled by default, but it can be turned off like in a normal data viewer.
When a table that references the current table is chosen, the references panel will show all the rows that refer a selected primary key in the current table.