SQL Assist and Auto Complete
Table of contents
The SQL Assist feature provides auto-completion of database object names and SQL commands, and other keywords in queries.
To perform some object name auto-complete, press Ctrl+Space or right-click the desired location in the query and click SQL Assist on the context menu. DBeaver searches for objects in a database by their names and/or descriptions.
When you start typing an SQL keyword in a statement, DBeaver offers auto-complete options as well.
Another auto-complete function is that it searches for the last entered identifier – type the first letter and press Ctrl+Shift+Space.
You can also press Ctrl+Space after the asterisk in the query similar to
SELECT * FROM tableName
INSERT INTO tableName (*)
Hippie Engine
Hippie Engine provides autocompletion based on information from the current script file. It scans files looking for words and adds proposals based on similarity with the given string.
It can be toggled on or off in the Code Completion preferences.
Customize
You can customize your SQL Assist and Auto Complete by navigating to Window -> Preferences -> Editor -> SQL Editor -> Code Completion, optimizing the performance of the auto-completion feature.
SQL Code Editor
Table of contents
Overview
The SQL Code Editor within DBeaver’s SQL Editor provides you with advanced functionalities for SQL script management. This includes displaying problem markers, automatic closing of quotes and brackets, semantic analysis, and more. This article explores the settings of the SQL Code Editor, focusing on how they enhance the Script panel’s behavior and ensure efficient management of your SQL code.
Configuring SQL Code Editor settings
To configure the SQL Script panel behavior, navigate to Window -> Preferences -> Editors -> SQL Editor -> Code Editor.
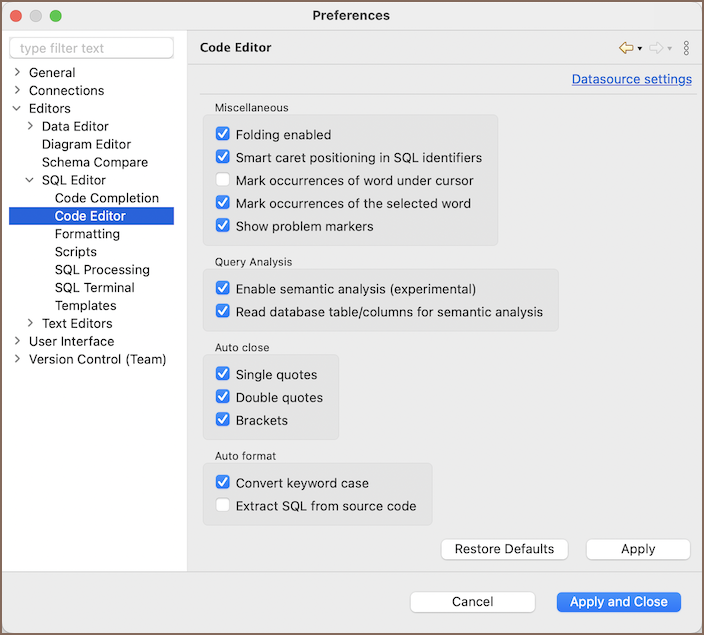
Further sections provide descriptions of the SQL Script panel settings.
Miscellaneous settings
| Setting | Description |
|---|---|
| Folding enabled | Use folding in SQL scripts. |
| Smart caret positioning in SQL identifiers | Respects underscore and other identifier parts to navigate with cursor. |
| Mark occurrences of word under cursor | Mark occurrences of current word in the current SQL file. |
| Mark occurrences of the selected word | Mark occurrences of the selected word in the current SQL file. |
| Show problem markers | Shows individual problem markers near the failed queries and highlights the problematic segment of it in the editor. If disabled, selects the problematic segment in the editor. |
Query analysis settings
| Setting | Description |
|---|---|
| Enable semantic analysis | Highlight anything treated as table or column name and resolve all the aliases and table names according to
FROM |
| Read database table/columns for semantic analysis | May be an expensive operation. Validate all the table and column names with respect to real database objects. This option is only available when Enable semantic analysis is activated. |
The Enable semantic analysis feature highlights column names, their aliases, table names, and schema names.

In instances where a selection list item is absent from the
clause, it is indicated with a red highlight.FROM
For example, the column
in the following SQL script will be highlighted, indicating it is missing from theb.idclause, thereby pinpointing a potential issue within the script.FROM
The Read database table/columns for semantic analysis feature extends to verifying the existence of database objects. If an object referenced in the script does not exist or is not recognized in the database metadata, it is marked with a highlight.
For example, if a script attempts to query a nonexistent column
as shown below, it will be highlighted to indicate that the column does not exist in the current database context:Biography
Auto close settings
| Setting | Description |
|---|---|
| Single quotes | Automatically closes a single quote mark with another single quote when the first one is typed. |
| Double quotes | Automatically closes a double quote mark with another double quote when the first one is typed. |
| Brackets | Automatically closes a bracket with the corresponding closing bracket when the first one is typed. |
Auto format settings
| Setting | Tooltip Description |
|---|---|
| Convert keyword case | Auto-convert keywords to upper/lower case on enter. |
| Extract SQL from source code | On source code paste will remove all source language elements like quotes,
+ \n |
Project security
Note: This feature is available in Community, Lite, Enterprise and Ultimate editions only.
Table of contents
Overview
DBeaver provides strong security features to help you manage and protect sensitive connection data within your projects. This includes safely storing credentials and settings for:
- Database server user credentials.
- SSH tunnel user credentials.
- Proxy user credentials.
- AWS SSM parameters.
By default, user names and passwords are stored in the
credentials-config.json
Tip: For more secure options, you can read the Security in DBeaver PRO article.
Project password management
You can secure your DBeaver project by setting a Project password, which encrypts the project’s configuration.
Setting a Project password
To enable a Project password:
Open the project properties:
- Navigate to File -> Project Security in the main menu.
- Click the Configure icon
 in the Project Explorer
toolbar, then switch to the Project Security tab.
in the Project Explorer
toolbar, then switch to the Project Security tab. - Press ALT+Enter for Windows/⌘+I for macOS on your Project folder in the Projects view and switch to the Project Security tab.
In the Project Security page, click the Set password button to initiate password setting. You will be prompted to enter and confirm the password.

After setting the password, be sure to click on Apply or Apply and Close to save the changes.
Disabling a Project password
To disable your Project password:
- Access the project properties as outlined in the setting section.
- Click the Clear password button.
- Click on Apply or Apply and Close to save the changes.
- In the confirmation dialog that appears, click Yes to finalize the removal of the project password.
Resetting a forgotten Project password
If you forget your Project password, you can reset it during the login process.
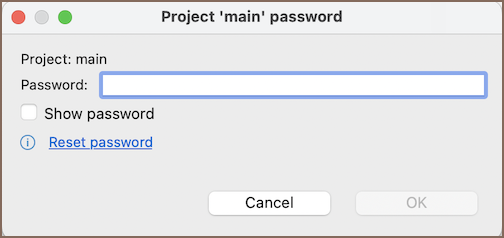
Important: Resetting your password when forgotten will delete all stored database credentials, requiring reconfiguration.
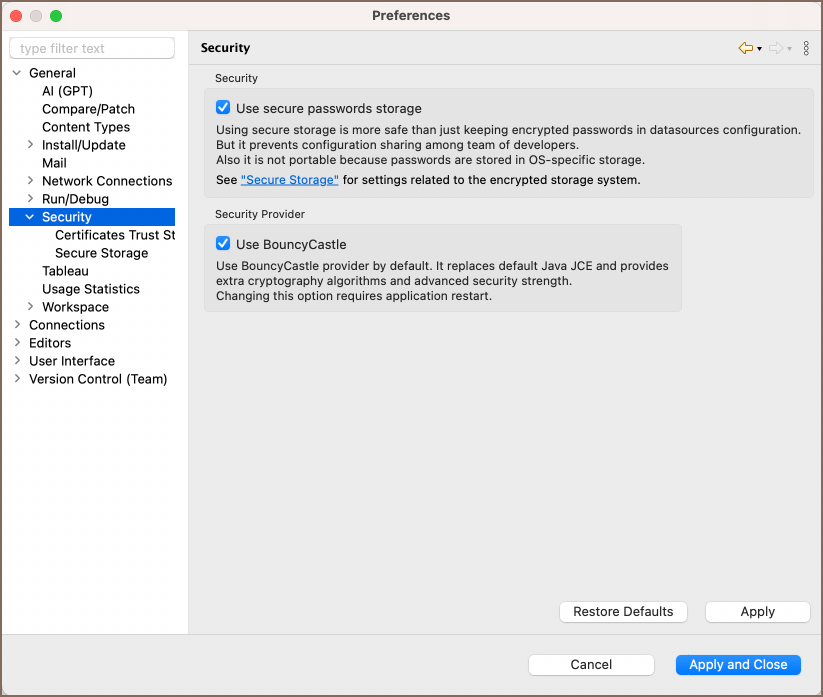
Master password
It is possible to set a Master password for all Projects in a local workspace. The Master password provides an additional layer of security by storing credentials in a secure local storage.
The side effect of using a Master password is that it affects the ability to share projects with complete credentials. If a Master password is enabled, credentials are stored locally and are not included when you export the project.
This means that while you can export a project with all settings, the credentials for connections will not be included if a Master password is active. In contrast, if no Master password is set, exported projects will include the connection credentials.
For more information about the Master password, refer to the Managing Master Password article.
Project team work
Note: This feature is available in Community, Lite, Enterprise and Ultimate editions only. For Git functionality specific to the Team Edition, please refer to Team Edition Git documentation. For users of the Community edition to access Git feature, first install the required extension.
Table of contents
Overview
DBeaver supports full integration with Git, a version control system. This integration allows users to maintain project configurations, scripts, diagrams, bookmarks, and other artifacts in a Git repository. It facilitates project management by enabling version control and collaboration within DBeaver.
In this guide, we will cover the foundational Git operations in DBeaver, such as creating and cloning repositories, committing changes, and pulling updates.
DBeaver’s Git support is built on the Eclipse platform. For advanced Git functionalities like branching, and merging conflicts, refer to the Eclipse EGit documentation.
Important: DBeaver’s Git integration is designed to work only with GitHub.
Create and share a Project repository
To share an existing project, follow these steps:
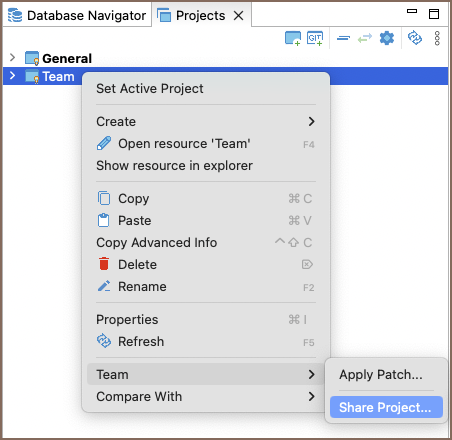
Navigate to the Projects tab, select the project you want to share, and choose Team -> Share project from the context menu.
Create a new local repository.
On the repository page on GitHub copy the repository URL/SSH.
Tip: For more details on creating GitHub repository you can refer to the official GitHub documentation.
Generate a GitHub access token in Settings -> Developer Settings -> Personal access tokens -> Tokens (classic) -> Generate new token (classic). Select all options in the
section and‘repo’under‘read:org’.admin:orgImportant: DBeaver supports all types of Git tokens, including fine-grained and Personal access tokens (classic).
In DBeaver, right-click the project node and choose Team -> Commit… or use the shortcut Ctrl+#. Stage the files you wish to include in the commit by clicking Add. Enter a clear and concise commit message, then click Commit to finalize your changes.
Use the Push HEAD button and paste the GitHub repository URL/SSH and provide your GitHub User and access token as the Password.
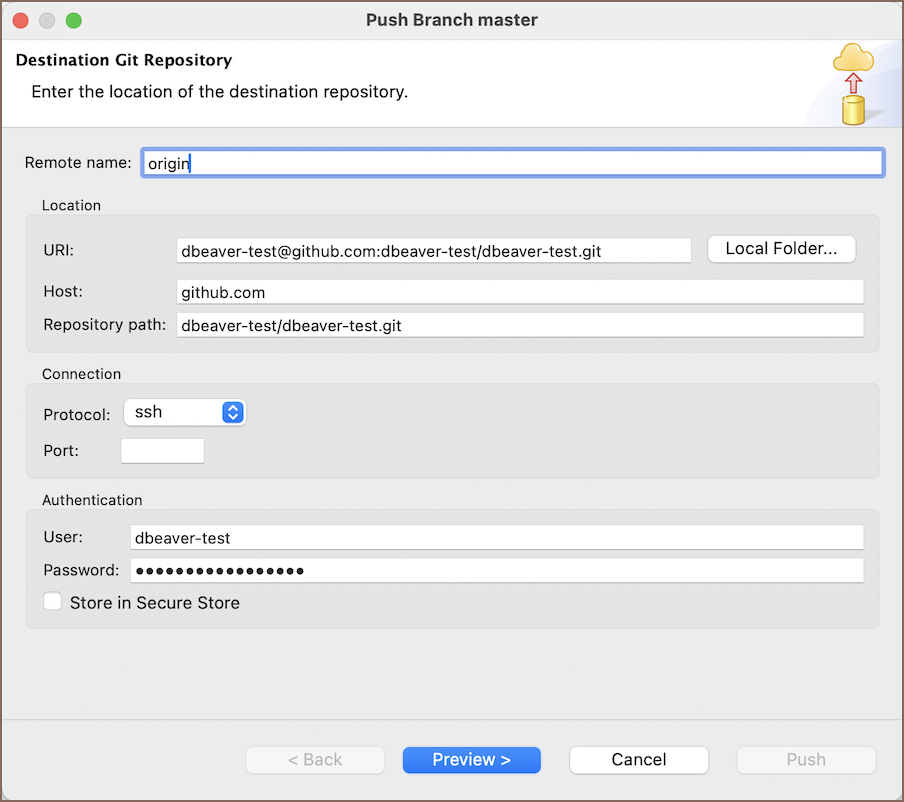
Push changes to the remote repository by using the Push button.
Cloning Existing Repositories
To clone an existing repository, ensure you have a GitHub account and follow these steps:
Click on Create Project from Git
 at the Projects Tab or
navigate through File -> Git -> Create Project from Git in the Main menu.
at the Projects Tab or
navigate through File -> Git -> Create Project from Git in the Main menu.Obtain the remote repository’s URL from its GitHub page by clicking the Code button and copying the URL/SSH.
Generate a GitHub access token in Settings -> Developer Settings -> Personal access tokens -> Tokens (classic) -> Generate new token (classic). Select all options in the
section and‘repo’under‘read:org’.admin:orgIn the wizard, enter the remote repository location. Use your GitHub User (it is commonly
) and access token instead of a Password.gitChoose which branches to clone from the remote repository.
Define the local file system location for the repository storage and set initial configurations.
Select the desired wizard type for the project setup and complete the cloning process. The project will now be visible in the Project Explorer.
Updating remote repository with changes
After making changes to your project, such as creating, deleting, or modifying connections, scripts, or ERDs, follow these steps to update your remote repository:
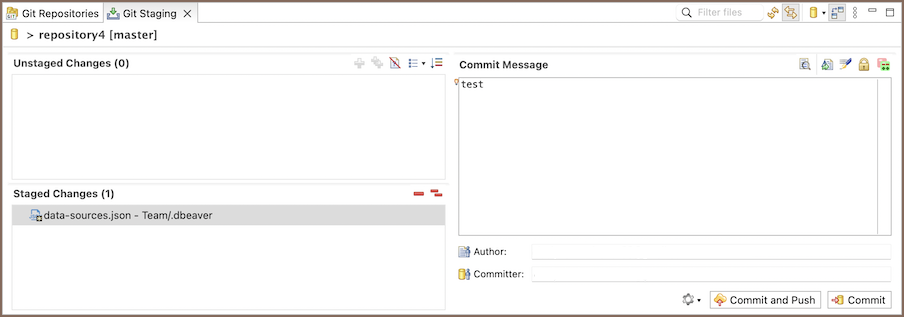
Right-click on the project in the Projects tab and select Team -> Commit to open the commit interface.
In the Git Staging tab at the bottom, you will see Unstaged Changes. Use the Add Selected files to the index
 or Add all files to the index
  button to stage the changes you want to commit. Enter a
commit message and then execute the commit using the Commit button or Ctrl+Enter. The commit will then
be visible in the History tab (Window -> Show view -> Other -> Version Control(Team) -> History).
button to stage the changes you want to commit. Enter a
commit message and then execute the commit using the Commit button or Ctrl+Enter. The commit will then
be visible in the History tab (Window -> Show view -> Other -> Version Control(Team) -> History).To push your commit to the remote repository, you can use the Commit and Push button. Alternatively, to push changes manually, navigate through the project’s context menu (Team -> Remote -> Push) or from the History tab by right-clicking on the desired commit and selecting Push commit. This updates your git repository with the new changes.
Pulling new changes from remote branch
To incorporate new changes from the remote branch into your local project, follow these steps:
Right-click on the project in the Project tab and select Team -> Pull. Alternatively, if you are in the Git Repositories view, you can right-click on the repository and select Pull. This action fetches and merges any new changes from the branch your local repository is tracking into your current branch.
If you have not made any local changes, or if you wish to discard your local changes and synchronize with the remote branch, you can use the Team -> Reset command. This will reset your local repository to the state of the remote repository, discarding any local changes that have not been committed.
This process ensures your project is up to date with the latest changes from the remote branch, facilitating collaboration and avoiding potential merge conflicts.
Installing the Git extension
Community Edition users can manually install the Git extension by following these steps:
Via Eclipse Marketplace:
- Visit the Eclipse Marketplace URL
- Follow the instructions to install the Git support extension directly through your DBeaver installation.
Via P2 Repository:
- Open DBeaver, and navigate to Help -> Install New Software.
- Enter the P2 repository URL in the Work with field.
- Select the Git extension from the list of available software and follow the on-screen instructions to complete the installation.
After installation, restart DBeaver for the changes to take effect, and you will have access to Git functionality within your DBeaver environment.
Projects View
Table of contents
Overview
You might need to classify and group database connections into projects. Projects store objects related not to a particular database but to all database connections. These are usually files stored on the file system.
The Projects view displays all projects created in the system and provides tools to manage them. To open the Projects view, on the Window menu, click Projects.

For information on how to change the view layout, please see the Application Window Overview article.
Project Structure
Projects in the system are displayed in a tree format and all have the same high-level structure:
| Section | Description |
|---|---|
| Connections | Repeat the content of the Database Navigator view for this project. Perform the same actions over the objects of the databases as in the Database Navigator. |
| Bookmarks | Contains bookmarks – shortcuts to database objects. |
| Diagrams | Contains ER diagrams that you can drag-and-drop here from other folders. |
| Scripts | Contains scripts that you can drag-and-drop here from other folders. |
Toolbar and View Menu
The toolbar is integrated into the title bar at the top of the window and contains buttons that mirror items in the view menu.
View Menu items
To open the view menu, click the View Menu button ![]() located in the
upper-right corner of the window. The view menu contains the following items:
located in the
upper-right corner of the window. The view menu contains the following items:
| Icon | Item | Description |
|---|---|---|
| Create Project | Opens the Project Create wizard. | |
| Create Project from Git | Opens the Import Projects from Git wizard. Learn more about Git Team work in our article | |
| Refresh Projects | Refreshes the projects tree to display changes caused by creating, modifying or deleting projects. | |
| Collapse All | Collapses the tree to the root level. | |
| Link with editor | Highlights the object in the tree that has its editor open Note: Button enabled when at least one editor is open, otherwise disabled. | |
| Preferences | Opens the Preferences window, allowing you to adjust resource locations settings specific to the Projects view. |
Context Menu
Right-click an object in the tree to access its context menu. For objects under the Connections node, see the Database Navigator documentation. Context menus for other nodes offer basic functionalities such as copy-pasting, renaming, and deleting objects, as well as property management and folder creation.
Special Actions
- Set Active Project: Makes the selected project root node active and visible in the Database Navigator.
- Link File and Link Folder: Create links to files and folders within the file system.
- Show Resource in Explorer: Opens the project’s directory in the user’s file system.
- Restore from Local History…: Opens the Restore from Local History window where you can select a file and its version (if multiple versions exist) for restoration.
For more details on project management, consult the Projects article.
Projects
Table of contents
The Projects view allows the creation of new projects as well as renaming and deleting projects that are not active. NOTE: You cannot rename or delete a project that is set as active.
Creating Project
To create a project, in the Projects view, in the toolbar, click Create Project (![]() ). The Project Create Wizard opens.
). The Project Create Wizard opens.

- In the Project screen, in the Project name field, specify the name of the project.
- To keep the default location to store the project, leave the Use default location checkbox selected. If you want to change the location, clear the checkbox and enter the name of the new directory into the Location field or click Browse and select the directory in the folder tree.
- Click Finish. The new project appears in the projects tree.
Deleting Project
To delete a project, in the Projects view, right-click its name in the tree and click Delete on the context menu. Two confirmation dialog boxes will appear one after another:
Delete object dialog box is to confirm the deletion of the project itself. Click Yes if you are sure you want to delete it. Otherwise, click No.

Delete project dialog box is to confirm the deletion of the project’s contents. These are the project configuration files and scripts stored in the file system. Click Yes if you want the contents to be deleted as well. To keep the contents, click No.
NOTE: If you have deleted a project and then re-create it with the same name, the new project picks up all the database connections of the deleted project.
Properties Editor
Table of contents
Overview
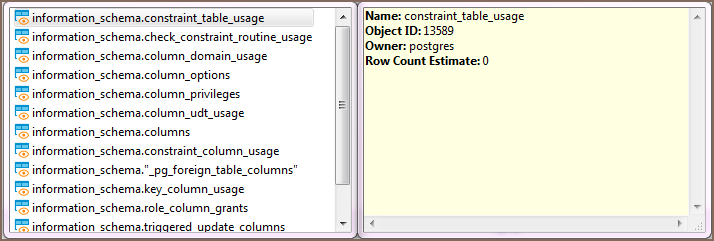
When you open the Properties tab of the Database Object Editor, you’ll encounter the following interface elements:
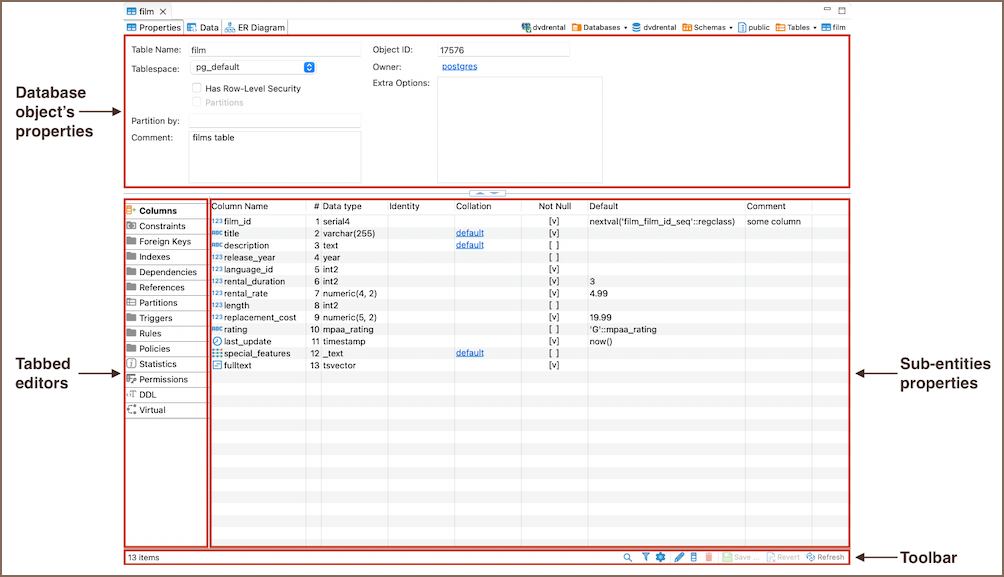
- Database object’s properties: displays the properties of the current database object.
- Tabbed editors: These vary depending on your database. Depending on the database you’re working with, you’ll see different tabs reflecting that particular database’s unique characteristics and requirements.
- Sub-entities properties: These contain the properties of the object’s sub-entities. To access these properties, click the tabs in the Tabbed Editors.
The Toolbar provides tools for managing these sub-entities.
Key Operations
To interact with the Properties Editor page, you can use Toolbar controls, execute commands from context menu associated with sub-entities, and utilize related keyboard shortcuts.
Toolbar controls
The toolbar at the bottom of the editor provides the following tools for the majority of sub-entities, except for some specific ones like SQL-based views (DDL and Source):
| Button | Name | Description |
|---|---|---|
| Search items | Displays a search field next to the button: – Type in the search combination – the content updates dynamically – To remove the filter, click the cross icon next to the search field. | |
| Filter settings | Opens the Filtering window, which allows setting a custom filter, see Configure Filters. | |
| Configure columns | Opens the Configure columns dialog box to select the columns to display or hide in the current view. | |
| Refresh the selected items | Depending on the database type, refreshes either the current item or its parent or the whole database object – reloading data from the database. | |
| View | Opens an editor/viewer for the item currently in focus. | |
| Create new [items] | Creates a new item of the same type as currently displayed in the open view, for example, a column. | |
| Delete database object | Deletes the item currently in focus. | |
| Save the current contents | – Same as the Save button on the main application toolbar – Same as Ctrl+S(or ⌘S for MacOS) Opens the Persist Changes window that allows saving changes in the currently open sub-entity. | |
| Revert to the last saved state | Reverts all changes made to the database object to the previous saved state. |
Context menu
The Properties of the sub-entities have context menus that offer the same commands as the Database Navigator. To access these menus, right-click on the item.
Proxy configuration
Table of contents
External resources access
Sometimes DBeaver needs to access external internet resources for tasks such as:
- 3rd party JDBC drivers download
- Information about a new DBeaver version
- Connect to remote databases outside of your corporate network
- Subscription license activation (commercial version)
- License information update (commercial version)
If you are behind some corporate firewall which restricts access to external internet resources then it may become a real problem.
Sometimes corporate firewalls allow access to external resources using a web browser but restricts this for all other applications.
How to configure a proxy for drivers download
You need to ask your network administrator about proxy parameters.
Then go to Preferences->Connections->Drivers.
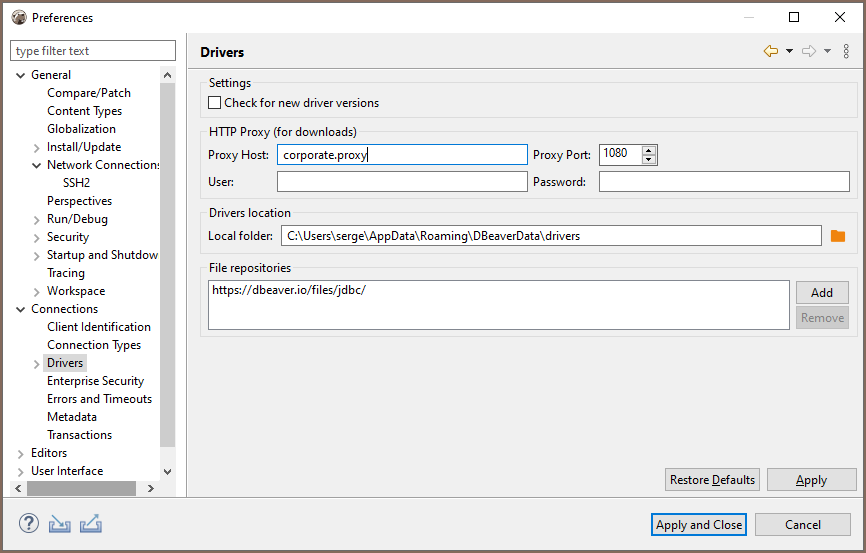 You can enter a proxy host/port and (optionally) user/password here. It will be used for drivers download only.
Drivers are usually downloaded from maven.org web site. You may also ask your network admin to add
maven.org
How to configure network for license activation
You need to configure a global proxy server.
If you cannot activate your subscription license then you first need to use a trial version to start DBeaver and configure a proxy.
Go to Preferences->General->Network Connections:
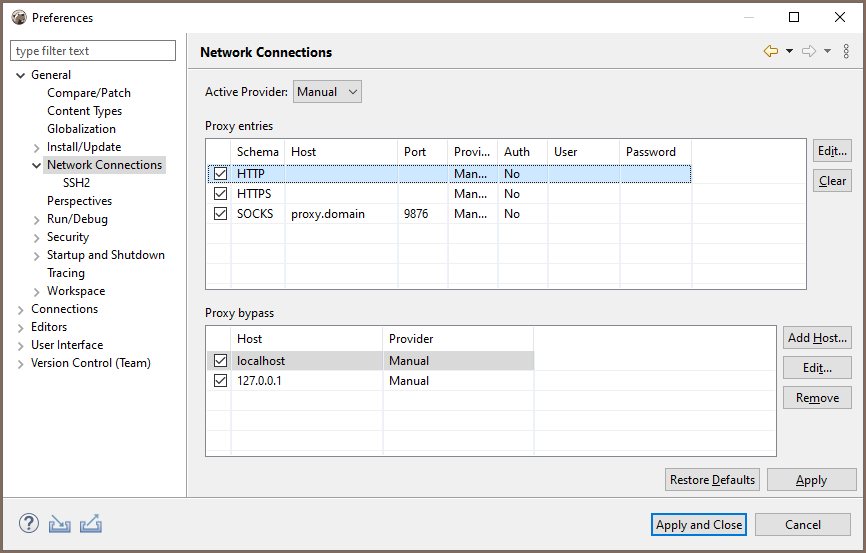
Switch to Manual or Native proxy (native proxy settings will use an active web browser proxy configuration).
Note: in order to activate/update a license DBeaver only needs to access the website
dbeaver.com
dbeaver.com
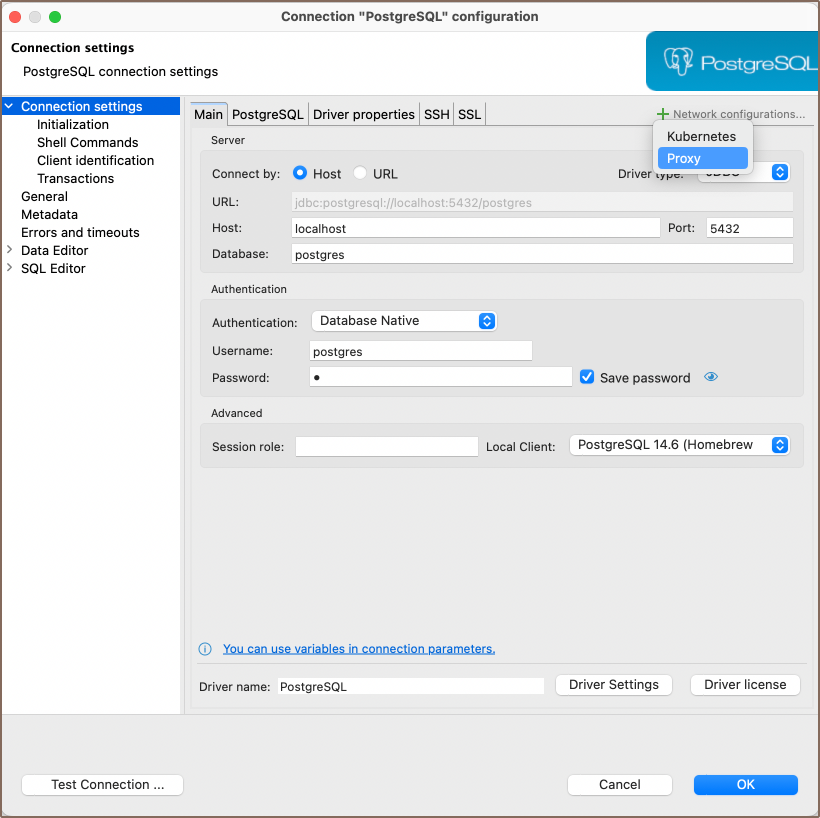
How to configure a proxy for external databases access
You can configure proxy settings for an individual connection.
1) Add a Network Handler – Proxy: To do this, click on the Network configurations… button and select Proxy.
 2) Set the Proxy Settings: After selecting Proxy, a Proxy tab will appear in the menu at the top. You may set the proxy
settings manually or use the active OS/web browser settings from this tab.
2) Set the Proxy Settings: After selecting Proxy, a Proxy tab will appear in the menu at the top. You may set the proxy
settings manually or use the active OS/web browser settings from this tab.
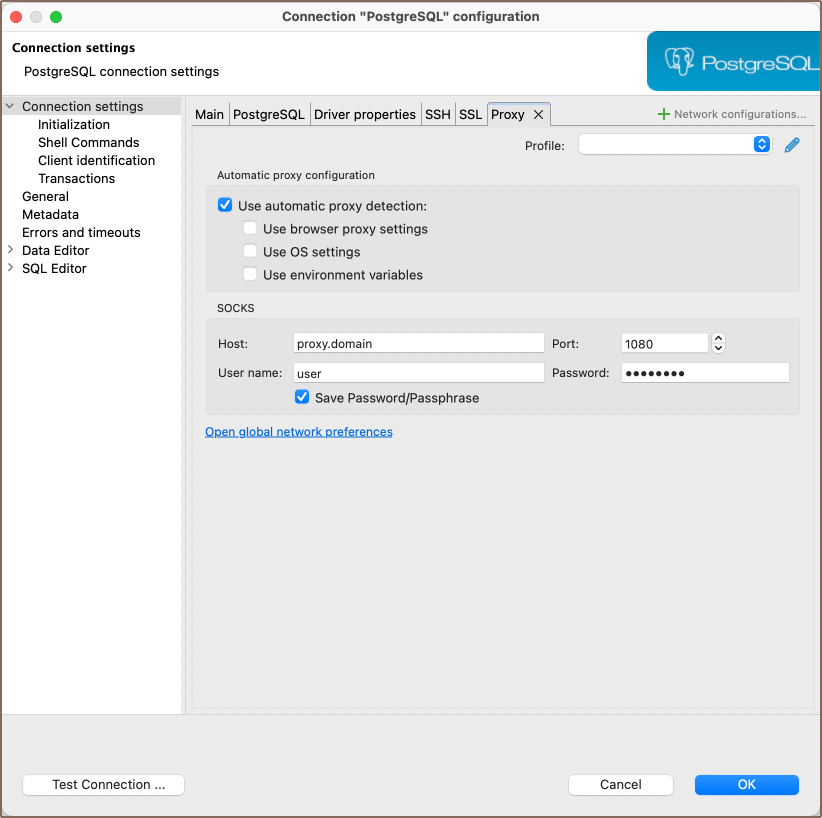
Note: Automatic proxy configuration is available in Lite, Enterprise, and Ultimate editions only.