Snowflake OpenID database access via Okta
Note
This feature is available in Enterprise and AWS editions only.
CloudBeaver allows for Snowflake connections through OpenID with Okta authentication. This guide details the process for establishing such connections. Please ensure you meet all the prerequisites outlined below before proceeding with the configuration steps.
Note
While this article provides an example specifically for Okta, you may use any Snowflake-compatible identity provider.
Prerequisites
- Snowflake Configuration: You must have a configured Snowflake account. This account should include the necessary roles and users for database access. For guidance on creating users and roles in Snowflake, refer to the Snowflake documentation.
- Okta setup: Access an Okta account with the necessary permissions to configure applications.
- CloudBeaver administrative access: Ensure administrative privileges in CloudBeaver.
Configuration steps
-
Create an Authorization Server in Okta: Begin by setting up an authorization server in Okta. This server will manage the security tokens needed for user authentication and authorization. For a comprehensive guide on how to create and configure an authorization server, refer to the Okta documentation on custom authorization servers.

-
Create a security integration in Snowflake:
To facilitate secure communication between Snowflake and Okta, it is essential to create a security integration in Snowflake. This integration will authenticate tokens issued by Okta and assign Snowflake data access based on your roles linked with the OAuth token.

-
Proceed to your Snowflake account. Select Projects -> Worksheets to access the query editor.
-
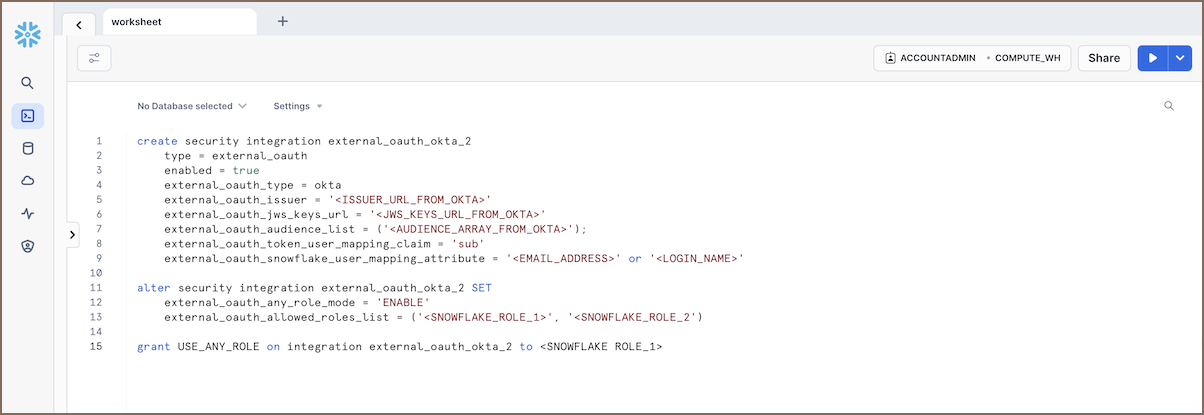
In the Worksheet, execute an SQL command to create the security integration. The command should include the following parameters:
create security integration external_oauth_okta_2
    type = external_oauth
    enabled = true
    external_oauth_type = okta
    external_oauth_issuer = '<ISSUER_URL_FROM_OKTA>'
    external_oauth_jws_keys_url = '<JWS_KEYS_URL_FROM_OKTA>'
    external_oauth_audience_list = ('<AUDIENCE_ARRAY_FROM_OKTA>');
    external_oauth_token_user_mapping_claim = 'sub'
    external_oauth_snowflake_user_mapping_attribute = 'EMAIL_ADDRESS' or 'LOGIN_NAME'
SQL Parameter Description Source location <EXTERNAL_OAUTH_ISSUER>The unique identifier for the authorization server in Okta. Okta: Security -> API -> Authorization Servers -> Settings (Issuer) <AUDIENCE_ARRAY_FROM_OKTA>Specifies the audience for which the token is intended to be used. Okta: Security -> API -> Authorization Servers -> Settings (Audience) <JWS_KEYS_URL_FROM_OKTA>JSON Web Key Set (JWKS) for token validation. Okta: Security -> API -> Authorization Servers -> Settings -> Metadata URI (jwks_uri) EMAIL_ADDRESSorLOGIN_NAMEAttribute used for mapping the user in Snowflake to the Okta token. Snowflake: Account -> Users -> Select User -> Edit ( User NameorEmail)Info
For more in-depth information on creating a security integration within Snowflake, consult the Snowflake documentation.
-
Allow dynamic roles:
Once the security integration is established, you need to enable dynamic role assignment. This step allows users authenticated through Okta to be granted different roles based on their authentication context.
-
Execute the following SQL query to set up dynamic roles.
-
Replace
<SNOWFLAKE_ROLE_1>,<SNOWFLAKE_ROLE_2>, etc., with the actual role names from Snowflake, enclosed in single quotes and separated by commas, forming an array.alter security integration external_oauth_okta_2 SET external_oauth_any_role_mode = 'ENABLE' external_oauth_allowed_roles_list = ('<SNOWFLAKE_ROLE_1>', '<SNOWFLAKE_ROLE_2') grant USE_ANY_ROLE on integration external_oauth_okta_2 to <SNOWFLAKE ROLE_1>To determine the appropriate roles, navigate to Admin -> Users and Roles in the Snowflake web interface.
Tip
In addition to predefined roles, you can grant a universal role assignment capability within Snowflake. Use the following command to allow all authenticated users to assume any role:
grant USE_ANY_ROLE on integration external_oauth_okta_2 to <SNOWFLAKE ROLE_1>;. Use this setting with caution, as it gives broad permissions to all users. -
Create API access Scopes in Okta:
After establishing the authorization server, the next step involves creating API access scopes within Okta. These scopes define the access permissions that an OAuth token grants in Snowflake, ensuring that users can only perform actions aligned with their roles in Snowflake.

Follow these guidelines to create API access scopes:
- Navigate to your Okta web interface.
- Go to Security -> API.
- Select the authorization server you created earlier.
- Click on the Scopes tab.
- Here, you can add new scopes that correspond to the roles and permissions you have defined in Snowflake.
To make sure that users have the right access in Snowflake, match the Okta scopes with Snowflake roles. For instance:
| Snowflake role | Corresponding Okta Scope |
|---|---|
PUBLIC |
session:role:PUBLIC |
SYSADMIN |
session:role:SYSADMIN |
ACCOUNTADMIN |
session:role:ACCOUNTADMIN |
Granted by grant USE_ANY_ROLE on integration external_oauth_okta_2 to <SNOWFLAKE ROLE_1> |
session:role-any |
> For detailed instructions on setting up API access scopes in Okta, consult
> the [Okta documentation on API scopes](https://help.okta.com/en-us/content/topics/security/api-config-scopes.htm).
-
Create an Application in Okta:
Continue the process by creating an application in Okta. For detailed steps, consult the official Okta documentation on application creation.

-
Log in to CloudBeaver as an Administrator.
-
Enable OpenID:
Navigate to Settings -> Administration -> Server Configuration and select the checkboxes for OpenID.
-
Configure Identity Provider
- Continue to Settings -> Administration -> Identity Providers.
- Click on the + Add button to begin configuring a new identity provider.
- After filling in the fields, click on the Create button to complete the identity provider configuration.

Below is the table with fields to be completed for configuring the identity provider:
| Field                      | Description                                                                                        |
|----------------------------|----------------------------------------------------------------------------------------------------|
| **Provider**               | Select **OpenID** from the dropdown menu.                                                          |
| **ID**                     | Enter a custom name for the identity provider.                                                     |
| **Configuration name**     | Specify the configuration name.                                                                    |
| **Description** (optional) | Provide a brief description of the identity provider.                                              |
| **Icon URL** (optional)    | Enter the URL of an icon to represent this identity provider in CloudBeaver.                       |
| **Client ID**              | Use the Client ID from the Okta application.                                                       |
| **Client Secret**          | Use the Client Secret from the Okta application.                                                   |
| **IDP auth endpoint URL**  | The URL for authorization from Okta, labeled as `authorization_endpoint` in the Okta Metadata URI. |
| **IDP token endpoint URL** | The URL for token exchange from Okta, labeled as `token_endpoint` in the Okta Metadata URI.        |
| **Custom scopes**          | The scopes you set up in Okta to control access, formatted like `session:role:PUBLIC`.             |

> **Tip**: The Metadata URI is found in the Okta web interface. You can locate it by navigating to **Security -> API ->
Authorization Servers -> Settings -> Metadata URI**.
- Copy Redirect and Sign out Links:
- Enter the newly created identity provider.
-
Copy the Redirect link and the Sign out link.

-
Update Redirect URIs in Okta:
- In your Okta application, navigate to General -> Login.
- Under Sign-in redirect URIs, paste the copied Redirect link.
- In the same section, locate Sign-out redirect URIs and paste the Sign out link there.
- Click Save in Okta to finalize these configurations.

-
Set SSO Authentication for a New Connection
To integrate Single Sign-On (SSO) authentication for database connections after configuring the identity provider:
- Create a new connection by following the guidelines provided in the Create Connection article.
- Ensure that you select the SSO option in the Authentication tab.
- For Identity Provider ID, use the ID defined during the identity provider setup.
- If you leave the Role field empty, the system will default to the Role specified in the Custom scopes of the Identity provider setup. If Custom scopes was not specified, you can manually input different roles here to fine-tune user permissions.
-
Now you can log in through the newly created Federated authentication method in CloudBeaver, using the Configuration name you assigned during the setup.
