SSH Configuration
Table of contents
Overview
Sometimes the database cannot be accessed directly, in such cases you can use the SSH tunnel. The SSH or Secure Shell is a network communication protocol that allows two computers to communicate and encrypts the shared data.
DBeaver supports the following SSH authentication methods:
- Username/password
- Public key authentication
- Agent authentication
Available agent authentication implementations:
Note: You have to run the agent first before connecting to the database in DBeaver.
Configuring SSH Tunnels
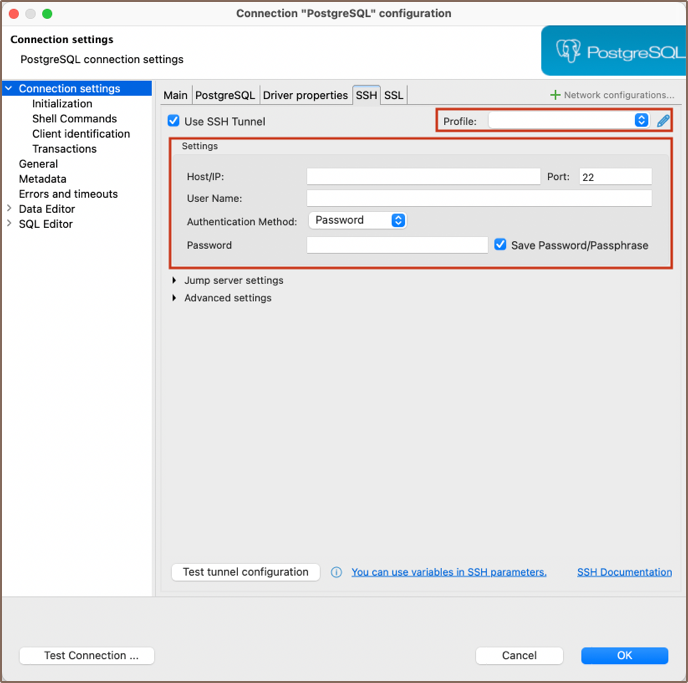
SSH can either be configured individually for each connection in Connection settings -> SSH or as a network profile which can be selected from the drop-down menu on the same page mentioned earlier:

In order to use SSH, you have to enable it first. After that, configure it for your needs, then click on Test tunnel configuration to test whether all parameters are valid or not.
It is often required to set the hostname to localhost in Connection settings -> Main. SSH establishes a
connection between two machines, authenticating each side to the other, and passing commands and output back and forth.
After connecting to remote machine, all commands you execute are executed on that remote machine, so by having the host
set to localhost you are opening a connection to the database on this remote machine, not on your local machine, and
just redirect I/O to the latter.
Configuring Jump servers
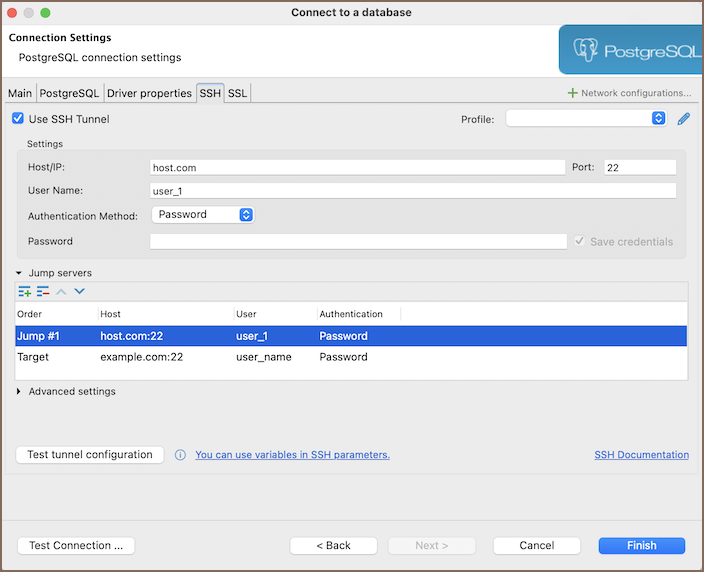
DBeaver allows the use of Jump servers, also known as Gateway hosts. This feature is essential when the direct access to a target machine is not possible from your local machine, and a gateway server is required for connection.

To add a jump server:
- Ensure Use SSH Tunnel is checked.
- Expand the Jump servers group.
- Specify your target in the Settings section.
- Click on the Create new jump host button
 to add your
first jump server configuration.
Repeat step 3 for each additional jump host you need to add, configuring each one within the Settings section.
Practical use
Imagine you have the following situation: your database is located on remote machine with IP address 100.100.100.100 and which is accessible through SSH. You cannot access this IP directly from your machine because of your network settings or firewall, but you can access other machines with the IP address 200.200.200.200 through SSH and which is able to access the desired remote machine.
You will need to specify 100.100.100.100 as a host in regular SSH configuration and 200.200.200.200 as a host in a gateway configuration to achieve such a "connection order": localhost → 200.200.200.200 → 100.100.100.100.
Advanced settings

| Setting | Description |
|---|---|
| Implementation | Specifies the SSH library used for the connection. |
| Bypass host verification | If checked, disables verification of the server's identity by not checking the remote host's fingerprint, which may lead to security risks such as Man-In-The-Middle attacks. |
| Share this tunnel with other connections | If checked, allows multiple connections to share the same SSH tunnel. This can improve connection speed and reduce server load. Sessions remain open until all connections using the tunnel are closed, even if the initiating connection is terminated. |
| Keep-Alive interval (ms) | Sets the interval in milliseconds for sending a keep-alive packet to keep the connection active. A value of 0 disables keep-alive packets. |
| Tunnel connect timeout (ms) | Sets the maximum time in milliseconds to establish a tunnel connection before timing out. |
Port Forwarding
Port forwarding is used to expose a socket sitting on a remote port to your local port, allowing you to communicate with it. After the SSH connection to the remote machine is established, you need to connect to the database on that machine. You must pass the port on which the database is listening from that remote machine to your local machine. This is when port forwarding becomes handy.
By default, it randomly chooses the local port and forwards it to the destination port set in Connection settings -> Main
It is not usually required to change this configuration, but it can be useful, for example, when you want to use a particular local port.
SSH and URL based connections
By default DBeaver opens random local port and forwards it to a target database port. It then implicitly replaces port configured in the connection with this random port.
So technically DBeaver will connect to something like localhost:45678 (random port on localhost) instead of database.server.domain:5432 (default PostgreSQL server port).
But if you use URL instead of manual connection configuration then you connect to jdbc:postgresql://database.server.domain/postgresql. DBeaver cannot replace port number automatically because you can use any type of sophisticated URLs. DBeaver just don't know how to change this URL.
If you use URL connection then you must configure port forwarding manually. In the Advanced Settings set both Local Port and Remote Port to 5432 (database server port, 5432 is the default value for PostgreSQL). It will work in most cases.
But it will fail if you have PostgreSQL server on your local machine because port 5432 is already occupied. In this case you can use any random port number for Loca Port (e.g. 15432). Use the same 5432 for Remote Port because it is real port number for remote PostgreSQL server.
SSH shared tunnels
By default, DBeaver shares SSH tunnels across connections when the same SSH settings are used. This is particularly useful when connecting to several databases on the same remote server, as it avoids the need to establish a separate SSH tunnel for each connection.
To view the active SSH tunnels and the databases utilizing a shared tunnel, use the SSH tunnel explorer. This feature provides a comprehensive overview of your SSH tunnel usage, including detailed information on each tunnel and the databases it serves. Here is how to access SSH tunnel explorer:
- Navigate to Window -> Show View -> Other...
- In the window that appears, expand the Database category.
- Select SSH tunnel explorer and click Open.
In the SSH tunnel explorer view, you will find information about each active tunnel. This includes:
| Field | Description |
|---|---|
| Destination | The remote server to which the tunnel connects. |
| Used by | A list of databases that are currently using the tunnel. |
| Port Forwards | The local and remote ports involved in the tunneling process. |
SSH tunnel sharing criteria
DBeaver shares SSH tunnels across connections if SSH settings are identical. The application compares the following parameters to determine if the SSH settings match:
- Hostname: The address of the SSH server.
- Host port: The port number used for the SSH connection.
- Username: The username required for SSH authentication.
Depending on the authentication method selected, DBeaver also compares:
- For password authentication:
- Password: The SSH account password.
- For public key authentication:
- Private Key: The file path to the SSH private key.
- Passphrase: The passphrase for decrypting the private key, if set.
- For agent authentication:
- Agents: DBeaver treats all agent authentication configurations as identical, ignoring specific agent settings and focusing only on the method's selection.
Configuring Cloud SSH Tunnels
- To configure Cloud SSH Tunnels, start by navigating to the Cloud Explorer button
 in the Toolbar.
 - Select Edit button
 for an existing connection or New button
  to create a new connection.
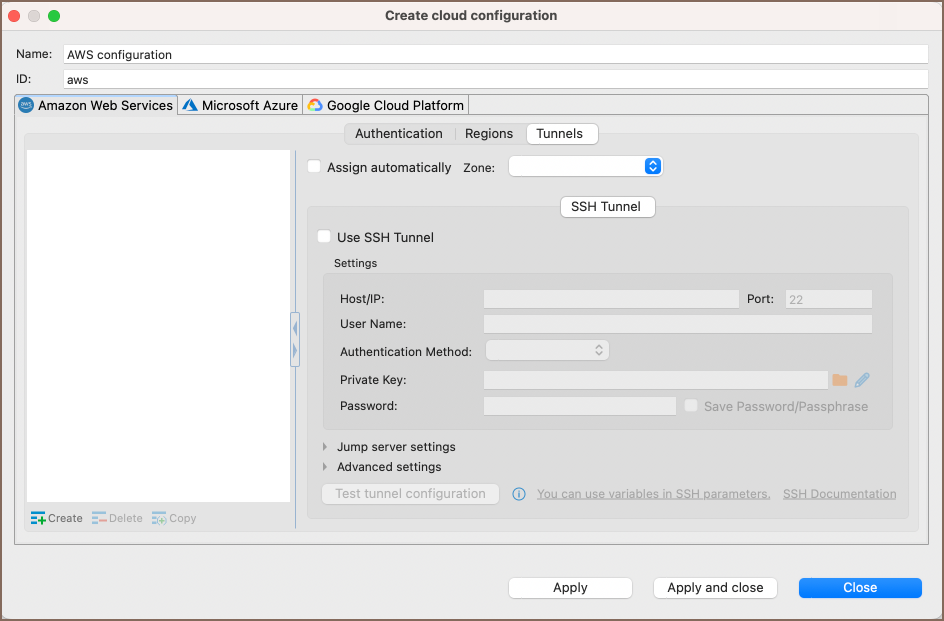
 In the opened window, go to the Tunnels tab.

This tab allows you to set up SSH tunnels specifically for cloud connections.
- The configuration here is similar to the standard SSH setup, but it's integrated within your cloud service provider's
