Database Navigator is the main view to work with the structure and content of databases. This navigator is one of the main parts of DBeaver, which displays all your database connections, and all our application users need it for their work. But not everyone knows that the navigation tree can be customized based on personal preferences and needs.

Context menu and tree customizing
You can use the context menu of the Database Navigator to change tree display options. Right-click on any of your connections and go to Connection View. Let’s take a look at all of the options you can change.
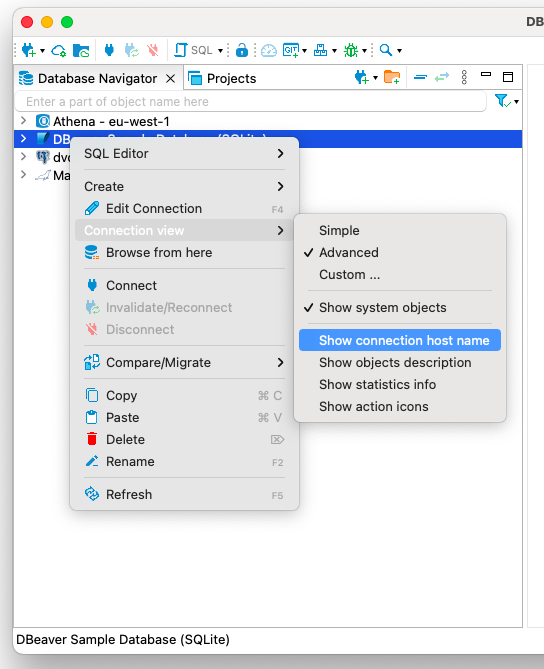
- Host name. Sometimes you may confuse connections with the same name. The easiest way to avoid this problem is to rename one of them. However, this is not always possible. This issue is solved by displaying the host next to the connection’s name.
- Objects description. Choose this option if you have a large number of objects in your database that have similar names. For example, it is sometimes useful to add descriptions to the columns if there are a lot of them in a table and they have non-obvious names. You can change any of the descriptions in the Properties tab of the Data Editor.
- Statistics info. For most databases, our application allows you to display the sizes of tables. This feature can be useful when your database has many tables, and you want to understand which one contains a large amount of data quickly.
- Action icons. We have three types of action icons in the DBeaver Navigation Tree. They make it easy to recognize connections through a tunnel, connections to cloud databases, as well as connections set to read-only mode. These icons are displayed on the right side of the view and allow you to navigate your connections better. For example, when they are enabled you can easily find cloud databases in your list.
Please be aware that displaying the statictic info may affect performance.

Please note that each action icon is also a button. Click on it to open and edit the corresponding settings.
You can also change all the same settings in global preferences in the User Interface -> Navigator section.
How to change the fetch size of database objects
When you click on the expand icon, all available objects are loaded by default if their number does not exceed 5000. But connecting to such a large database can negatively affect performance. Therefore, if you know that the table you need is in the first hundred, you can limit the number of objects that are loaded using the global app settings.
Open the main menu and go to Window -> Preferences, choose User Interface -> Navigator. You will see the item “Elements fetch size” on the right side of the settings window. Enter the number that suits you and click the Apply and save button. Please note that the minimum possible fetch size limit is 100 objects.

If you connect to the database after applying these settings, only the number of tables that you specified will be loaded. By clicking on the line with the refresh icon, you will load the next 100 tables and so on.
Now you know about all the options that allow you to customize your Database Navigator. Combine them according to your personal needs to make navigation through your tree faster and more efficient. And do not forget that you can switch between Advanced View and Simple View, which we told you about in a previous article.