Overview
DBeaver supports the ability to establish connections using Secure Socket Layer (SSL), a protocol for creating
authenticated and encrypted links between networked computers.
Note: SSL parameters are optional and should only be specified if required by your server configuration.
Setting up SSL configuration
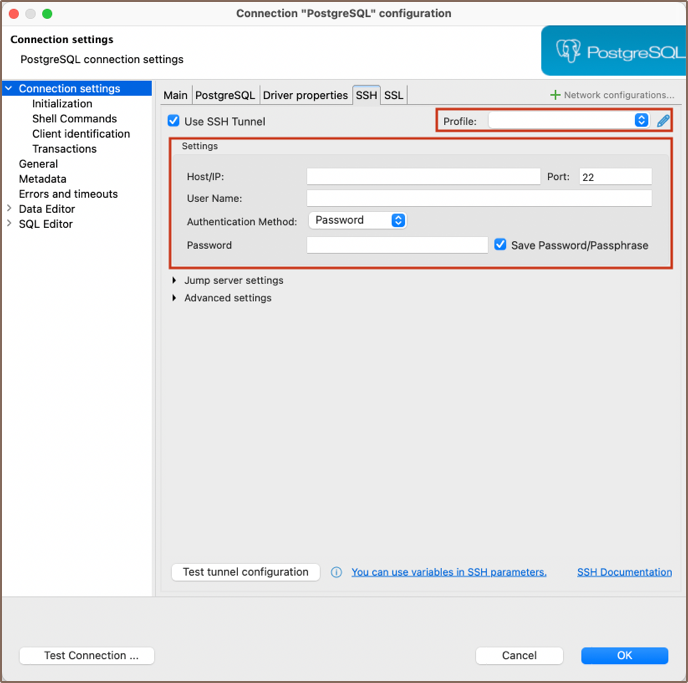
To set up SSL, you need to configure the following settings:
Navigate to the SSL tab within the Connection settings.
Enable the Use SSL option to activate SSL for your connection.
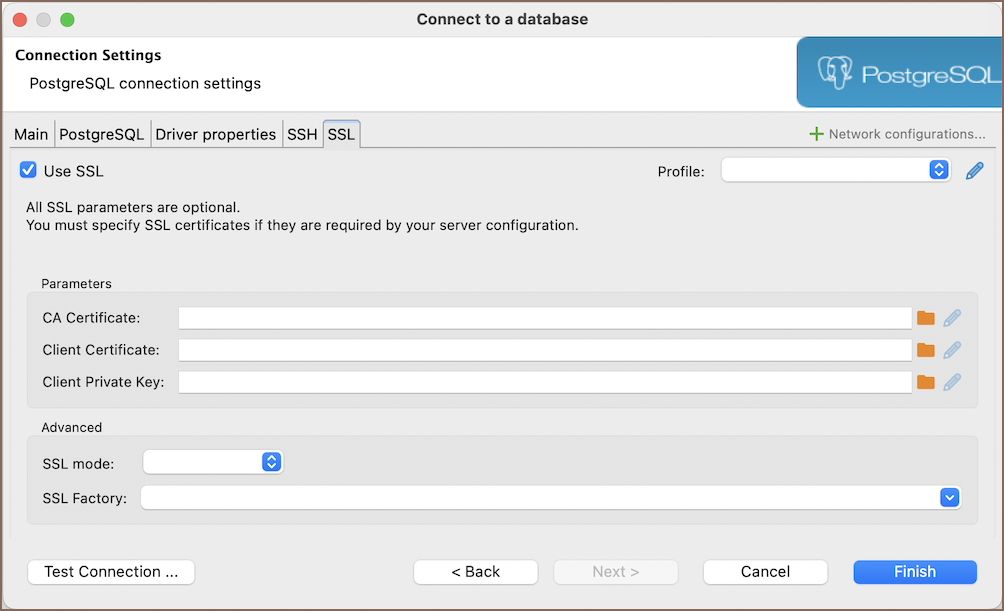
Enter the necessary SSL configuration details (optional):
| Parameter | Description |
|---|
| CA Certificate | Path to the Certificate Authority (CA) certificate. |
| Client Certificate | Path to the client’s public key certificate. |
| Client Private Key | Path to the client’s private key. |
| Keystore | Path to the keystore file. |
| Keystore Password | Password for the keystore. |
| Certificate hostname | Expected hostname in the certificate. |
| SSL Mode | Desired security level for SSL. |
| SSL Factory | Provide SSLSocketFactory factory class name. |
| Cipher suites (optional) | Specific cipher suites to use. |
| Skip host name validation | Whether to bypass hostname validation. |
| Use self signed certificate (non-secure) | Acceptance of self-signed certificates. |
| Force TLS 1.2 | Enforce using TLS version 1.2. |
| Verify server certificate | Ensures the server certificate is valid. |
| Allow public key retrieval | Allows the retrieval of the server’s public key. |
Note: The availability of these parameters can vary depending on the database. Check the SSL tab for your
database within the Connection settings for any specific options.
If all other necessary connection settings are configured, complete the setup by clicking Finish, or test the
configuration by clicking Test Connection to ensure that SSL is functioning correctly.
Setting up SSL configuration via Driver properties
For some databases, an alternative method to configure SSL settings is available through the Driver properties tab.
This approach allows access to additional or driver-specific SSL options that may not be present in the main SSL tab:
Select the Driver properties tab within the Connection settings.
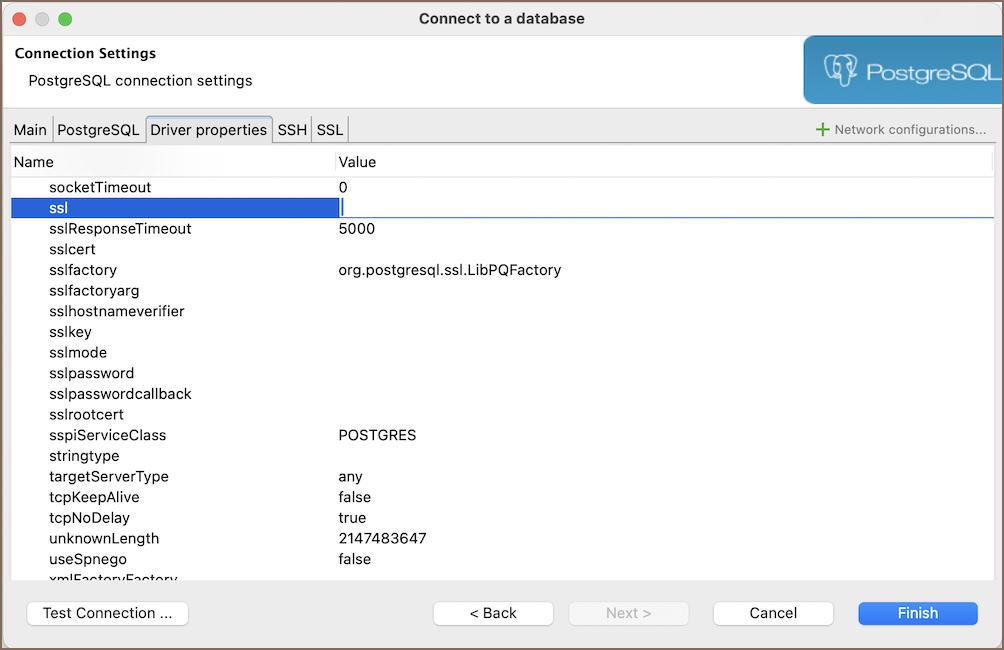
Look for properties prefixed with
, such as
,
,
, etc.
Configure the necessary properties according to your database and server requirements.
If all other necessary connection settings are configured, complete the setup by clicking Finish, or test the
configuration by clicking Test Connection to ensure that SSL is functioning correctly.
Import SSL certificates on startup
DBeaver can import certificates from a predefined folder at startup. This method is useful for databases protected by self-signed certificates. It ensures secure connections without manual setup, especially when a firewall or internal security policies require specific certificates.
To add a certificate, place the file in the
{DBeaverData}/secure/custom-certs
folder. DBeaver
will detect and import it on startup. For more details on
location,
see
Workspace location
Note: Only certificates are imported, not private keys.
Setting up SSL configuration for Oracle connections
Prerequisites:
- Oracle Client installed.
- An Oracle Database Server that supports SSL.
- Access rights to create directories and files.
- A valid SSL certificate from a trusted CA.
- Oracle Wallet Manager for wallet management.
To set up SSL configuration for Oracle connections, follow these steps:
1) Create a Wallet Folder:
First, you need to create a directory that will serve as a wallet folder. This wallet stores your security
credentials. Execute the following command to create this folder:
2) Generate Key:
Use the
utility to create a new wallet and generate a self-signed certificate. Create the wallet:
$ORACLE_HOME/bin/orapki wallet create -wallet /opt/oracle/wallet -pwd YourWalletPassword -auto_login
Replace
with a secure password for accessing the wallet.
3) Add a self-signed certificate to the wallet:
When setting up your Oracle wallet, you may need to add a certificate. There are two main scenarios for this:
- Creating and adding a self-signed certificate:
If you do not have a certificate, you can create a self-signed certificate and add it to your wallet using the following command:
$ORACLE_HOME/bin/orapki wallet add -wallet /opt/oracle/wallet -pwd YourWalletPassword -dn "CN=example.com" -keysize 1024 -self_signed -validity 365
- Adding a certificate signed by a certificate authority (CA):
If you use a certificate signed by a Certificate Authority (CA), you need to add the Root Certificate Authority
(RootCA) certificate to your wallet as well. This is done using the following command:
$ORACLE_HOME/bin/orapki wallet add -wallet /opt/oracle/wallet -pwd YourWalletPassword -trusted_cert -cert path_to_root_ca_cert
Replace the following placeholders:
: Use the same wallet password as
before.
: Replace this with your server’s fully qualified domain name (FQDN) or the
hostname.
: This is the actual path to your
certificate file:
4) Generate JKS File:
Convert the wallet to Java Keystore format.
$ORACLE_HOME/bin/orapki wallet pkcs12_to_jks -wallet /opt/oracle/wallet -pwd YourWalletPassword -jksKeyStoreLoc /opt/oracle/wallet/oracle_keystore.jks -jksKeyStorepwd YourJKSPassword -jksTrustStoreLoc /opt/oracle/wallet/oracle_truststore.jks -jksTrustStorepwd YourJKSPassword
Replace the following placeholders:
: Use the same wallet password as before.
: This is a new password for the Java Keystore files. Choose a secure password.
5) Modify configuration files for SSL in Oracle
: Configure the listener to recognize SSL connections. For instance:
SSL_CLIENT_AUTHENTICATION = FALSE


WALLET_LOCATION =

   (SOURCE =

    (METHOD = FILE)

    (METHOD_DATA =

     (DIRECTORY = /opt/oracle/wallet)

   )

  )


LISTENER =

(DESCRIPTION_LIST =

   (DESCRIPTION=

    (ADDRESS = (PROTOCOL = IPC)(KEY = EXTPROC1))

    (ADDRESS = (PROTOCOL = TCP)(HOST = 0.0.0.0)(PORT = 1521))

   )

  (DESCRIPTION=

     (ADDRESS = (PROTOCOL = TCPS)(HOST = 0.0.0.0)(PORT = 2484))

   )

)


DEDICATED_THROUGH_BROKER_LISTENER=ON

DIAG_ADR_ENABLED = off
: Configure SSL parameters and wallet location. Example:
WALLET_LOCATION =

   (SOURCE =

     (METHOD = FILE)

     (METHOD_DATA =

       (DIRECTORY = /opt/oracle/wallet)

     )

   )


SQLNET.AUTHENTICATION_SERVICES = (TCPS,NTS,BEQ)

SSL_CLIENT_AUTHENTICATION = FALSE

SSL_CIPHER_SUITES = (SSL_RSA_WITH_AES_256_CBC_SHA, SSL_RSA_WITH_3DES_EDE_CBC_SHA)
: Defines connection aliases. Example:
SSL=

(DESCRIPTION=

  (ADDRESS = (PROTOCOL = TCPS)(HOST = 0.0.0.0)(PORT = 2484))

  (CONNECT_DATA =

    (SERVER = DEDICATED)

    (SERVICE_NAME = XE)

  )

)


XE=

 (DESCRIPTION=

 (ADDRESS = (PROTOCOL = TCP)(HOST = 0.0.0.0)(PORT = 1521))

 (CONNECT_DATA =

    (SERVER = DEDICATED)

    (SERVICE_NAME = XE)

  )

)
Replace placeholders like
,
, and
with your actual server
,
port,
and
.
6) Restart listener
To apply the changes made to the
file, you need to restart the Oracle listener. Use the following
commands:
$ORACLE_HOME/bin/lsnrctl stop

$ORACLE_HOME/bin/lsnrctl start
7) Restart Oracle database.
After updating the SSL configuration, restart the Oracle Database to ensure all settings are applied:
$ORACLE_HOME/bin/sqlplus / as sysdba

shutdown

startup
This sequence shuts down the database and then starts it up again.
Tip: If your Oracle Database runs in a Docker container, you can restart the container to apply the configuration
changes –
docker restart oracle_container_name
8) Open DBeaver and initiate the process to create a new database connection. If unsure how to start, refer to the
article on creating a connection.
9) Specify the Custom JDBC URL:
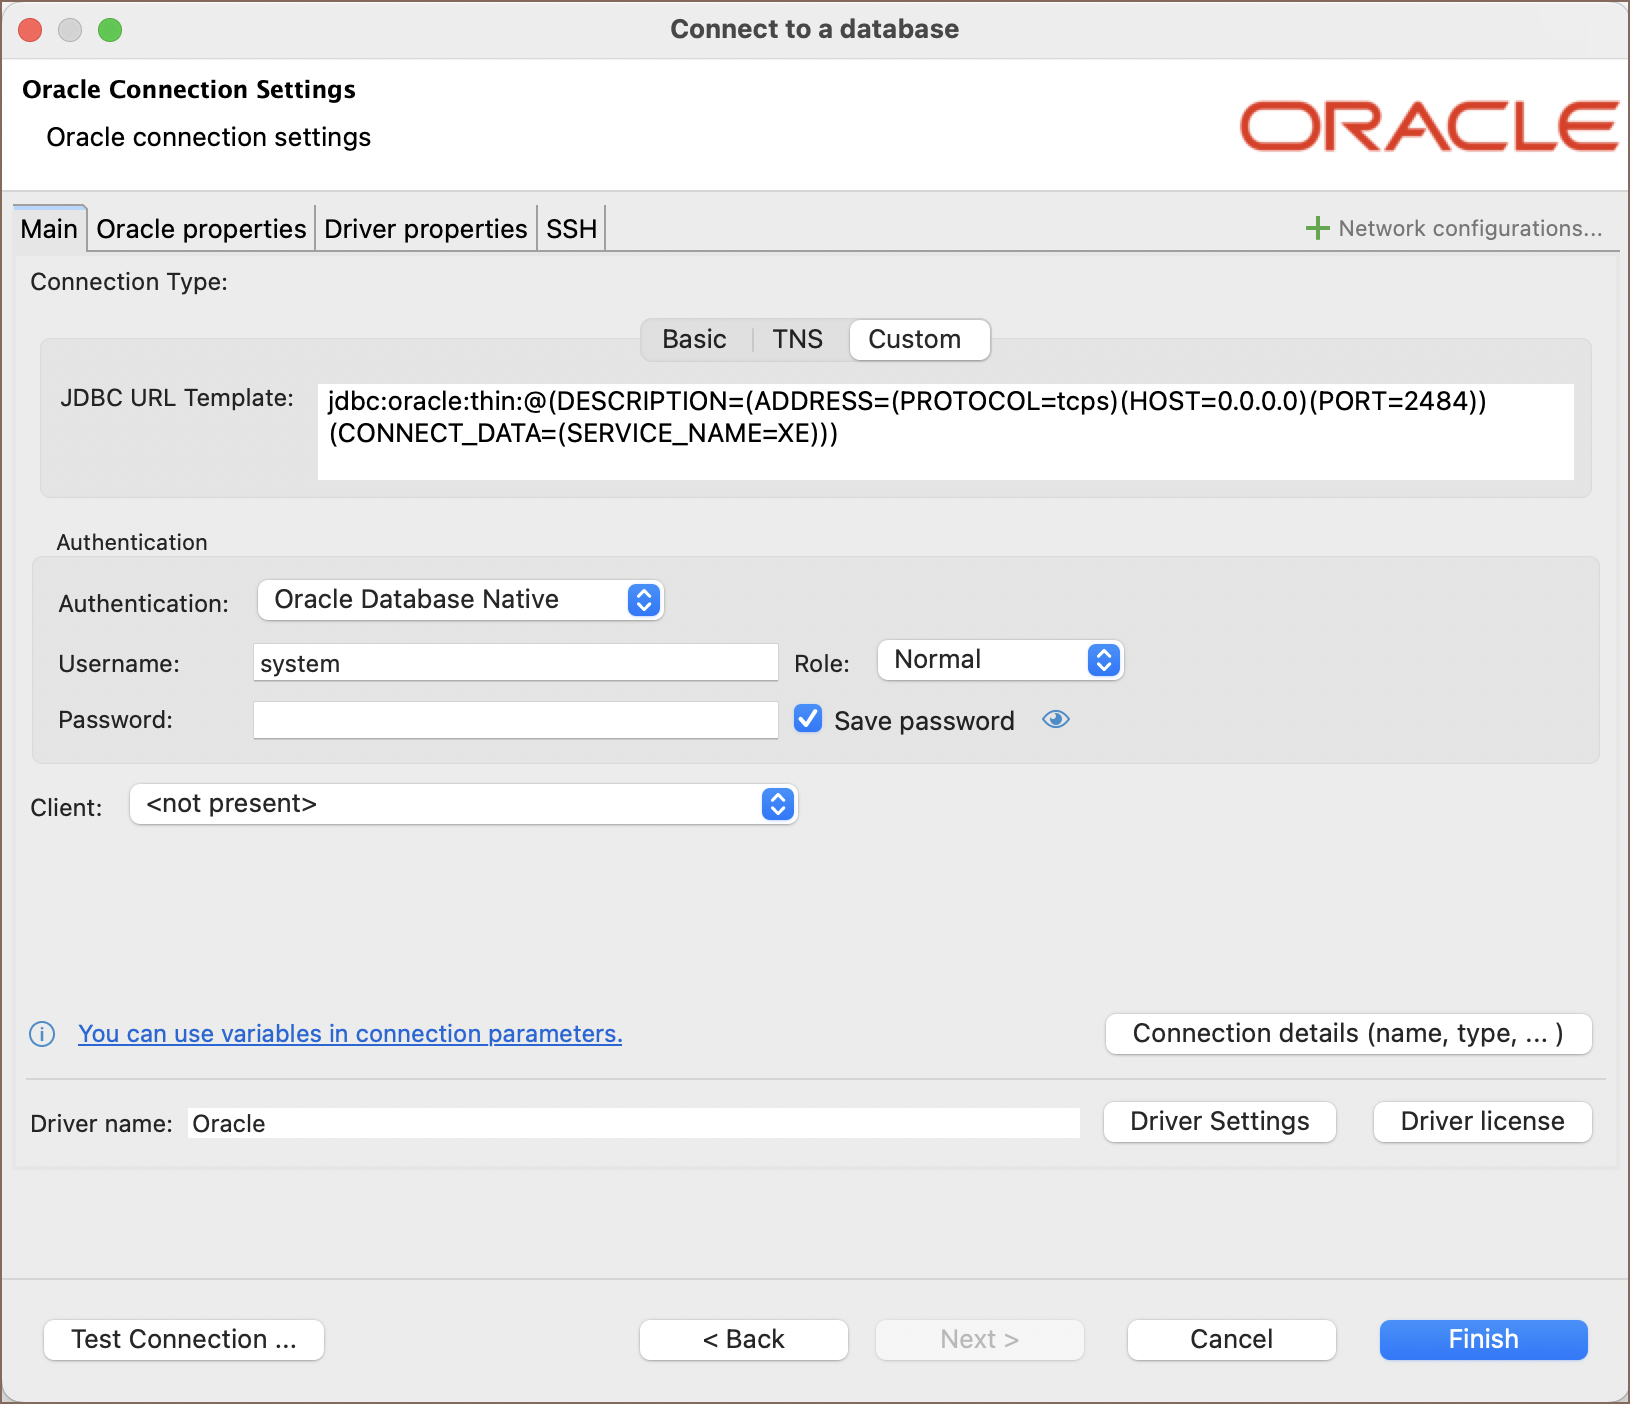
In the Main tab, construct the JDBC URL using the SSL configuration.
Example:
jdbc:oracle:thin:@(DESCRIPTION=(ADDRESS=(PROTOCOL=tcps)(HOST=0.0.0.0)(PORT=2484))(CONNECT_DATA=(SERVICE_NAME=XE)))
Replace
,
, and
with your actual server’s hostname/IP, SSL port, and service name as specified in
your
.
10) Move to the Driver properties tab within the connection setup and fill in the following properties:
javax.net.ssl.trustStorePassword
: Enter the password for your truststore. This property secures access to the
truststore.
javax.net.ssl.trustStoreType
: Set this to
to indicate the type of your truststore.
oracle.net.wallet.location
: Provide the location of your Oracle wallet. This is the directory path where your
wallet is stored, as specified in your configuration files.

11) After configuring all these properties, you can test the connection to verify that the SSL setup is correct and that you can successfully connect to your Oracle database over SSL.
Troubleshooting SSL issues
If you encounter a
Pkix path building failed
error, it may be due to incorrect SSL configurations. A common resolution
is to consider ignoring host name validation, an option available for some databases in the
SSL tab of the Connection
settings, which can help bypass common SSL errors.