Connection configuration
Please note: This article has been updated and its content is now available in a revised form at a new location. Please refer to the updated article Create Connection for the most current information.
Please note: This article has been updated and its content is now available in a revised form at a new location. Please refer to the updated article Create Connection for the most current information.
This document provides guidelines for contributing to the CloudBeaver repository. It outlines the procedures for creating pull requests, fixing bugs, and maintaining consistency in code style within our codebase.
Generally, you can suggest any feature you think is useful for the database management tool. However, we usually do not implement features that are too specific to your development process or specific to your internal company processes.
Good options include:
You can find code examples of all these features in our codebase.
Important: When suggesting new features, be aware that if a feature already exists in the Enterprise, AWS, or Team Editions, we may not merge it into the Community Edition.
If you identify a bug on our board that needs fixing and it is not scheduled for the nearest milestone, you are welcome to attempt fixing it yourself. It is a good idea to ask in the ticket because some issues may not be resolved for specific reasons.
If you decide to fix the bug and submit a pull request (refer to the guidelines), the team will review it and provide feedback if necessary. If the PR is merged, the fix will be included in the next release of the CloudBeaver Community Edition.
Before creating a pull request, you should first create a ticket in our issue tracker. Leave a comment indicating that you intend to implement the feature or fix the bug yourself. Once the CloudBeaver development or QA team has responded to your comment, you may begin your work.
You can follow the standard GitHub instructions for this process. Generally, you will need to:
Important: When committing changes in your branch, include the ticket number in the commit message like this:
. You may make any number of commits. We typically perform a squash merge before integrating changes into the main repository.dbeaver/cloudbeaver#issue-number Initial commit for my super-duper feature
If the UI is affected, it is recommended to provide screenshots or a video demonstrating the changes made.
The main rule is to use the same code style already applied in a particular source file.
IntelliJ IDEA code style can be found at: https://github.com/dbeaver/idea-rcp-launch-config-generator.
| Related articles | Description |
|---|---|
| Code of conduct | Project rules and guidelines. |
| Code structure | Overview of the plugin-based architecture. |
| Frontend development guidelines | Guidelines for frontend development. |
| Build and deploy | Guide on building and deploying the application. |
| Frontend technical overview | Detailed overview of the frontend architecture. |
| Server architecture | Explanation of the server architecture. |
| Server API explorer | Tool to explore the server API. |
| CloudBeaver styling components | Guidelines for styling components. |
| Adding new database drivers | Instructions for adding new database drivers. |
| Develop in IDEA | Instructions for working in IntelliJ IDEA. |
| Develop in Eclipse | Instructions for working in Eclipse. |
| Develop in VS Code | Instructions for working in Visual Studio Code. |
Every file you add or modify must include the following copyright header at the top:
/*

 * DBeaver - Universal Database Manager

 * Copyright (C) 2010-2024 DBeaver Corp and others

 *

 * Licensed under the Apache License, Version 2.0 (the "License");

 * you may not use this file except in compliance with the License.

 * You may obtain a copy of the License at

 *

 *     http://www.apache.org/licenses/LICENSE-2.0

 *

 * Unless required by applicable law or agreed to in writing, software

 * distributed under the License is distributed on an "AS IS" BASIS,

 * WITHOUT WARRANTIES OR CONDITIONS OF ANY KIND, either express or implied.

 * See the License for the specific language governing permissions and

 * limitations under the License.

 */
Tip: Ensure the copyright header is present and up to date for each file in your pull request.
We appreciate your contributions and offer rewards for accepted pull requests. Keep contributing to improve the project and receive a reward from the team! For more details, visit Help the Beaver.
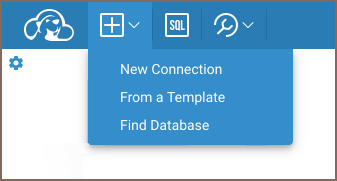
CloudBeaver provides multiple methods to set up a connection. To create a connection, do one of the following:
To establish a new connection, follow these steps:
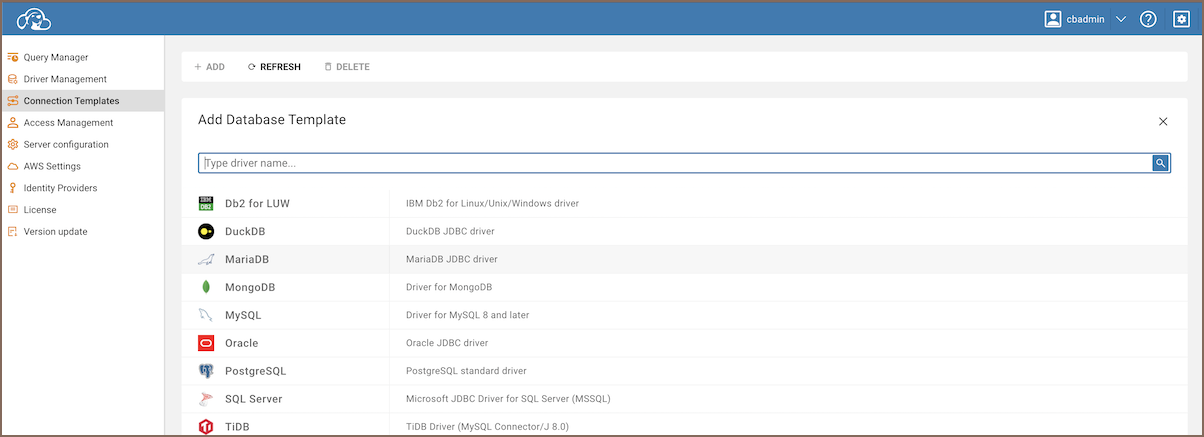
Initiate new connection:
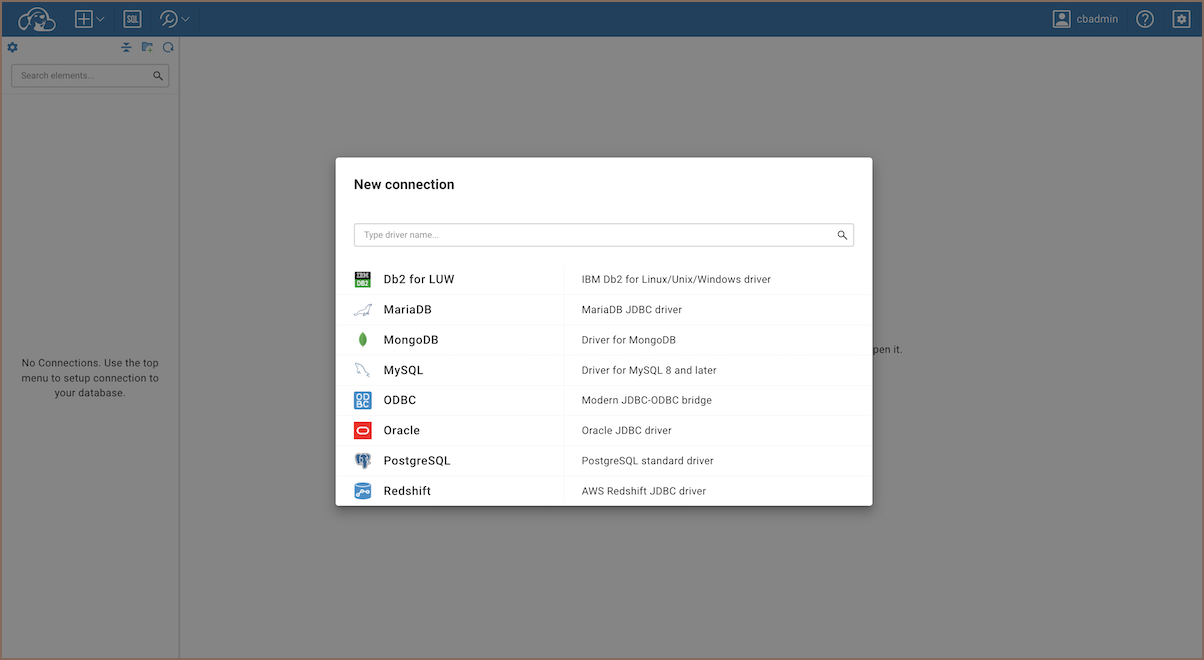
Select the appropriate driver from the available options.
Tip: If you cannot find a driver for your database, then probably there is no suitable driver, and you need to create one. Please see the Database Drivers article.
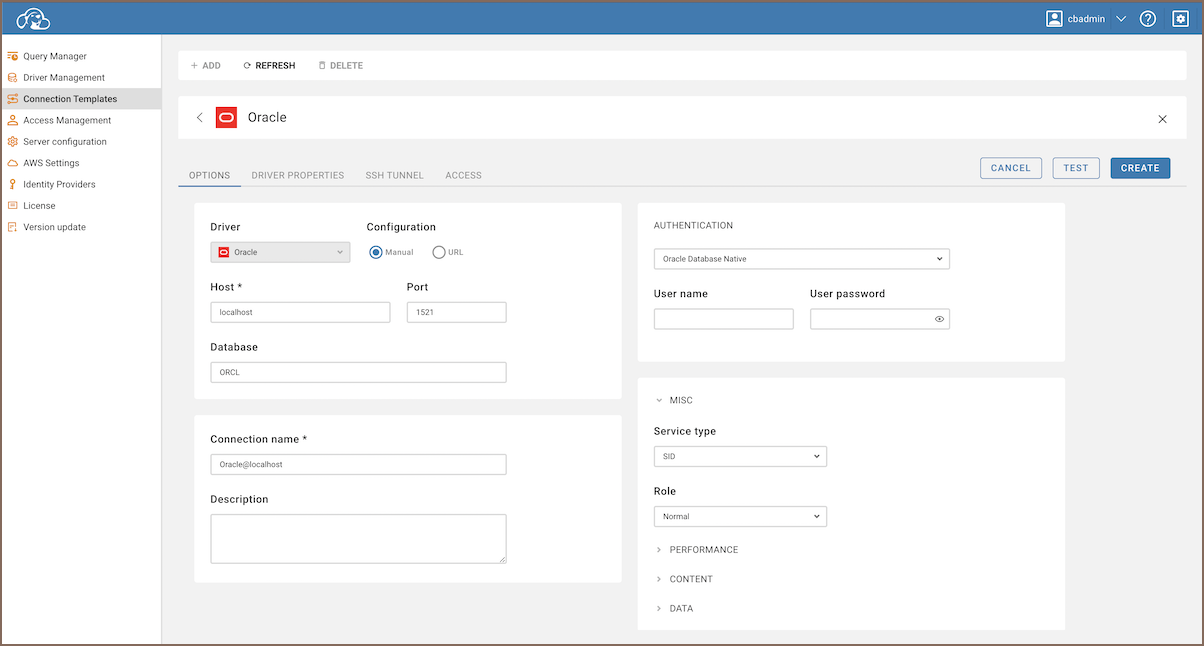
Enter all necessary details in the form fields provided. For detailed steps on filling out these fields, refer to the section below.
Test the connection (optional):
After confirming all details, click the Create button.
Access and modify connection:

Access these connections through
To use and adjust template connections, refer to the guide available in Connection templates management article.
Cloud connections are set up through your cloud service provider and automatically populated in your navigator tree, based on configurations managed by the server administrator. For a comprehensive guide on configuring and managing cloud connections, please refer to the Cloud Explorer article.
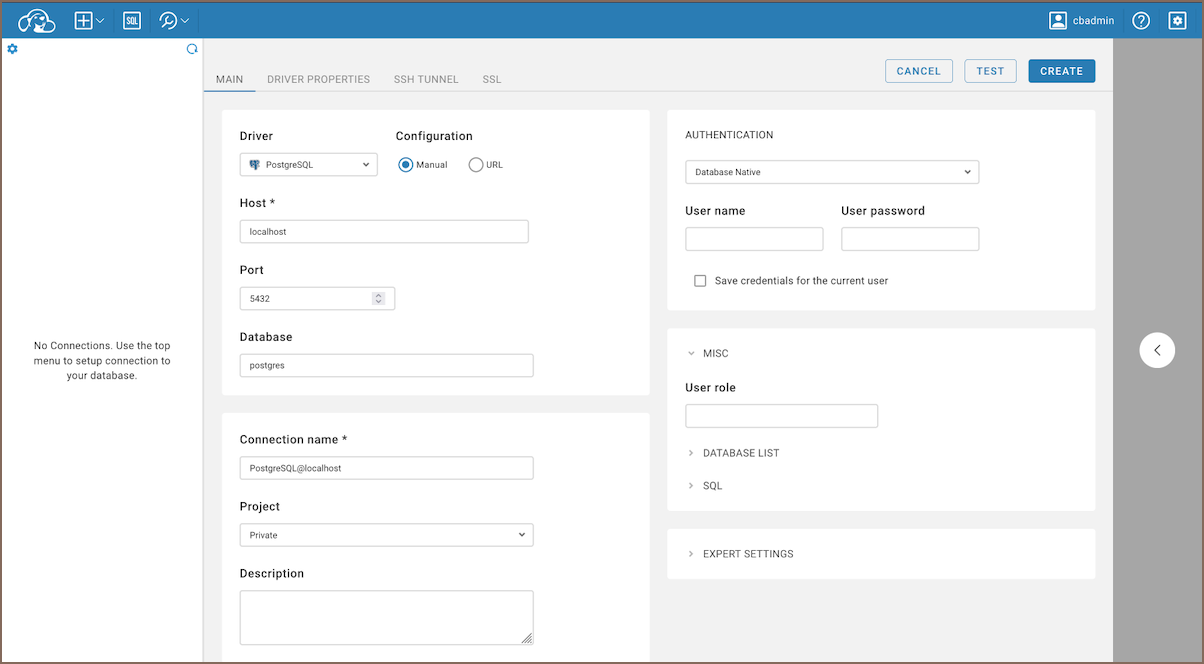
In the New connection wizard, on the Main tab, you need to set all primary connection settings.
Here’s what you typically need to configure:
| Setting | Description |
|---|---|
| Host | The address of your database server. |
| Port | The port number used to connect. |
| Database | The name of the database you want to connect to. |
| Connection name | A name you choose for this connection. It shows up in the Database Navigator. |
| Project | Links the connection to a specific Project. You can choose between “Shared” and “Private”. |
| Description | A short description of the connection. |
| Authentication | Choose the type of authentication the database requires. |
This table describes how credential options vary based on the project type:
| Project | Option | Description |
|---|---|---|
| Private | Save credentials for the current user. | These credentials will be used to make automatic connection. |
| Shared | Save credentials for all users with access. | These credentials will be used to make automatic connection for all users having access. For more details, see Users and Teams. |
| Setting | Description |
|---|---|
| Keep alive (in seconds) | Sets the interval in seconds for sending signals to keep the connection active. Set to
0 |
| Auto commit | Automatically commits changes during a transaction if enabled. For more information, see Auto and Manual commit |
Note: The number and type of connection properties are very dependent on the driver.
When setting up a new connection, you may need to configure additional options:
| Additional tab | Description |
|---|---|
| Driver Properties | Each driver has its own set of additional properties. |
| SSH Tunnel | Configure an SSH tunnel if your database requires a secure connection. |
| SSL | Enable and configure SSL if your connection requires encryption. |
Tip: For secure database connections, store your SSH credentials in
as follows:data-sources.json
- SSH Key: Assign your SSH key to
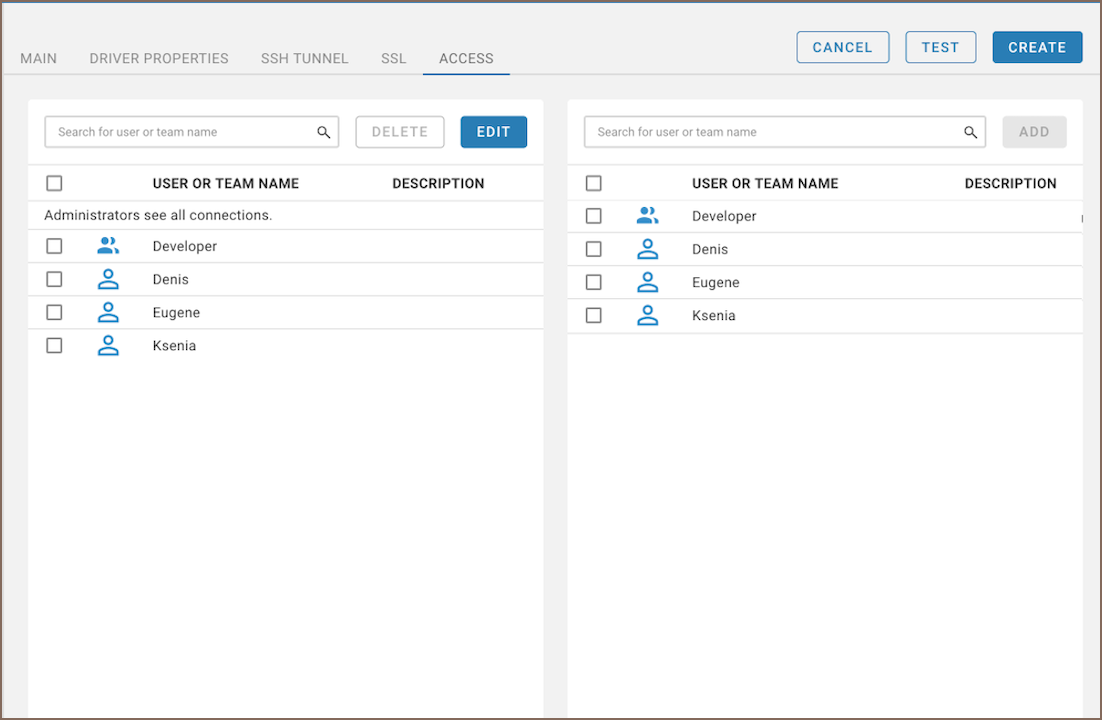
.connections.configuration.handlers.ssh_tunnel.properties.keyValueManage access permissions
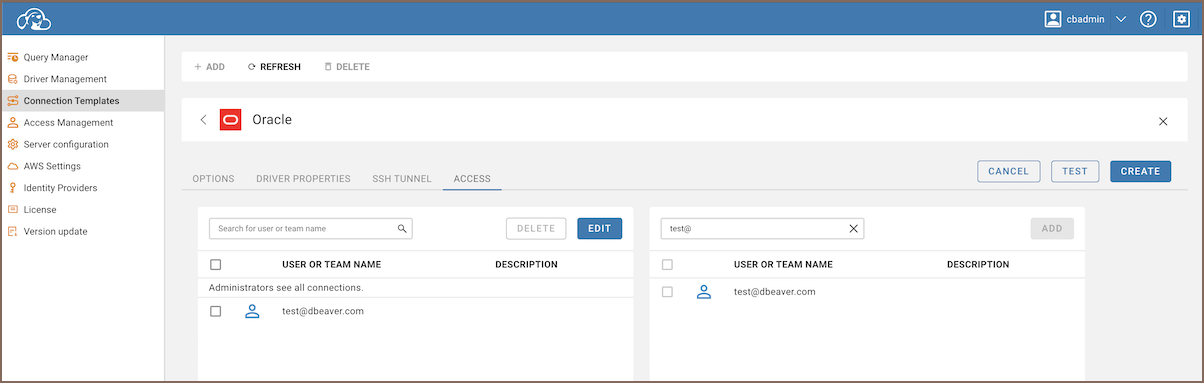
In the Community, Enterprise and AWS Editions, you can manage access permissions for a database:
- Initiate the creation of a new database connection as an administrator.
- Find the Project dropdown menu and select Shared project.
- Complete the necessary fields based on the selected type of credentials.
Go to Access tab, click Edit, check the box next to their names and click the Add button.
To manage access permissions for a database, ensure the Enable private connections setting is configured correctly in the Server configuration settings:
- If Enable private connections is turned on, switch the project mode to Shared from the dropdown menu of the Project settings to access the Access tab.
- If Enable private connections is turned off, the Access tab is available by default.
Note: For Private projects, credentials saved during connection creating or database login are stored permanently for the current user. For Shared projects, credentials saved while creating a connection are available to all users with access, but if saved during login, they are retained only for the current session.
This guide explains how to create a custom plugin for CloudBeaver. It walks you through the process of adding a simple button to the application’s top bar.
Follow these steps to create a custom plugin that adds a button to the top bar and logs
Inside
Copy the following files from any existing package into your plugin folder:
Remove the
Remove the
Export the manifest from
export * from './manifest.js';
Example service:
import { Bootstrap, injectable } from '@cloudbeaver/core-di';

import { ActionService, MenuService } from '@cloudbeaver/core-view';

import { MENU_APP_ACTIONS } from '@cloudbeaver/plugin-top-app-bar';

import { ACTION_HELLO_WORLD } from './ACTION_HELLO_WORLD.js';


@injectable()

export class HelloWorldService extends Bootstrap {

  constructor(

    private readonly actionService: ActionService,

    private readonly menuService: MenuService,

  ) {

    super();

  }


  override register(): void {

    this.menuService.addCreator({

      menus: [MENU_APP_ACTIONS],

      getItems: (context, items) => [...items, ACTION_HELLO_WORLD],

    });


    this.actionService.addHandler({

      id: 'hello-world-handler',

      actions: [ACTION_HELLO_WORLD],

      handler: (context, action) => {

        switch (action) {

          case ACTION_HELLO_WORLD: {

            console.log('Hello, World!');

            break;

          }

        }

      },

    });

  }

}
Create the
import { createAction } from '@cloudbeaver/core-view';


export const ACTION_HELLO_WORLD = createAction('hello-world', {

  label: 'Hello, world!',

});
Register your service in
import type { PluginManifest } from '@cloudbeaver/core-di';


export const helloWorldPlugin: PluginManifest = {

  info: {

    name: 'Hello World Plugin',

  },

  providers: [() => import('./HelloWorldService.js').then(m => m.HelloWorldService)],

};
Open
import { helloWorldPlugin } from '@cloudbeaver/plugin-hello-world';


const PLUGINS: PluginManifest[] = [

  ...existingPlugins,

  helloWorldPlugin,

];
In
yarn run update-ts-references

yarn

yarn run update-ts-references
Your button should now appear in the top bar and log
This article explains how to set up and manage pre-configured database connections for the CloudBeaver server. These connections are defined by the administrator and stored on the server, making them unmodifiable by end users. Users can choose from these pre-configured connections directly through the main CloudBeaver toolbar and only need to provide their username and password to access the datasource; no other parameters are necessary.
For information about server and workspace configuration, see Server configuration.
All project-level configurations are located in the
This file contains the settings for each pre-configured connection, allowing the CloudBeaver server to manage and display these connections.
Example configuration:
{

  "folders": {

  },

  "connections": {

    "dbeaver-sample-database-sqlite-1": {

      "provider": "sqlite",

      "driver": "sqlite_jdbc",

      "name": "DBeaver Sample Database (SQLite)",

      "save-password": true,

      "show-system-objects": true,

      "configuration": {

        "database": "/Users/user/Library/DBeaverData/workspace6/.metadata/sample-database-sqlite-1/Chinook.db",

        "url": "jdbc:sqlite:/Users/user/Library/DBeaverData/workspace6/.metadata/sample-database-sqlite-1/Chinook.db",

        "configurationType": "MANUAL",

        "type": "dev",

        "closeIdleConnection": true

      }

    }

  }

}
Tip: This file follows the same format as the DBeaver datasources configuration file. You can create this configuration in DBeaver and then copy it to your CloudBeaver server.
Please note: This article has been updated and its content is now available in a revised form at a new location. Please refer to the updated article Create Connection for the most current information.
Important: This feature will be removed in version
.25.0
The templates enable administrators to define various reusable connection parameters, subsequently allowing users to create multiple connections based on these templates. This process ensures consistency across the connections created from these templates, as they adhere to the defined parameters within the templates.
You can add, edit, or remove database templates on the
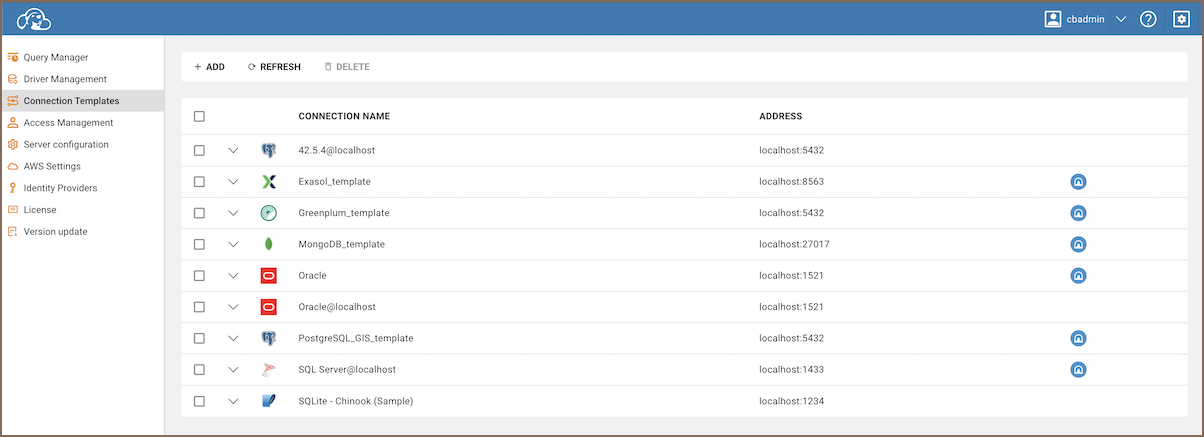
To create a new template, follow the steps below:
Your new template should be successfully created and it will appear at the top of the templates table.
Below are the detailed steps to set the template parameters:
You can manage access to the database at the
Once a template is prepared, connections can be created using the template from the public section of the CloudBeaver.
CloudBeaver support the same system parameters as DBeaver.
There are two ways to pass command line parameters to CloudBeaver server
java -Xmx2048M -jar ${launcherJar} -product io.cloudbeaver.product.ce.product -web-config conf/cloudbeaver.conf -nl en -registryMultiLanguage
Note: to be able to modify run script you must build CloudBeaver from sources. It doesn’t make sense to modify the script in docker container because all changes will be reset after container restart.
Set variable
export JAVA_OPTS=-Xmx2048

./run-server.sh
You can pass JAVA_OPTS variable to docker container by using
sudo docker run -d --restart unless-stopped -p 80:8978 \

  -e JAVA_OPTS=-Xmx2048 \

  -v /var/cloudbeaver/workspace:/opt/cloudbeaver/workspace dbeaver/cloudbeaver:latest`}
IMPORTANT: You must replace
Open the terminal and navigate to the workspace directory
Type the following commands:
Create a new file called
<!DOCTYPE Configure PUBLIC "-//Jetty//Configure//EN" "http://www.eclipse.org/jetty/configure_10_0.dtd">

<Configure id="Server" class="org.eclipse.jetty.server.Server">

    <New id="httpConfig" class="org.eclipse.jetty.server.HttpConfiguration">

        <Set name="sendServerVersion">false</Set>

        <Set name="sendDateHeader">false</Set>

    </New>


    <Call name="addBean">

        <Arg>

            <New id="sslContextFactory" class="org.eclipse.jetty.util.ssl.SslContextFactory$Server">

                <Set name="keyStorePath">

                    {Full path to your keystore. Example: /opt/cloudbeaver/workspace/cb_keys/domain.test.keystore}

                </Set>

                <Set name="keyStorePassword">

                    {The password you specified when creating certificates}

                </Set>

                <Set name="trustStorePath">

                    {Full path to your keystore example: /opt/cloudbeaver/workspace/cb_keys/domain.test.keystore}

                </Set>

                <Set name="trustStorePassword">

                    {The password you specified when creating certificates}

                </Set>

                <Set name="IncludeProtocols">

                    <Array type="String">

                        <Item>TLSv1.2</Item>

                    </Array>

                </Set>

                <Set name="IncludeCipherSuites">

                    <Array type="String">

                        <Item>TLS_ECDHE_ECDSA_WITH_AES_256_GCM_SHA384</Item>

                        <Item>TLS_ECDHE_RSA_WITH_AES_256_GCM_SHA384</Item>

                    </Array>

                </Set>

                <New id="tlsHttpConfig" class="org.eclipse.jetty.server.HttpConfiguration">

                    <Arg>

                        <Ref refid="httpConfig" />

                    </Arg>

                    <Call name="addCustomizer">

                        <Arg>

                            <New class="org.eclipse.jetty.server.SecureRequestCustomizer">

                                <Set name="sniHostCheck">false</Set>

                            </New>

                        </Arg>

                    </Call>

                </New>

            </New>

        </Arg>

    </Call>


    <Call id="sslConnector" name="addConnector">

        <Arg>

            <New class="org.eclipse.jetty.server.ServerConnector">

                <Arg name="server">

                    <Ref refid="Server" />

                </Arg>

                <Arg name="factories">

                    <Array type="org.eclipse.jetty.server.ConnectionFactory">

                        <Item>

                            <New class="org.eclipse.jetty.server.SslConnectionFactory">

                                <Arg name="next">http/1.1</Arg>

                                <Arg name="sslContextFactory">

                                    <Ref refid="sslContextFactory" />

                                </Arg>

                            </New>

                        </Item>

                        <Item>

                            <New class="org.eclipse.jetty.server.HttpConnectionFactory">

                                <Arg name="config">

                                    <Ref refid="tlsHttpConfig" />

                                </Arg>

                            </New>

                        </Item>

                    </Array>

                </Arg>

                <Set name="port">

                    8978

                </Set>

                <Set name="idleTimeout">

                    <Property name="jetty.idleTimeout" default="30000" />

                </Set>

            </New>

        </Arg>

    </Call>

</Configure>