Here is a complete list of default hotkeys in Team Edition UI for Windows, Linux, and macOS users. It will help you work in
Team Edition faster and more efficiently. Remember that you can always change the keyboard shortcut in the Team Edition settings.
Go through: Window -> Preferences -> User Interface -> Keys. Select command and add a keyboard shortcut to the Binding
row.
If you mostly use keyboard, to get more shortcuts you can switch default key scheme to DBeaver Keyboard Only key
scheme in Window -> Preferences -> User Interface -> Keys settings.
– Current query is the query under cursor or the selected text. Query is separated from other script queries by delimiter (; by default) or by empty lines.
**
– Current script is a set of all queries in the current SQL file. If there is a text selection then only queries in this selection are processed. Queries are separated from each other with a delimiter (; by default).
***
– Current connection detected from active window and selection. If active (focused) window is SQL editor or database object editor then the current connection is the same as in this editor. If the active window is the database navigator then the active connection is the “owner” connection of the currently selected element. In other cases there is no current connection and Team Edition will ask you to choose the connection explicitly.
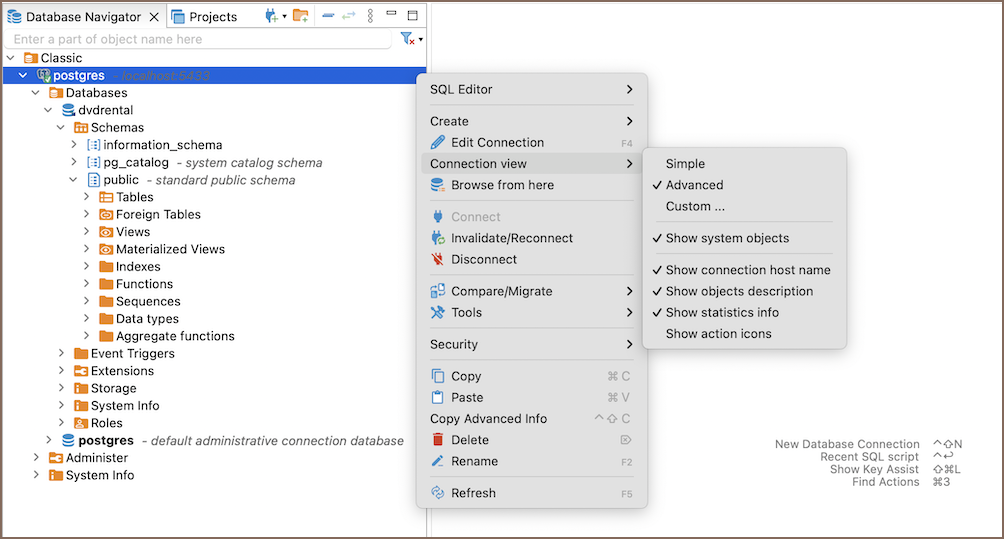
The Database Navigator in Team Edition displays various database objects by default, including system objects, schemas,
tables, indexes, utilities, and more.
To customize or simplify the Database Navigator’s contents, you may choose from three view
modes:
Simple: This mode offers a streamlined view, ideal for users who primarily interact with tables.
Advanced: This mode provides a comprehensive view of all database objects that Team Edition can manage.
Custom: This mode allows for a personalized configuration of the Database Navigator display.
Right-click on the desired database within the Database Navigator.
Select Connection view.
Choose between Simple, Advanced, or Custom to suit your preferences.
For the Custom view:
After selecting Custom, an additional window will appear.
In this window, you can configure the custom settings for the Database Navigator view.
Important: Changing the view modes settings affects the currently selected database. To customize the display of
objects in each database individually, you must select a specific view mode for each one.
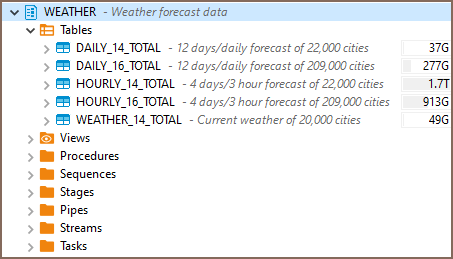
Simple View: Tailored for ease of use, the Simple view offers a minimalist approach, displaying only schemas and
tables. It is optimal for users who focus predominantly on these database objects.
Advanced View: The Advanced view presents a comprehensive display of the database, showing all database objects,
including system objects, all folders, and all supported objects. This mode is intended for users who require
visibility across the entire database structure.
Custom View: For those who prefer a personalized setup, the Custom view mode provides the ability to configure the
Database Navigator.
Following is a detailed comparison of the features across the different view modes, along with descriptions for the
configurable options available in the Custom View:
Feature
Simple View
Advanced View
Custom View (Configurable)
Description
Show system objects
No
Yes
Yes/No
Includes or excludes system objects such as
pg_catalog
or
SYSTEM
.
Show utility objects
No
Yes
Yes/No
Includes or excludes utility objects like template databases for new database creation.
Show only schemas and tables
Yes
No
Yes/No
Displays only schemas and tables, hiding all other objects for a simplified view.
Show all tables in a single list
No
No
Yes/No
Consolidates all tables into one list, regardless of their schema.
Hide folders
Yes
No
Yes/No
Hides all intermediate logical folders, displaying objects directly.
In addition to selecting a view mode, there are other settings accessible via the Connection view context menu.
These settings provide additional information about the database objects and enhance your experience:
Setting
Description
Show connection host name
Displays the host name or tunnel of the current database next to the connection name.
Show objects description
Shows object (table, column, etc.) description next to it.
Show statistics info
Provides statistical information on objects (e.g. table size), on the right side of the Database Navigator.
Show action icons
Shows action icons for database elements. For example, you can see a read-only icon on the right side of the Database Navigator, indicating that a particular connection is in a read-only state.
These settings can be toggled on or off based on your preference, allowing for a customized Database Navigator. To access
and modify these settings:
Right-click on the desired database within the Database Navigator.
Navigate to the relevant options.
Select or deselect the options to show or hide the desired information.
Note: These settings alter the display for the entire Database Navigator, affecting how all database objects are
presented.
Sometimes the database cannot be accessed directly, in such cases you can use the SSH tunnel. The SSH or Secure Shell is a network communication protocol that allows two computers to communicate and encrypts the shared data.
Team Edition supports the following SSH authentication methods:
SSH can either be configured individually for each connection in Connection settings -> SSH or as a network profile which can be selected from the drop-down menu on the same page mentioned earlier:
In order to use SSH, you have to enable it first. After that, configure it for your needs, then click on Test
tunnel configuration to test whether all parameters are valid or not.
It is often required to set the hostname to
localhost
in Connection settings -> Main. SSH establishes a
connection between two machines, authenticating each side to the other, and passing commands and output back and forth.
After connecting to remote machine, all commands you execute are executed on that remote machine, so by having the host
set to
localhost
you are opening a connection to the database on this remote machine, not on your local machine, and
just redirect I/O to the latter.
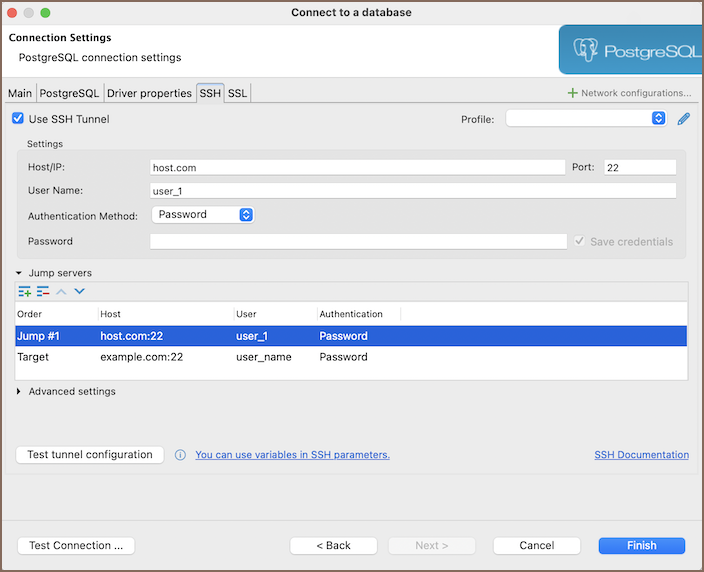
Team Edition allows the use of Jump servers, also known as Gateway hosts. This feature is essential when the direct access to
a target machine is not possible from your local machine, and a gateway server is required for connection.
To add a jump server:
Ensure Use SSH Tunnel is checked.
Expand the Jump servers group.
Specify your target in the Settings section.
Click on the Create new jump host button to add your
first jump server configuration.
Repeat step 3 for each additional jump host you need to add, configuring each one within the Settings section.
Imagine you have the following situation: your database is located on remote machine with IP address
100.100.100.100
and which is accessible through SSH. You cannot access this IP directly from your machine because of your network settings or firewall, but you can access other machines with the IP address
200.200.200.200
through SSH and which is able to access the desired remote machine.
You will need to specify
100.100.100.100
as a host in regular SSH configuration and
200.200.200.200
as a host in a gateway configuration to achieve such a “connection order”:
Specifies the SSH library used for the connection.
Bypass host verification
If checked, disables verification of the server’s identity by not checking the remote host’s fingerprint, which may lead to security risks such as Man-In-The-Middle attacks.
Share this tunnel with other connections
If checked, allows multiple connections to share the same SSH tunnel. This can improve connection speed and reduce server load. Sessions remain open until all connections using the tunnel are closed, even if the initiating connection is terminated.
Keep-Alive interval (ms)
Sets the interval in milliseconds for sending a keep-alive packet to keep the connection active. A value of 0 disables keep-alive packets.
Tunnel connect timeout (ms)
Sets the maximum time in milliseconds to establish a tunnel connection before timing out.
Port forwarding is used to expose a socket sitting on a remote port to your local port, allowing you to communicate with
it. After the SSH connection to the remote machine is established, you need to connect to the database on that machine.
You must pass the port on which the database is listening from that remote machine to your local machine. This is when
port forwarding becomes handy.
By default, it randomly chooses the local port and forwards it to the destination port set in Connection
settings -> Main
It is not usually required to change this configuration, but it can be useful, for example, when you want to use a
particular local port.
By default Team Edition opens random local port and forwards it to a target database port. It then implicitly replaces port configured in the connection with this random port.
So technically Team Edition will connect to something like
localhost:45678
(random port on localhost) instead of
database.server.domain:5432
(default PostgreSQL server port).
But if you use URL instead of manual connection configuration then you connect to
. Team Edition cannot replace port number automatically because you can use any type of sophisticated URLs. Team Edition just don’t know how to change this URL.
If you use URL connection then you must configure port forwarding manually. In the Advanced Settings set both Local Port and Remote Port to 5432 (database server port, 5432 is the default value for PostgreSQL). It will work in most cases.
But it will fail if you have PostgreSQL server on your local machine because port 5432 is already occupied. In this case you can use any random port number for Loca Port (e.g. 15432). Use the same 5432 for Remote Port because it is real port number for remote PostgreSQL server.
By default, Team Edition shares SSH tunnels across connections when the same SSH settings are used. This is particularly
useful when connecting to several databases on the same remote server, as it avoids the need to establish a separate SSH
tunnel for each connection.
To view the active SSH tunnels and the databases utilizing a shared tunnel, use the SSH tunnel explorer.
This feature provides a comprehensive overview of your SSH tunnel usage, including detailed information on each
tunnel and the databases it serves. Here is how to access SSH tunnel explorer:
Navigate to Window -> Show View -> Other…
In the window that appears, expand the Database category.
Select SSH tunnel explorer and click Open.
In the SSH tunnel explorer view, you will find information about each active tunnel. This includes:
Field
Description
Destination
The remote server to which the tunnel connects.
Used by
A list of databases that are currently using the tunnel.
Port Forwards
The local and remote ports involved in the tunneling process.
Team Edition shares SSH tunnels across connections if SSH settings are identical. The application compares the following
parameters to determine if the SSH settings match:
Hostname: The address of the SSH server.
Host port: The port number used for the SSH connection.
Username: The username required for SSH authentication.
Depending on the authentication method selected, Team Edition also compares:
For password authentication:
Password: The SSH account password.
For public key authentication:
Private Key: The file path to the SSH private key.
Passphrase: The passphrase for decrypting the private key, if set.
For agent authentication:
Agents: Team Edition treats all agent authentication configurations as identical, ignoring specific agent settings
and focusing only on the method’s selection.
Team Edition supports the ability to establish connections using Secure Socket Layer (SSL), a protocol for creating
authenticated and encrypted links between networked computers.
Note: SSL parameters are optional and should only be specified if required by your server configuration.
To set up SSL, you need to configure the following settings:
Navigate to the SSL tab within the Connection settings.
Enable the Use SSL option to activate SSL for your connection.
Enter the necessary SSL configuration details (optional):
Parameter
Description
CA Certificate
Path to the Certificate Authority (CA) certificate.
Client Certificate
Path to the client’s public key certificate.
Client Private Key
Path to the client’s private key.
Keystore
Path to the keystore file.
Keystore Password
Password for the keystore.
Certificate hostname
Expected hostname in the certificate.
SSL Mode
Desired security level for SSL.
SSL Factory
Provide SSLSocketFactory factory class name.
Cipher suites (optional)
Specific cipher suites to use.
Skip host name validation
Whether to bypass hostname validation.
Use self signed certificate (non-secure)
Acceptance of self-signed certificates.
Force TLS 1.2
Enforce using TLS version 1.2.
Verify server certificate
Ensures the server certificate is valid.
Allow public key retrieval
Allows the retrieval of the server’s public key.
Note: The availability of these parameters can vary depending on the database. Check the SSL tab for your
database within the Connection settings for any specific options.
If all other necessary connection settings are configured, complete the setup by clicking Finish, or test the
configuration by clicking Test Connection to ensure that SSL is functioning correctly.
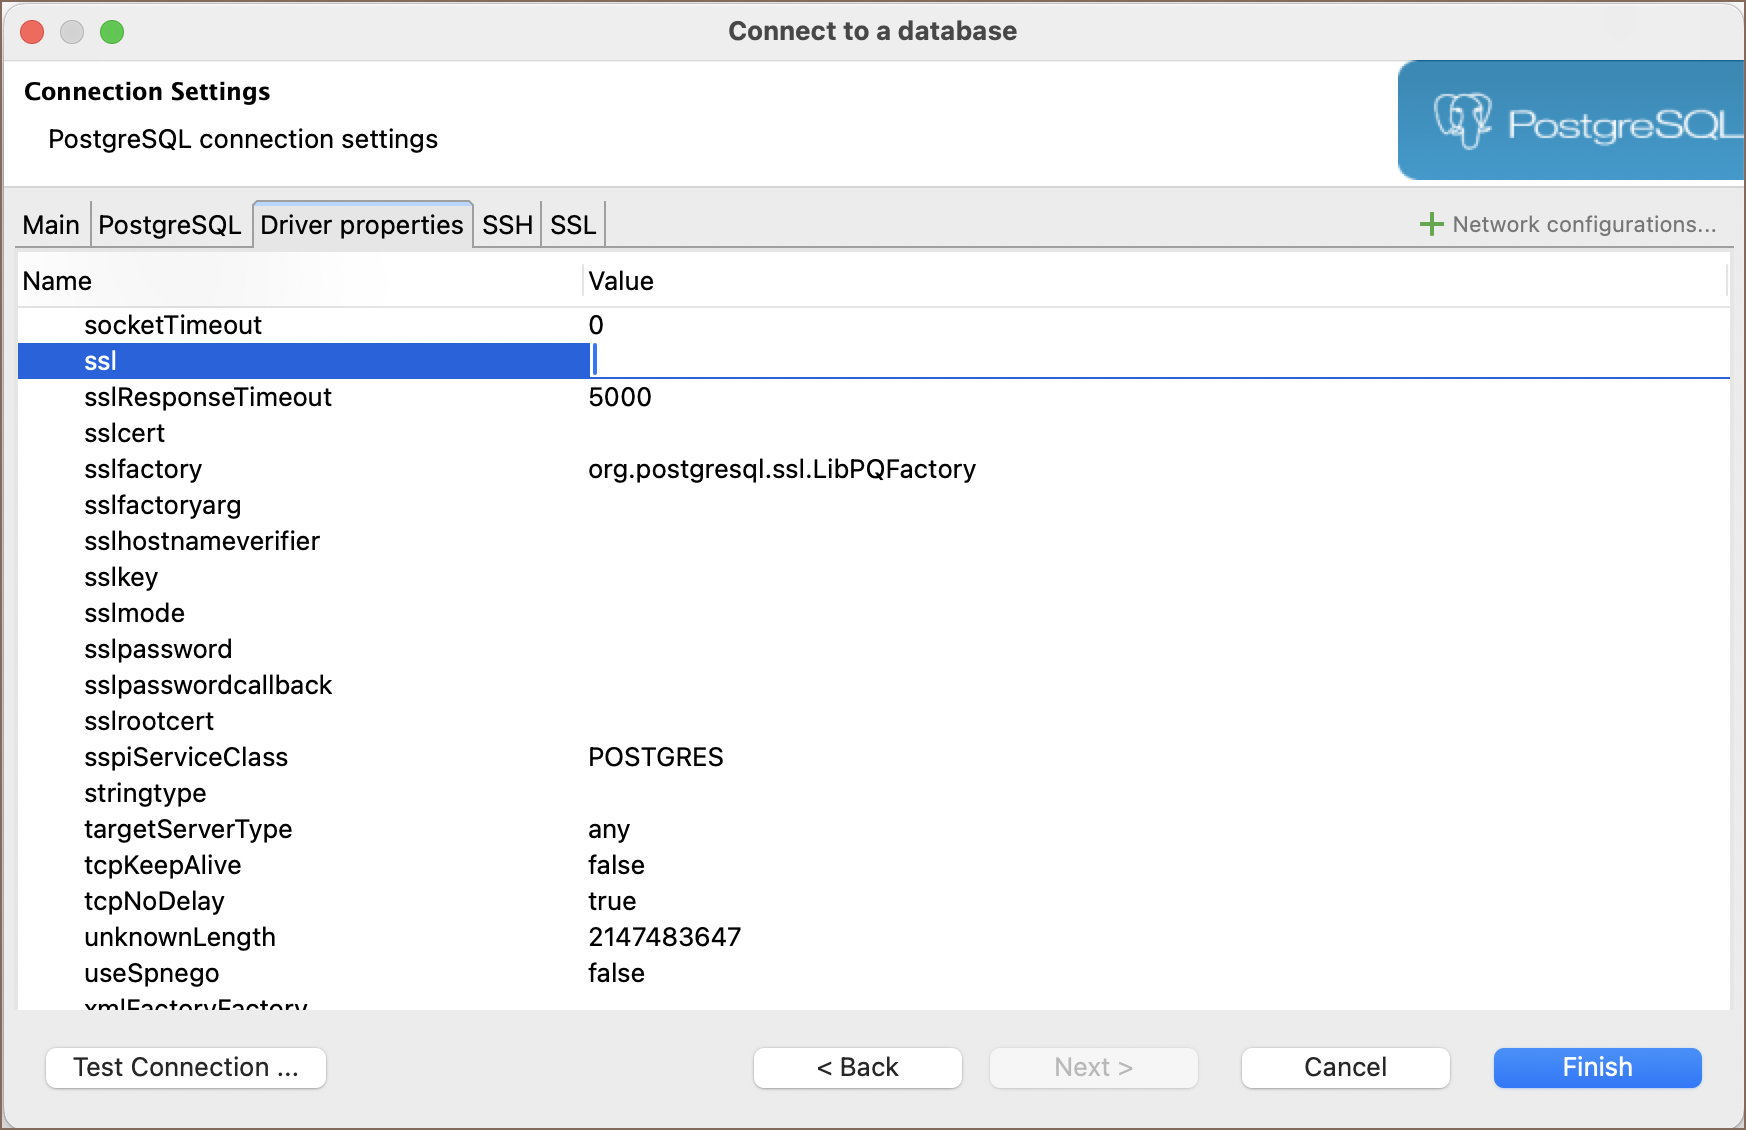
For some databases, an alternative method to configure SSL settings is available through the Driver properties tab.
This approach allows access to additional or driver-specific SSL options that may not be present in the main SSL tab:
Select the Driver properties tab within the Connection settings.
Look for properties prefixed with
ssl
, such as
sslResponseTime
,
sslfactoryarg
,
sslhostnameverifier
, etc.
Configure the necessary properties according to your database and server requirements.
If all other necessary connection settings are configured, complete the setup by clicking Finish, or test the
configuration by clicking Test Connection to ensure that SSL is functioning correctly.
Team Edition can import certificates from a predefined folder at startup. This method is useful for databases protected by self-signed certificates. It ensures secure connections without manual setup, especially when a firewall or internal security policies require specific certificates.
To add a certificate, place the file in the
{DBeaverData}/secure/custom-certs
folder. Team Edition
will detect and import it on startup. For more details on
To set up SSL configuration for Oracle connections, follow these steps:
1) Create a Wallet Folder:
First, you need to create a directory that will serve as a wallet folder. This wallet stores your security
credentials. Execute the following command to create this folder:
mkdir /opt/oracle/wallet
2) Generate Key:
Use the
orapki
utility to create a new wallet and generate a self-signed certificate. Create the wallet:
When setting up your Oracle wallet, you may need to add a certificate. There are two main scenarios for this:
Creating and adding a self-signed certificate:
If you do not have a certificate, you can create a self-signed certificate and add it to your wallet using the following command:
Adding a certificate signed by a certificate authority (CA):
If you use a certificate signed by a Certificate Authority (CA), you need to add the Root Certificate Authority
(RootCA) certificate to your wallet as well. This is done using the following command:
After updating the SSL configuration, restart the Oracle Database to ensure all settings are applied:
$ORACLE_HOME/bin/sqlplus / as sysdba

shutdown

startup
This sequence shuts down the database and then starts it up again.
Tip: If your Oracle Database runs in a Docker container, you can restart the container to apply the configuration
changes –
docker restart oracle_container_name
. Replace
oracle_container_name
with the name of your Oracle Docker
container.
8) Open Team Edition and initiate the process to create a new database connection. If unsure how to start, refer to the
article on creating a connection.
9) Specify the Custom JDBC URL:
In the Main tab, construct the JDBC URL using the SSL configuration.
with your actual server’s hostname/IP, SSL port, and service name as specified in
your
tnsnames.ora
.
10) Move to the Driver properties tab within the connection setup and fill in the following properties:
javax.net.ssl.trustStorePassword
: Enter the password for your truststore. This property secures access to the
truststore.
javax.net.ssl.trustStoreType
: Set this to
JKS
to indicate the type of your truststore.
oracle.net.wallet.location
: Provide the location of your Oracle wallet. This is the directory path where your
wallet is stored, as specified in your configuration files.
11) After configuring all these properties, you can test the connection to verify that the SSL setup is correct and that you can successfully connect to your Oracle database over SSL.
error, it may be due to incorrect SSL configurations. A common resolution
is to consider ignoring host name validation, an option available for some databases in the SSL tab of the Connection
settings, which can help bypass common SSL errors.
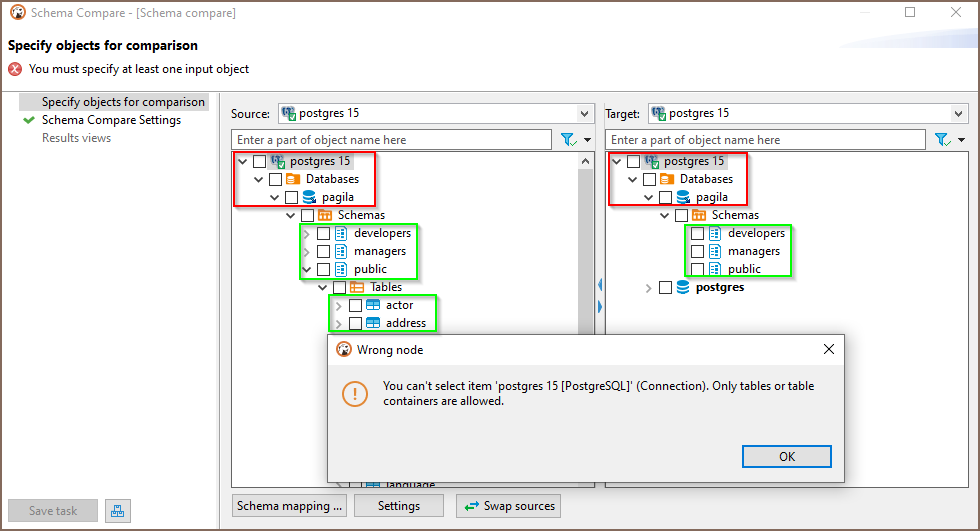
In most cases, you can compare schemas, databases, or tables. However, some databases (such as SQLite and Firebird) do not have catalogs and schemes that can be compared. In this case (and only for these databases), it is possible to compare the entire datasources.
Usually, you can compare the following database objects: columns, primary keys, foreign keys, indexes, and so on (it depends on your database). If you want to compare more objects, such as check constraints, procedures, functions, triggers, you need to enable Liquibase PRO.
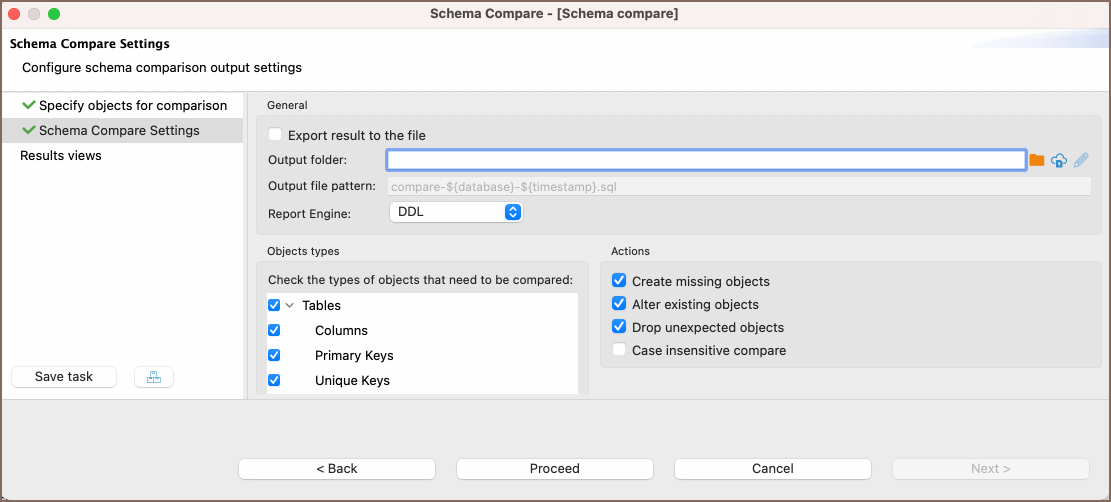
If you want to export the comparison result in a file, select Export result to the file option, then specify the folder and file name. You can use variables in the file name. Click on the field with a file name to see a list of available variables.
Select the report format in the Report Engine field.
You can simply exclude specific types of objects from comparison.
For example, it is possible not to show sequences, views, or external keys in the final comparison result.
You can also specify which changes should be processed: create, drop, or alter. By default, all kinds of changes are enabled. If you do not want to compare objects with equal names but in different cases (like “test” and “TesT”), enable the Case insensitive compare.
(Note: This settings section is unavailable for the generation changelog process.)
Tip: You can export the results of a schema compare operation to a remote file system
via Cloud Storage using the Browser remote file system
button . This feature is exclusively available to users of the
Ultimate Edition, Team Edition, and CloudBeaver versions.
By default, DDL diff is generated. It contains a series of creating, altering, and/or dropping statements that will
modify the schema on the right side. Thus, it will make it identical to the schema on the left side.
This comparison interface provides a suite of options to manage your results effectively:
Button/Option
Description
All
Enables all changes in the changes tree on the left side of the diff page.
None
Disables all changes in the changes tree on the left side of the diff page.
Refresh Report
Updates the comparison report to reflect any changes made to the selection or schema.
Show log
For detailed information about logs, refer to the section Compare logs.
Export
Exports the current diff report to a
.txt
file.
Save
Saves the current state of the report.
Copy
Copies the generated SQL or report text to the clipboard for easy pasting elsewhere.
Open in Editor
Opens the current diff report in the SQL Editor for further editing or review.
Migrate
Executes the generated SQL statements on the target database, applying all selected changes.
To get acquainted with the comparison logs, you first specify the logging level on the Preferences-> Editors-> Schema Compare preference page. Specify one of the logging levels and click on Apply. By default, the logging level is the OFF level. To get complete information, you can choose the DEBUG level.
After comparing operations, click the
Show log
button. A log will be open in the Editor, and the content of this log will depend on the logging level you choose in the settings. Log level changes from preferences will not be applied to the comparison wizard if it is already open in another window. Close and open the schema compare wizard in this case.
Suppose you want to create a report about the objects in your table container (similar to the metadata dump operation).
In that case, you can select in the navigator tree on your container Compare/Migrate -> Liquibase changelog command.
One or several table containers can be chosen. The report will contain creation statements of
tables/views/keys/sequences – metadata from the table containers. But without data from tables/views. You can use this
report in the future to restore the structure of your database.
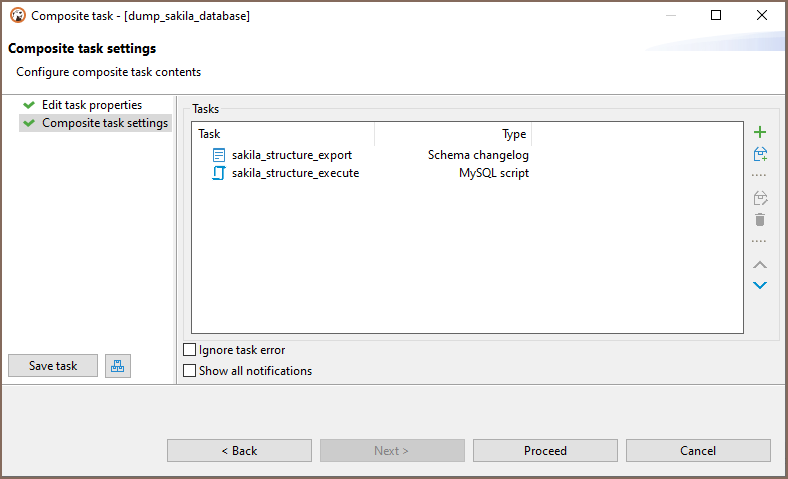
If you plan to constantly use the comparison or generation changelog/schema comparison, exporting the result as a file, you can save this as a task. The task can be completed anytime and put on the schedule.
Also, generating a changelog or schema comparison can be part of the composite task. For example, if you keep the log as a script with a certain name, then the implementation of this script can be set by the second operation of the composite task.
With a Liquibase Pro key, you can unlock advanced schema comparison features in Team Edition, including support for
functions, procedures, and extended Pro objects.
You can save scripts to a predefined space in the currently active project or somewhere in the file system.
To save a script to the current project space, just press Ctrl+S or right-click the script and click Save on the context menu:
You can find the script saved this way in the Project Explorer view in the Scripts folder.
To save a script to the file system, right-click the script, click File -> Export SQL script on the context menu and then select the folder in the file system.
You can also click SQL Editor -> Export SQL script on the main menu:
Unsaved data is highlighted in color on the left side of the editor, in addition to having an asterisk in the name of the script.
To load a script stored in the file system to the SQL Editor, press CTRL+SHIFT+O, or click SQL Editor -> Import SQL script on the main menu, or right-click the script panel and click File -> Import SQL script on the context menu:
If you want to revert all changes made to the current SQL script and return it to its initial state (reload from disk), right-click anywhere in the script panel and click File -> Revert on the context menu.
By default all of the scripts are saved to a “Scripts” folder located in your project inside the workspace directory. This can be changed by clicking the Configure button in Project Explorer view. There you can click on a folder’s name an pick any other folder inside the Project.
You can also link an external directory to your project to either save your scripts into it, or to access scripts that were created outside of Team Edition.
To link an External directory right-click anywhere in the Project Explorer and pick Create -> Link Folder. There you can link any directory on your drive to a project. This will allow you to open any externally created scripts through Project explorer and to set this folder as default to save new scripts into.
In some cases you might want to execute a query and not save it in a script. For example, when you read table data using “Read data in SQL console” or open procedure/function source from DDL editor.
SQL console does not have an associated .sql file. Its contents will be lost when you close it.
To use search, click the Search button on the main toolbar:
Please see the dedicated articles for information about searching for different types. This article describes common features of the three search types.
Search results for any of the search types appear in a separate Search view. The following image shows the Search view for the database full text search:
The view contains a toolbar that provides common tools for all types of search as well as specific tools for the File Search type. The following are common tools:
Button
Name
Description
Run the Current Search Again
Refreshes the search results
/
Cancel Current Search
– Active state (red) indicates that the search is still in progress and appears if the search takes some time to complete. Clicking the button in this state stops the current search. – Inactive state (grey) indicates that the search is complete. The button in this state is non-actionable.
Show Previous Searches
– Clicking the button itself opens the Previous Searches window. – Clicking the arrow next to the button opens a dropdown menu. See the Search History section further in this article.
Pin the Search View
Ties the current search results to the Search view. If you click this button, the current results stay in the view while the results of the next search appear in a new Search view. Otherwise, every new search replaces the previous results with new results.
For information about specific tools of File search, see the File Search article.
If the search is short, the results appear almost instantly. But if it takes some time, the Search view indicates the progress in the following ways:
The Cancel Current Search button in the toolbar has the Active state ()
The progress bar appears in the bottom-right corner of the view indicating the process:
The button to show the search progress in a separate view () appears in the bottom-right corner of the view next to the search progress bar. Clicking the button opens the Background Tasks view:
Team Edition stores the history of search queries made during the current session. You can reopen the Search view with results of a previous search query. You can also remove individual queries and clear the history.
To manage the search history, use the Show Previous Searches button in the toolbar ().
To open the results of a previous search query, do one of the following:
Click the arrow next to the Show Previous Searches button in the toolbar and then click the query in the dropdown list:
Click the Show Previous Searches button itself or the arrow next to it and then History on the dropdown menu to open the Previous Searches window. Then, in the window, click the query and then either click Open to open it in the active Search view or click Open in New to open it in a new view:
To remove one or more of the previous search queries:
Click the Show Previous Searches button in the toolbar or click the arrow next to it and then History on the dropdown menu. The Previous Searches window opens.
Click the query to remove or select several of them by clicking and simultaneously holding the Ctrl key.
Click Remove.
To clear the history by removing all previous queries, click the arrow next to the Show Previous Searches button on the toolbar and then click Clear History on the dropdown menu.
To execute a query under the cursor or selected text, press Ctrl+Enter or right-click the query and click
Execute -> Execute SQL Statement on the context menu. You can do the same using the main toolbar or main menu: SQL
Editor -> Execute SQL Statement. This executes the SQL query under the cursor or selected text and fills the results
pane with the query results.
To execute a query under the cursor in a separate tab, press CTRL+\ or right-click the query and click
Execute -> Execute SQL in new tab on the context menu. The same can be done using the main toolbar or the main menu:
SQL Editor -> Execute SQL in new tab. This executes the SQL query under the cursor or selected text and creates a
new results tab.
To execute the whole script, press Alt+X or click Execute -> Execute SQL Script on the context menu or
SQL Editor -> Execute SQL Script on the main menu or in the main toolbar. This executes all queries in the current
editor (or selected queries) as a script. Team Edition parses queries one by one using a statement delimiter (“;” by default)
and executes them consecutively. For these settings, see the Delimiter preferences section.
To execute the script natively, press Alt+N or click Execute -> Execute SQL Script natively on the
context menu or SQL Editor -> Execute SQL Script natively on the main menu or in the main toolbar.
Upon activation, a setup wizard is launched, which allows you to configure the parameters for script execution before the script is launched in the native client like PLSQL, MySQL, or SQLPlus. The results are displayed in a text field in the format of console output. It is handy when functions are not supported by Team Edition drivers and require more specialized clients or when the function is weighty, and a faster client is needed.
Note: This function is available for MySQL/Maria, Oracle, and PostgreSQL and may require additional software
installation for each database.
To execute a script opening, each query results in a separate tab, press Ctrl+Alt+Shift+X or click
Execute -> Execute Statements In Separate Tabs on the context menu or SQL Editor -> Execute Statements In Separate
Tabs on the main menu or in the main toolbar. It executes all queries in the script but opens multiple result tabs.
Each script query is executed in a separate thread (that is, all queries are executed simultaneously).
Important: Executing a massive script with numerous queries can result in unforeseen problems.
Tabs can be moved around by dragging them with a mouse and pinned using the Pin tab on the context menu of the desired tab. Pinned tabs are stacked on the left. They can be moved among other pinned tabs but can’t be mixed with unpinned tabs. Pinned tabs cannot be closed without being unpinned first and cannot be overwritten by executing a query (by making this tab active).
Tabs can be detached from the SQL editor into a separate view using the Detach Tab action found in the context menu of the desired tab. After the tab is detached, you can rearrange and move it anywhere you want (for example, you can put two tabs side-by-side for comparison).
Additionally, you can detach it from the application window using Detach found in the context menu of an already detached tab.
After the tab is detached, it’s still synchronized with the SQL editor, meaning you can edit and refresh data as long as the SQL editor that produced that tab is open. Once you close it, tabs become read-only.
To evaluate an SQL expression, right-click the expression and click Execute -> Evaluate SQL expression on the context menu. This command performs a query of SELECT [expression] FROM DUAL type:
If you want to know how many rows an SQL query will produce, you need to apply the Row Count feature – highlight and right-click the SQL text and then click Execute -> Select row count on the context menu:
It might be useful to export a query if you have a long-running query and you do not need to see its results in the results panel. You can directly export the current query results to a file/table by right-clicking the query and then clicking Execute -> Export From Query on the context menu:
The Data transfer wizard opens. Go through its steps to complete the export of the query.
In Team Edition, parameters are used within SQL queries as placeholders, prompting for user input at query execution.
Variables, defined with the
@set
command or through the Variables panel, substitute placeholders
with predefined values, enabling scripts to run without manual input each time.
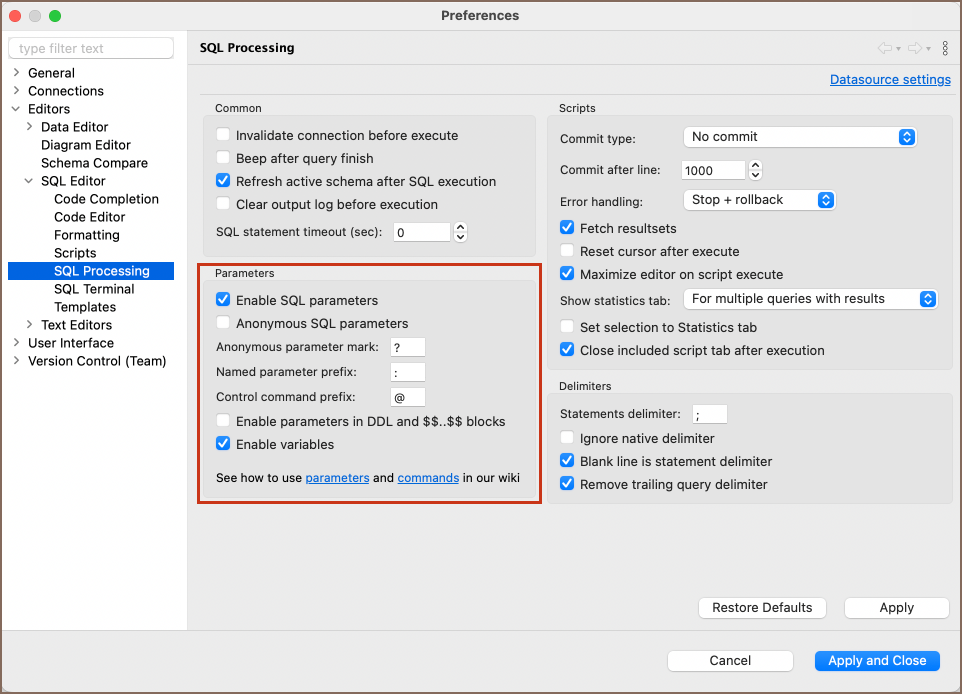
To customize parameter and variable behavior in Team Edition, access the settings
through Window -> Preferences -> Editors -> SQL Editor -> SQL Processing.
Setting
Description
Enable SQL parameters
Allows the use of named parameters within SQL queries.
Anonymous SQL parameters
Permits the usage of unnamed parameters, enabling the SQL editor to recognize placeholders denoted by the character specified in the Anonymous parameter mark field.
Anonymous parameter mark
Sets the symbol for anonymous parameters (default
?
).
Named parameter prefix
Defines the prefix for named parameters (default
:
).
Control command prefix
Specifies the prefix for control commands like
@set
(default
@
).
Enable parameters in DDL and
$$..$$
blocks
Permits the use of parameters within DDL statements and
$$..$$
code blocks.
Enable variables
Activates variable substitution within SQL scripts.
For advanced SQL execution, Team Edition extends functionality with context variables that come from:
CLI: Command-line interface variables, which offer a hands-off approach for setting up environments. See
the Command-line guide for usage details.