Creating Indexes
Table of contents
In the process of creating tables in a database, an integral part is the creation of indexes. Indexes are tools that can significantly enhance the performance of your database. They are designed to speed up the retrieval of data from the tables, making them particularly useful in large databases where without them, searches could be time-consuming.
Indexes work by providing a more direct path to the data, reducing the need for the database to scan the entire table. They can be created on one or more columns of a table, and when a query is made, the database can use the indexes to find the data more quickly.
However, while indexes can improve the speed of data retrieval, they can also slow down data modification operations
such as INSERT, UPDATE, and DELETE, as the index must also be updated. Therefore, it's crucial to strike a balance
between the number of indexes and the frequency of data modification in your database.
This article will guide you through the process of creating, modifying, and deleting indexes using the DBeaver. It will also discuss the restrictions you need to be aware of when working with indexes, such as the impact on performance, storage considerations, and restrictions related to null values and certain data types.
Create
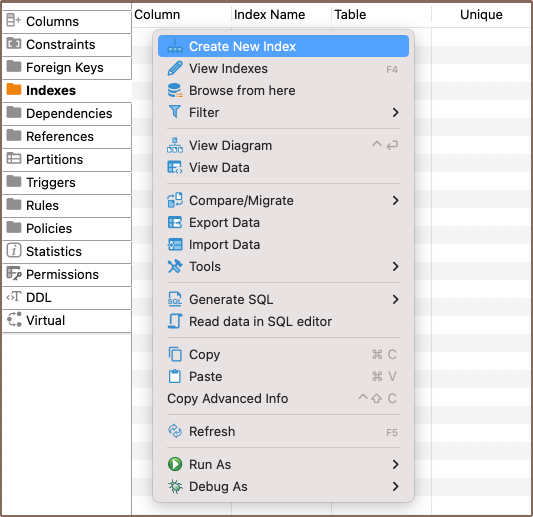
1) You can start the process of creating a new index in three ways:
Using the Properties editor: Open the Properties Editor and navigate to the Indexes tab of the corresponding table.
Using the Database Navigator: Navigate to the database where the table you want to add a index to is located. Find and select the table for which you want to create a new index. Within the selected table, you'll find a folder named Indexes.
- Additionally, to create a new index, you can utilize the Create New Index
button
 located at the bottom of the Properties editor.
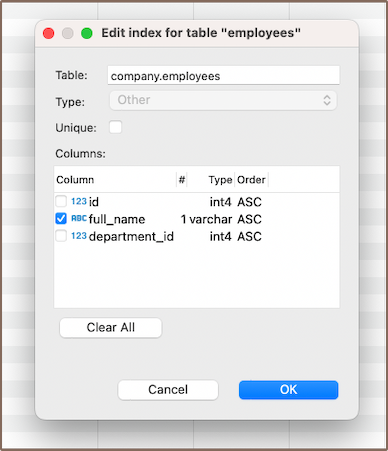
2) Depending on the method you chose in step 1, either right-click on the window (in the Properties Editor) or within the Foreign Keys folder (in the Database Navigator), and select Create New Index. If you're using the third method, simply click the Create New Index button. This will open a new window where you'll be able to customize the index's settings to suit your needs.
| Field | Description |
|---|---|
| Unique | If set to unique, the index ensures that all entries in the indexed column(s) are distinct. This can limit data entry if values must be unique. |
| Columns | This setting allows you to select one or more columns for the index. |
Note: In addition to creating a simple index on a single column, DBeaver also provides the option to create a composite index. A composite index is an index that is built on several table columns. This type of index can significantly boost query execution speed when dealing with multiple-column conditions. It's recommended to put unique fields at the end of the composite index to maximize its efficiency.
3) After you've chosen the column(s) for your index and configured any additional settings, you can finalize the creation of the index by clicking OK.
Saving changes
Once you have configured the index properties, it is essential to save these changes to the database. Until you commit your modifications, the new index will only exist within DBeaver and will not be added to the actual database table. Here are three options for committing the changes:
- Click on File -> Save -> Persist.
- Select the desired table in the Database Navigator and press Ctrl+S (or CMD+S for Mac OS), choose Persist to save the changes.
Utilize the Save button
 located at the bottom of the
Properties editor and press Persist to save the changes.
located at the bottom of the
Properties editor and press Persist to save the changes.
Modify
As your database evolves, there might be a need to modify the properties of your indexes. This could involve changing the indexed columns, adjusting the uniqueness constraint, or renaming the index. DBeaver provides the flexibility to make these modifications as required. Here's the process:
- Properties Editor: Open the Properties Editor by double-clicking on the table name. Within the selected table, you'll find a folder named Indexes. Right-click on the index you want to modify and select View Index.
- Database Navigator: In the Database Navigator, select the appropriate database and table. Within the selected table, you'll find a folder named Indexes. Right-click the index and select View Index.
Bottom Menu: In the Properties Editor interface, use the View Indexes button
 to open the properties of the selected index in the
Editor panel.
to open the properties of the selected index in the
Editor panel.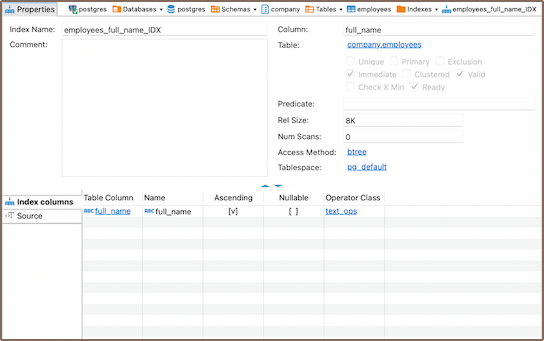
Delete
1) You can delete an index either through the Properties Editor or the Database Navigator:
Using the Properties Editor: Open the Properties Editor, navigate to the Indexes tab of the corresponding table, and find the index you want to delete.
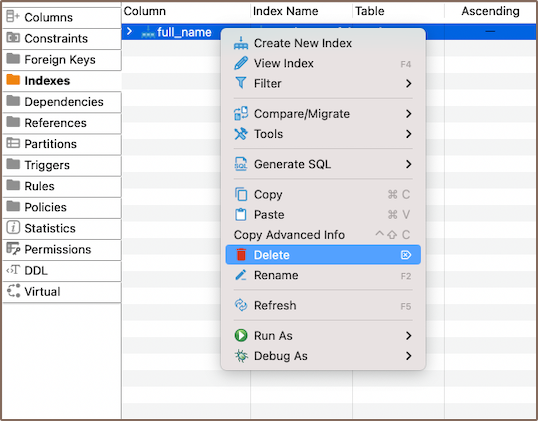
Using the Database Navigator: Navigate to the database where the table with the index is located. Open the Indexes folder, and find the index you want to delete.
2) To delete an index, right-click on the index's name and select Delete, or you can select the necessary index and
press the Delete key, or Delete button ![]() (in the
Bottom Menu of the Properties Editor).
3) A confirmation dialog will appear, asking you to confirm the deletion. Before proceeding, ensure that you've selected
the correct index for deletion.
4) After confirming the deletion, you'll need to persist the changes to apply them to the database.
(in the
Bottom Menu of the Properties Editor).
3) A confirmation dialog will appear, asking you to confirm the deletion. Before proceeding, ensure that you've selected
the correct index for deletion.
4) After confirming the deletion, you'll need to persist the changes to apply them to the database.
Restrictions
- Unique indexes created due to a primary key or unique constraint can't be deleted. Instead, remove the constraint. This action removes the uniqueness requirement for column values involved in the constraint expression and deletes the corresponding unique index.
- Unique Indexes: These enforce uniqueness on the indexed column(s), which can limit data entry if values must be distinct.
- Performance Impact: Indexes can improve query speed, but they slow down data modification operations (
INSERT,UPDATE,DELETE) as the index must also be updated. - Storage: Indexes consume disk space. This might become significant if there are many indexes or the table is large.
- Null Values: Depending on the database system, there may be restrictions related to indexing null values.
- Data Types: Certain data types might not be indexable or may require specific index types.
Further Reading:
New Table Creation | Creating columns | Implementing Constraints | Utilizing foreign keys | Creating indexes | Incorporating triggers