Project team work
Note: This feature is available in Community, Lite, Enterprise and Ultimate editions only. For Git functionality specific to the Team Edition, please refer to Team Edition Git documentation. For users of the Community edition to access Git feature, first .
Table of contents
Overview
DBeaver supports full integration with Git, a version control system. This integration allows users to maintain project configurations, scripts, diagrams, bookmarks, and other artifacts in a Git repository. It facilitates project management by enabling version control and collaboration within DBeaver.
In this guide, we will cover the foundational Git operations in DBeaver, such as creating and cloning repositories, committing changes, and pulling updates.
DBeaver's Git support is built on the Eclipse platform. For advanced Git functionalities like branching, and merging conflicts, refer to the Eclipse EGit documentation.
Important: DBeaver's Git integration is designed to work only with GitHub.
Create and share a Project repository
To share an existing project, follow these steps:
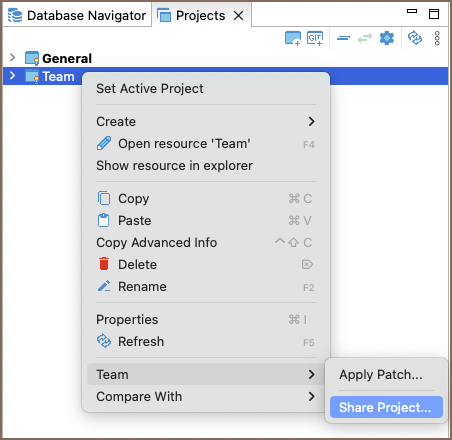
Navigate to the Projects tab, select the project you want to share, and choose Team -> Share project from the context menu.
Create a new local repository.
On the repository page on GitHub copy the repository URL/SSH.
Tip: For more details on creating GitHub repository you can refer to the official GitHub documentation.
Generate a GitHub access token in Settings -> Developer Settings -> Personal access tokens -> Tokens (classic) -> Generate new token (classic). Select all options in the
‘repo’section and‘read:org’underadmin:org.Important: DBeaver supports all types of Git tokens, including fine-grained and Personal access tokens (classic).
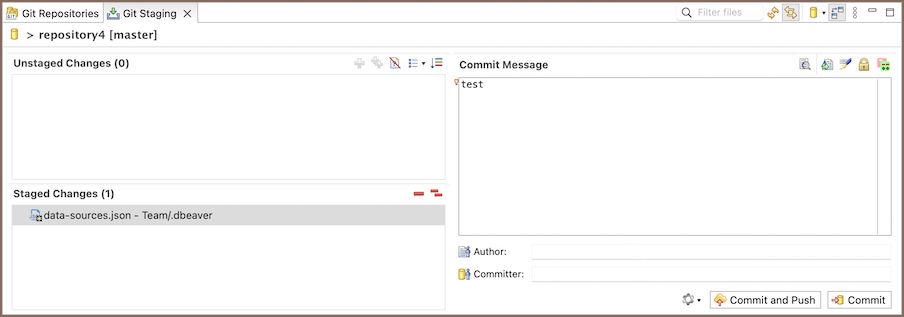
In DBeaver, right-click the project node and choose Team -> Commit… or use the shortcut Ctrl+#. Stage the files you wish to include in the commit by clicking Add. Enter a clear and concise commit message, then click Commit to finalize your changes.
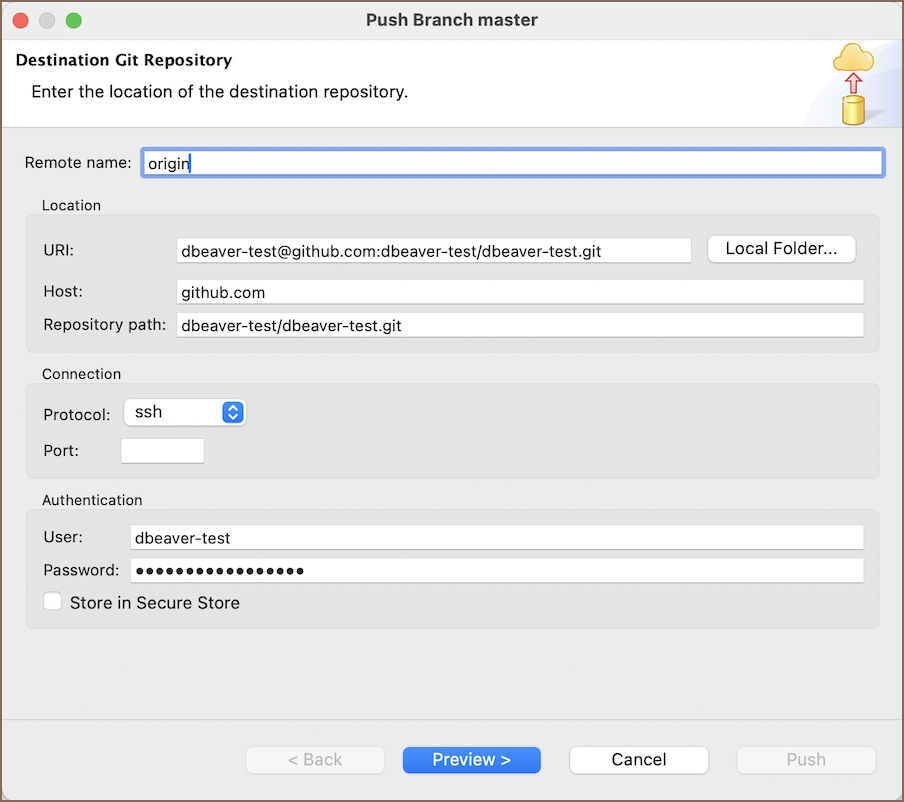
Use the Push HEAD button and paste the GitHub repository URL/SSH and provide your GitHub User and access token as the Password.
Push changes to the remote repository by using the Push button.
Cloning Existing Repositories
To clone an existing repository, ensure you have a GitHub account and follow these steps:
Click on Create Project from Git
 at the Projects Tab or
navigate through File -> Git -> Create Project from Git in the Main menu.
at the Projects Tab or
navigate through File -> Git -> Create Project from Git in the Main menu.Obtain the remote repository's URL from its GitHub page by clicking the Code button and copying the URL/SSH.
Generate a GitHub access token in Settings -> Developer Settings -> Personal access tokens -> Tokens (classic) -> Generate new token (classic). Select all options in the
‘repo’section and‘read:org’underadmin:org.In the wizard, enter the remote repository location. Use your GitHub User (it is commonly
git) and access token instead of a Password.Choose which branches to clone from the remote repository.
Define the local file system location for the repository storage and set initial configurations.
Select the desired wizard type for the project setup and complete the cloning process. The project will now be visible in the Project Explorer.
Updating remote repository with changes
After making changes to your project, such as creating, deleting, or modifying connections, scripts, or ERDs, follow these steps to update your remote repository:
Right-click on the project in the Projects tab and select Team -> Commit to open the commit interface.
In the Git Staging tab at the bottom, you will see Unstaged Changes. Use the Add Selected files to the index
 or Add all files to the index
  button to stage the changes you want to commit. Enter a
commit message and then execute the commit using the Commit button or Ctrl+Enter. The commit will then
be visible in the History tab (Window -> Show view -> Other -> Version Control(Team) -> History).
button to stage the changes you want to commit. Enter a
commit message and then execute the commit using the Commit button or Ctrl+Enter. The commit will then
be visible in the History tab (Window -> Show view -> Other -> Version Control(Team) -> History).To push your commit to the remote repository, you can use the Commit and Push button. Alternatively, to push changes manually, navigate through the project's context menu (Team -> Remote -> Push) or from the History tab by right-clicking on the desired commit and selecting Push commit. This updates your git repository with the new changes.
Pulling new changes from remote branch
To incorporate new changes from the remote branch into your local project, follow these steps:
Right-click on the project in the Project tab and select Team -> Pull. Alternatively, if you are in the Git Repositories view, you can right-click on the repository and select Pull. This action fetches and merges any new changes from the branch your local repository is tracking into your current branch.
If you have not made any local changes, or if you wish to discard your local changes and synchronize with the remote branch, you can use the Team -> Reset command. This will reset your local repository to the state of the remote repository, discarding any local changes that have not been committed.
This process ensures your project is up to date with the latest changes from the remote branch, facilitating collaboration and avoiding potential merge conflicts.
Installing the Git extension
Community Edition users can manually install the Git extension by following these steps:
Via Eclipse Marketplace:
- Visit the Eclipse Marketplace URL
- Follow the instructions to install the Git support extension directly through your DBeaver installation.
Via P2 Repository:
- Open DBeaver, and navigate to Help -> Install New Software.
- Enter the P2 repository URL in the Work with field.
- Select the Git extension from the list of available software and follow the on-screen instructions to complete the installation.
After installation, restart DBeaver for the changes to take effect, and you will have access to Git functionality within your DBeaver environment.