

Backup and restore
Note
This feature is available in Community, Enterprise, and Ultimate editions only.
DBeaver backs up and restores databases with each database's own native client tools, instead of moving data through DBeaver like the standard Data Transfer feature.
You can back up a single table, a schema, or a whole database. Select the object in the Database Navigator, right-click, and choose the backup command under Tools (or the main toolbar menu under Database -> Tools). To restore, pick the matching Restore command and point it at a backup file.
Tip
To run a SQL script directly through the database's native client, outside of restore, use the Execute script command. See Execute script with local client.
Supported databases
| Classic databases | Cloud databases |
|---|---|
| CrateDB | AlloyDB |
| Greenplum | Google Cloud SQL for MySQL |
| MariaDB | Google Cloud SQL for PostgreSQL |
| Materialize | |
| MySQL | |
| PostgreSQL | |
| SingleStore | |
| TiDB | |
| TimescaleDB | |
| Yellowbrick | |
| YugabyteDB | |
| EnterpriseDB |
Database specific settings
Each database system has its own backup and restore settings. This section covers the settings for MySQL and PostgreSQL.
MySQL
Backup MySQL database
- Select the desired database.
- Right-click on the database and choose Tools -> Dump database.
- The Dump window opens. Select the objects you need and click Next.
-
The Export configuration tab opens with these checkboxes and fields:
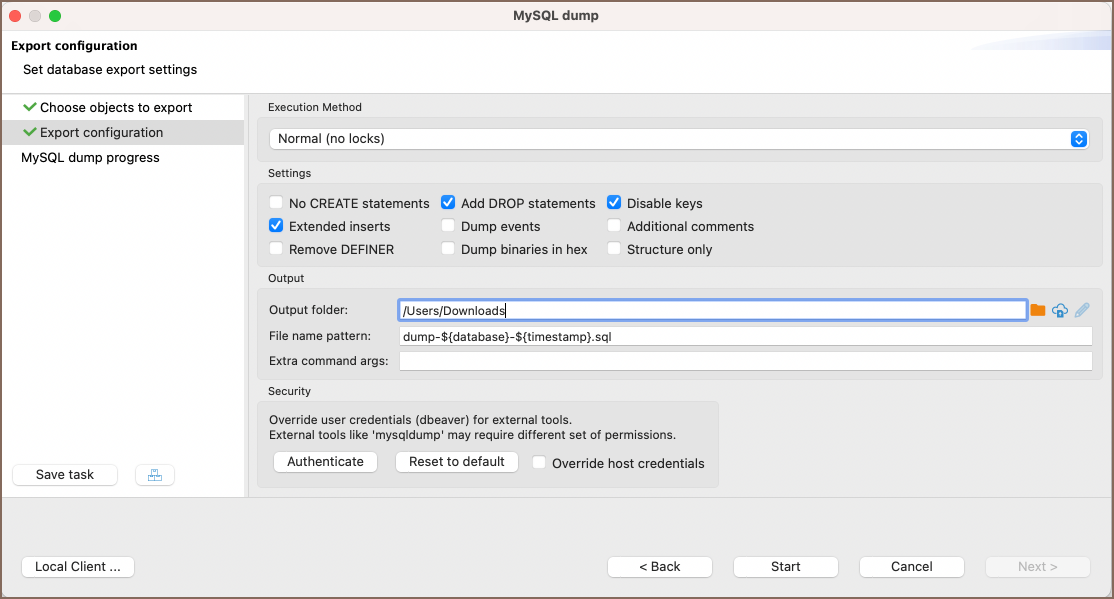
Option/Field Description Execution Method Method for execution. The default is Normal (no locks). Execution Method options: Normal (no locks): Default method. Dumps without locking any tables, so it causes minimal disruption. Online backup in single transaction: Dumps within a single transaction for a consistent snapshot. Best for transactional engines like InnoDB. Doesn't interrupt other operations but needs a higher isolation level. Lock all tables: Locks every table during the dump. Guarantees a consistent snapshot but can interrupt other operations. No CREATE statements Do not include CREATEstatements in the dump.Compressed Include the --compressflag to enable network compression during dump.Add DROP statements Include DROPstatements before CREATE statements.Disable keys Disable keys during the dump process. Extended inserts Use extended INSERTstatements in the dump.Dump events Include events in the dump. Additional comments Include comments in the dump. Remove DEFINER Remove DEFINERclause from the dump.Dump binaries in hex Display binary data as HEXin the dump.Structure only Only dump table structures, not data. Output folder Specify the directory where the dump file will be saved. For Ultimate Edition, Team Edition, and CloudBeaver versions, users have the option to save to a remote file system using the Browser remote file system button  .
.Extra command args Provide additional command-line arguments. See details in the Extra command arguments section. Authenticate Click to open the Authentication window where you can fill in the Username/Password for override. Reset to default Reset credentials to their default values. Override host credentials Use different host credentials, if necessary. Local Client Open a window to specify the path to the Local client. Learn more. Note
The particular set of configuration options depends on the database type.
-
After configuring the settings, click Start.
- When the process finishes, a notification appears with the details.
- You'll find the backup file in the folder you set in the Export configuration step.
Restore MySQL database
- Select the desired database.
- Right-click on the database and choose Tools -> Restore database.
-
The Restore window opens. Enter the path to the SQL file you want to restore from in the designated field.
Example
path:
/path/to/file.sql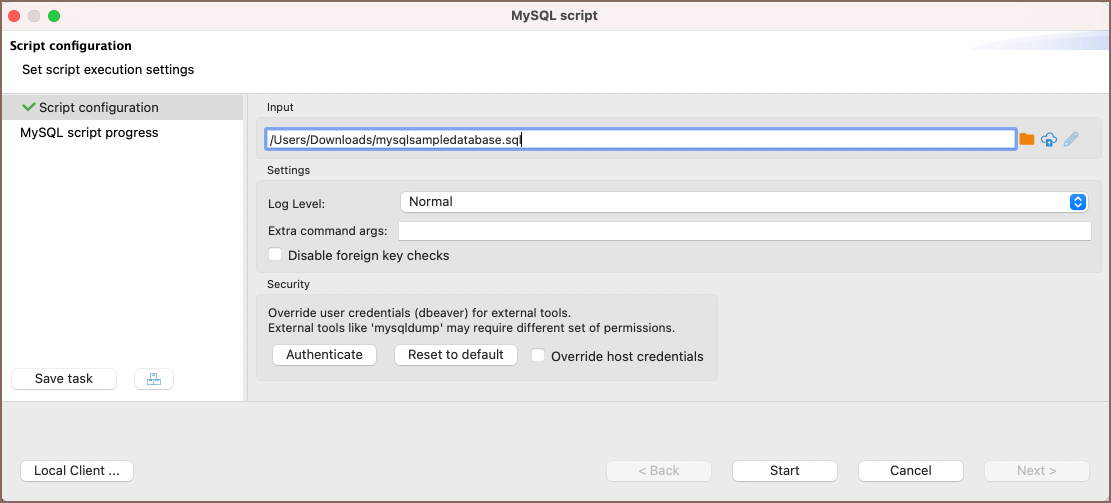
Below are the settings for the restore process:
Setting Name Description Log Level Choose the level of logging for the restore process. Log Level options: Normal: Standard logging. Captures the essential details of the restore and keeps logs short. Verbose: More detail than Normal. Adds context when you want to follow the process closely, without full debug output. Debug: The most detailed logging. Captures every event, including low-level operations. Best for troubleshooting. Extra command args Provide additional command-line arguments. See details in the Extra command arguments section. Disable foreign key checks Disable foreign key checks during the restore process. Authenticate Click to open the Authentication window where you can fill in the Username/Password for override. Reset to default Reset credentials to their default values. Override host credentials Use different host credentials, if necessary. Local Client Specify the path to the Local client. -
After configuring the settings, click Start.
- When the process finishes, a notification appears with the details.
Tip
In the input field for specifying the path to the SQL file, you can choose a file from a local directory or
use the Browser remote file system button to select a file
from a remote file system. This functionality is accessible to users of the Ultimate Edition, Team Edition, and
CloudBeaver.
PostgreSQL
Backup PostgreSQL database
- Select the desired database.
- Right-click on the database and choose Tools -> Backup.
-
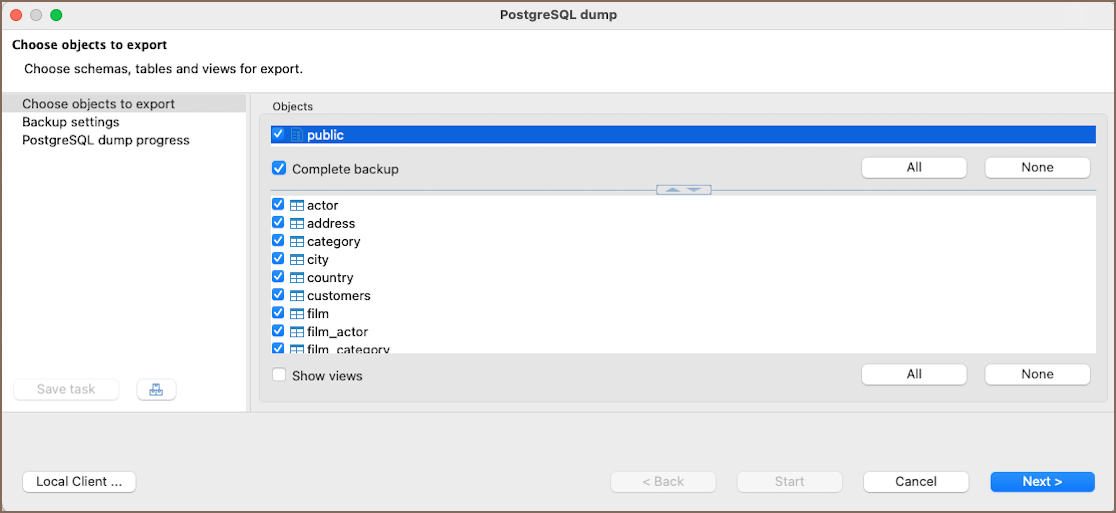
The Dump window opens. Select the objects you need and click Next.
Note
By default, when all schemas are selected, DBeaver enables the Complete backup checkbox and skips
-nflags in thepg_dumpcommand to include all database objects. Clear the checkbox to add-nfor each selected schema and back up only those. For details, see thepg_dump--schema documentation.Warning
When you select more than one schema, DBeaver ignores individual table selections and backs up each selected schema in full. To back up specific tables, select a single schema.
-
The Backup settings tab opens with these checkboxes and fields:
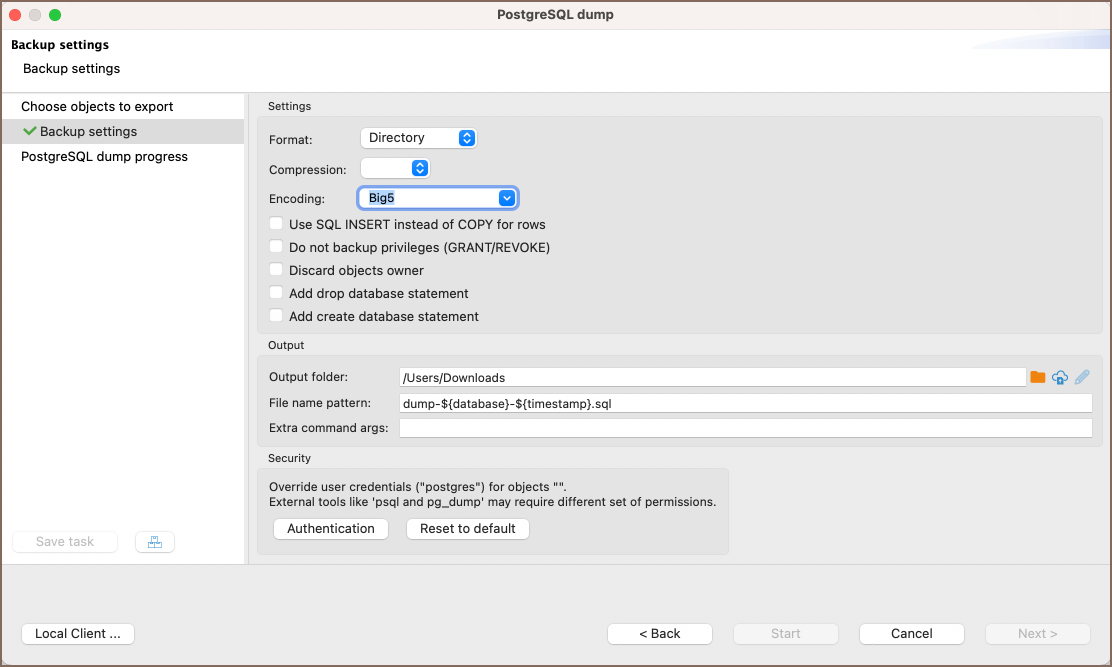
Setting Description Format Choose the format for the dump. Options include Directory, Tar, Custom, and Plain. Format options: Directory: Splits the output into one file per table. Suitable for larger databases as it facilitates parallel restoration. Tar: Produces archive in tar format. Useful for backups since it can be read by standard tools. Custom: A flexible format that allows selective restore and other operations. Plain: Produces plain-text SQL script file. It can be used with psql for restoring. Compression Set the compression level for the dump, ranging from 0 (no compression) to 9 (maximum compression). Encoding Select the character encoding for the dump. The available encodings depend on database configuration and locale. Use SQL INSERT instead of COPY for rows Use the INSERTcommand instead of theCOPYcommand for row data.Do not backup privileges (GRANT/REVOKE) Exclude privilege commands ( GRANT/REVOKE) from the dump.Discard objects owner Exclude the ownership information from the dump. Add drop database statement Include a statement in the dump to drop the database before restoring. Add create database statement Include a statement in the dump to create the database when restoring. Output folder Specify the directory where the dump file will be saved. For Ultimate Edition, Team Edition, and CloudBeaver versions, users have the option to save to a remote file system using the Browser remote file system button.File name pattern Define the naming pattern for the dump file, with variables like ${database}and${timestamp}to customize the filename.Extra command args Provide additional command-line arguments. See details in the Extra command arguments section. Authentication Click to open the Authentication window where you can fill in the Username/Password for override. Reset to default Reset credentials to their default values. Override host credentials Use different host credentials, if necessary. Local Client Specify the path to the Local client. Note
The particular set of configuration options depends on the database type.
-
After configuring the settings, click Start.
- When the process finishes, a notification appears with the details.
- You'll find the backup file in the folder you set in the Backup settings step.
Global PostgreSQL database backup
When performing a Global PostgreSQL database Backup, the entire database is dumped, including roles and tablespaces. This differs from standard backup procedures where only specific schemas and their contents can be selected. Additionally, multiple databases can be chosen for backup at once in the global method.
To run a global backup:
- Select the desired database.
- Right-click on the database and choose Tools -> Global Backup.
- The Global Dump window opens. Select the objects you need and click Next.
-
The Backup settings tab opens with these checkboxes and fields:
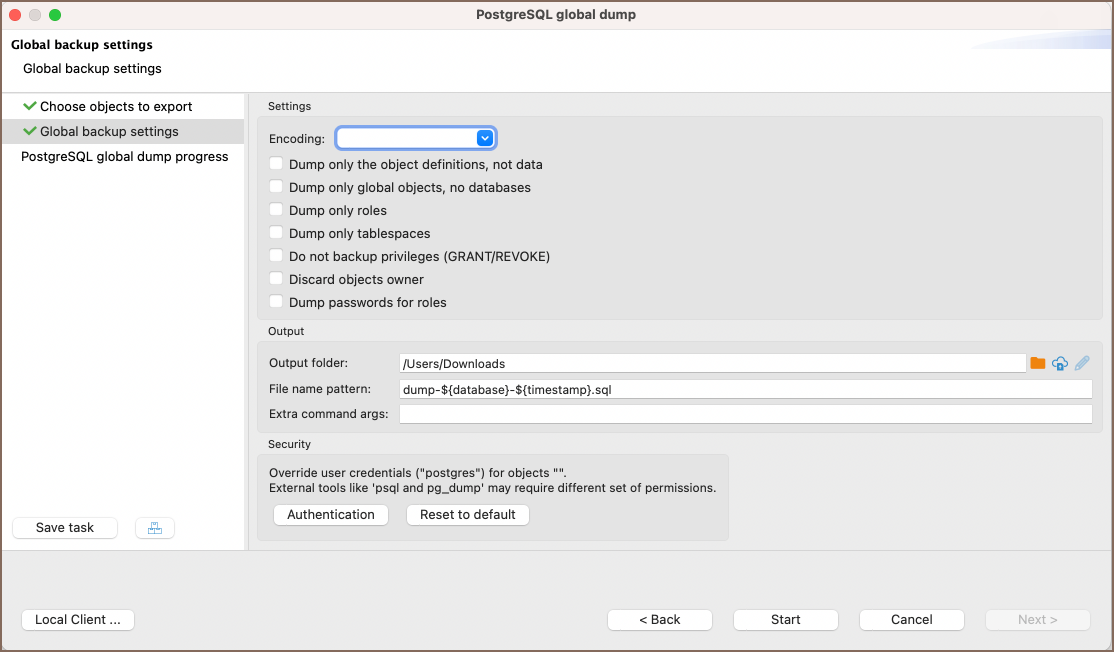
Setting Description Encoding Set the character encoding for the backup. Dump only the object definitions, not data Includes only the structure of the database objects, excluding the data. Dump only global objects, no databases Includes only global objects and excludes individual databases. Dump only roles Includes only user roles. Dump only tablespaces Captures only tablespaces without the databases. Do not backup privileges (GRANT/REVOKE) Excludes privilege statements like GRANTandREVOKE.Discard objects owner Excludes the ownership information of the database objects. Dump passwords for roles Includes passwords associated with the user roles. Output folder Specify the directory where the dump file will be saved. For Ultimate Edition, Team Edition, and CloudBeaver versions, users have the option to save to a remote file system using the Browser remote file system button .File name pattern Define the naming pattern for the dump file, with variables like ${database}and${timestamp}to customize the filename.Extra command args Provide additional command-line arguments. See details in the Extra command arguments section. Authenticate Click to open the Authentication window where you can fill in the Username/Password for override. Reset to default Reset credentials to their default values. Override host credentials Use different host credentials, if necessary. Local Client Specify the path to the Local client. -
After configuring the settings, click Start.
- When the process finishes, a notification appears with the details.
- You'll find the backup file in the folder you set in the Global backup settings step.
Restore PostgreSQL database
- Select the desired database.
-
Right-click on the database and choose Tools -> Restore.
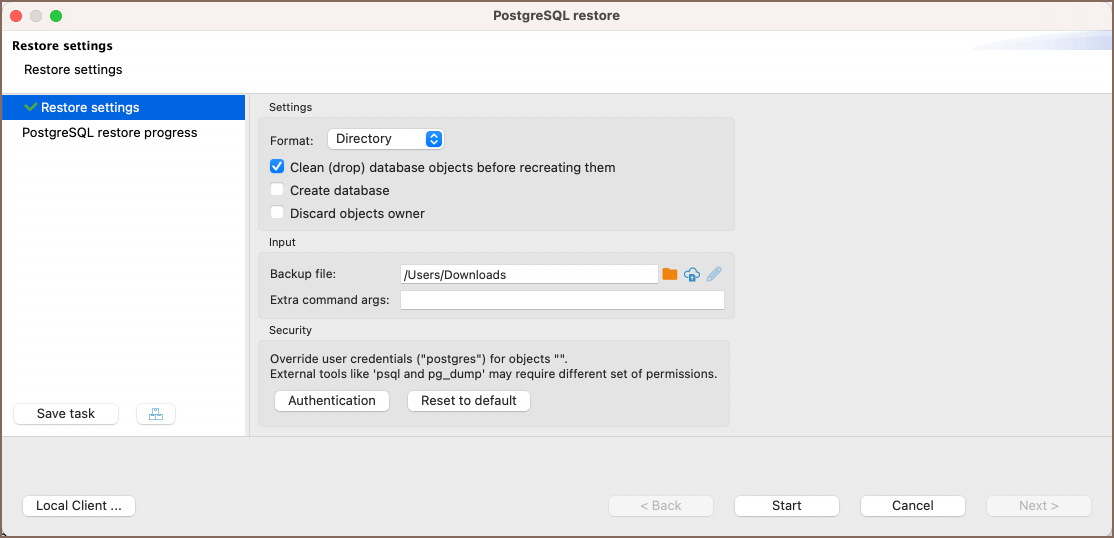
Setting Description Format Choose the format for the restore operation. Options include Directory, Tar, Custom, and Plain. Format options: Directory: Assumes the input consists of one file per table. Suitable for larger databases as it supports parallel restore. Tar: Assumes the input is an archive in tar format. This is useful when restoring backups made in tar format. Custom: A flexible input format that allows selective restore and other operations. Plain: Assumes the input is a plain-text SQL script file. Suitable for scripts that can be executed with psql. Clean (drop) database objects before recreating them Drop database objects before recreating them from the backup. Create database Create a new database from the backup. Discard objects owner Exclude ownership information during the restore. Backup file Specify the path to the backup file that you wish to restore. For Ultimate Edition, Team Edition, and CloudBeaver versions, use the Browser remote file system button to select a backup file from a remote file system via Cloud Storage.Extra command args Provide additional command-line arguments. See details in the Extra command arguments section. Authentication Click to open the Authentication window where you can fill in the Username/Password for override. Reset to default Reset credentials to their default values. Local Client Specify the path to the Local client. -
After configuring the settings, click Start.
- When the process finishes, a notification appears with the details.
Extra command arguments
The Extra command args field takes extra command-line arguments, giving you finer control over the dump.
For example, when configuring backup/restore for PostgreSQL, you may want to exclude specific tables. To exclude a table
named employee_data, use the --exclude-table option. Enter --exclude-table=employee_data in the Extra command
args field during the setup process.
By doing this, the resulting process won't contain any data or structure from the employee_data table.
Note
Always consult the database's official documentation for a comprehensive list and explanation of available command-line arguments.
Dump and restore operations as tasks
You can set up both restore and dump operations as tasks. To save an operation as a task, click the Save
task button  during the dump/restore process.
Info
For detailed instructions and features related to task management in DBeaver, refer to Task management article.
Troubleshooting
Backup, restore run through the database's native client tools. DBeaver doesn't bundle these tools, so you point it at a local installation.
Native client not found
DBeaver reports that the client binaries location isn't set, or that the client home can't be found. It couldn't locate the native client on your machine.
Install the client tools, then set the folder with the Local Client button in the tool window, or in the connection settings.
Info
For details, see Local Client Configuration.