

Oracle authentication
Configure an Oracle connection with Basic, Transparent Network Substrate (TNS), or Custom settings. Then choose the authentication method required by your environment.

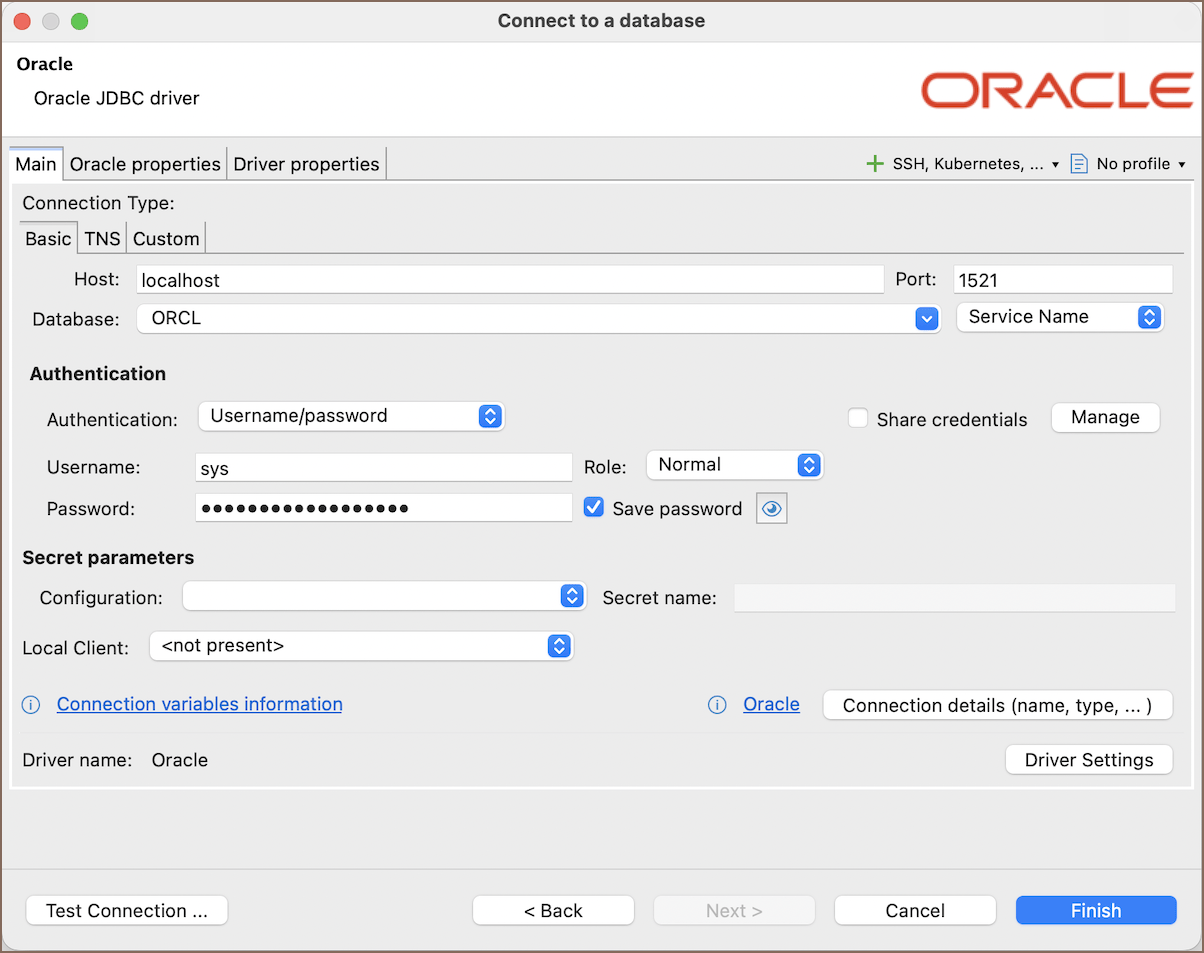
Oracle connection types
Use this section to configure how DBeaver connects to Oracle. Follow the procedure for your connection method.
Basic connection type
Use Basic to connect directly to an Oracle host.
- Select Basic in the connection settings.
- Enter Host, Port, and Database, then select Service/SID.
| Parameter | Description | Example |
|---|---|---|
| Host | Server host name | 192.168.1.25 |
| Port | Server listener port | 1521 |
| Database | Service or system identifier (SID) name | ORCL |
| Service/SID | Database identifier type required by the server | SID |
| Authentication | Authentication method for the connection; see Choose an authentication method |
For a service, DBeaver uses jdbc:oracle:thin:@//host:port/service. For a SID, it uses
jdbc:oracle:thin:@host:port:SID.
TNS connection type
Use TNS when you have a tnsnames.ora file that defines Oracle network aliases.
- Select TNS in the connection settings.
- Configure the TNS settings.
| Parameter | Description |
|---|---|
| TNS names path | Path to tnsnames.ora; DBeaver loads the available aliases from this file |
| Network Alias | Alias that identifies the database connection |
| Authentication | Authentication method for the connection; see Choose an authentication method |
DBeaver can detect the default tnsnames.ora location. You can also specify the path manually.
Custom connection type
Use Custom when you need to provide the complete Java Database Connectivity (JDBC) URL.
- Select Custom in the connection settings.
- Configure the Custom settings.
| Parameter | Description |
|---|---|
| JDBC URL Template | Complete JDBC URL for the connection |
| Authentication | Authentication method for the connection; see Choose an authentication method |
Connect to Oracle Autonomous Database with a Custom URL
Use this workflow to connect to Oracle Autonomous AI Database Serverless with JDBC Thin TLS without a wallet.
- Configure network access for the database endpoint. You can allow secure access from everywhere, use access control rules for IP addresses or CIDR blocks, configure VCN rules, or use a private endpoint. For information on access control rules, see Configure access control lists.
- In the Oracle Cloud console, open Database connection -> TLS Authentication -> TLS, and copy the connection string.
- In DBeaver, select Custom, and enter the complete connection string in JDBC URL Template.
For information on this connection method, see Connect JDBC Thin with TLS authentication without a wallet. For an overview of JDBC Thin connection options, see Connect with JDBC Thin.
Example
Oracle Cloud URL:
jdbc:oracle:thin:@(description=(retry_count=20)(retry_delay=3)(address=(protocol=tcps)(port=1522)(host=adb.us-ashburn-1.oraclecloud.com))(connect_data=(service_name=xxxxxxxxxxxxxxxxx_high.adb.us-ashburn-1.oraclecloud.com))(security=(ssl_server_cert_dn="CN=adwc.uscom-east-1.oraclecloud.com, OU=Oracle BMCS US, O=Oracle Corporation, L=Redwood City, ST=California, C=US")))
Info
For information on connections that use the Oracle Call Interface (OCI) driver, see Connect with the JDBC OCI driver.
LDAP connection type
Use the LDAP connection type to connect to Oracle through a manually configured LDAP directory entry. DBeaver uses the entry to retrieve the Oracle connection descriptor.
To configure an LDAP connection:
- Select LDAP as the connection type.
- Enter the directory and authentication settings in the following table:
| Parameter | Description |
|---|---|
| LDAP server | Required LDAP server host name |
| Port | LDAP server port, default 389 |
| Network Service Alias | Required Oracle service alias stored in LDAP |
| Oracle context | Required LDAP context containing the Oracle service entry |
| LDAP principal | Optional LDAP directory principal |
| LDAP password | Optional password for the LDAP principal |
| Database authentication (optional) | Optional Oracle database credentials and wallet settings |
| Username | Optional Oracle database username |
| Role | Optional database role: Normal, SYSDBA, or SYSOPER |
| Password | Optional Oracle database user password |
| Save password | Option to save the database password |
| Wallet location | Optional Oracle wallet directory |
| Wallet password | Optional Oracle wallet password |
- DBeaver automatically retrieves the Oracle connection details from LDAP.
Authenticate with Microsoft Entra ID
When the LDAP configuration uses Microsoft Entra ID interactive authentication, DBeaver opens the Entra settings and automatically fills Tenant ID, Client ID, and Scope. Review the populated settings, and continue authentication.
Troubleshoot LDAP and Microsoft Entra ID
Can not extract wallet archive: The wallet archive is invalid, can't be extracted, or can't be stored. Select a valid wallet archive and verify that DBeaver can write to its credential or certificate storage location.- Can't continue from the Microsoft Entra ID settings: Tenant ID or Client ID is empty, or Client secret is empty when Client secret authentication is selected. Enter Tenant ID and Client ID, and also Client secret when using Client secret authentication.
Choose an authentication method
Username/password
Enter the Oracle database credentials and role.
| Parameter | Description | Example |
|---|---|---|
| User name | Database user name | SYS |
| Password | Database user password | |
| Role | Connection role, such as Normal, SYSDBA, or SYSOPER | Normal |
| Save password | Saves the credentials in the local DBeaver configuration |
OS authentication
Configure Oracle and Oracle Client before selecting OS authentication in DBeaver.
- Create or map the OS account to an externally identified Oracle database user. Oracle prepends the
OS_AUTHENT_PREFIXvalue to the OS username during mapping. For information on configuring users and name mapping, see Operating System Authentication of Users. - Install and configure Oracle Client for the passwordless external authentication path through the OCI driver. For information on Oracle JDBC requirements, see JDBC Client-Side Security Features.
-
Configure the JDBC OCI driver in DBeaver.
Note
Remote OS authentication over TCP is disabled by default and requires Oracle-side configuration by an administrator.
For information on configuring the OCI driver in DBeaver, see Connect to Oracle Database using the JDBC OCI driver.
-
Select OS authentication and leave the username and password empty. DBeaver uses the current OS user.
Kerberos
For information on Kerberos authentication, see Kerberos authentication.
Microsoft Entra ID
For information on direct Microsoft Entra ID authentication, see Authentication with Microsoft Entra ID.
Oracle Wallet
Oracle Wallet stores security keys and can also contain database credentials or TNS configuration.
- Extract the wallet archive to a local folder.
- Select Oracle Wallet as the authentication method.
- Enter the folder in Wallet location.
- Enter Wallet password if the wallet is password-protected.
- Enter the database user name, password, and role if the wallet doesn't contain database credentials.
Connect to Oracle Autonomous Database with a wallet
Use this mutual TLS workflow to connect to Oracle Autonomous AI Database Serverless. TNS reads the connection alias
from the wallet's tnsnames.ora file, while Wallet location supplies the wallet files.
- Download the wallet from Oracle Cloud.
- Extract the archive to a local folder.
- Select TNS as the connection type.
- Set TNS names path to the
tnsnames.orafile in the extracted wallet folder. - Select the required Network Alias.
- Select Oracle Wallet as the authentication method, as described in the parent section, and enter the database user name and password.
- Set Wallet location to the extracted wallet folder.