Create connection
CloudBeaver provides multiple methods to set up a connection. To create a connection, do one of the following:
Create a new connection
-
Initiate new connection:
- Click the
+button in the top menu. - Select New Connection from the dropdown options.
- Click the
-
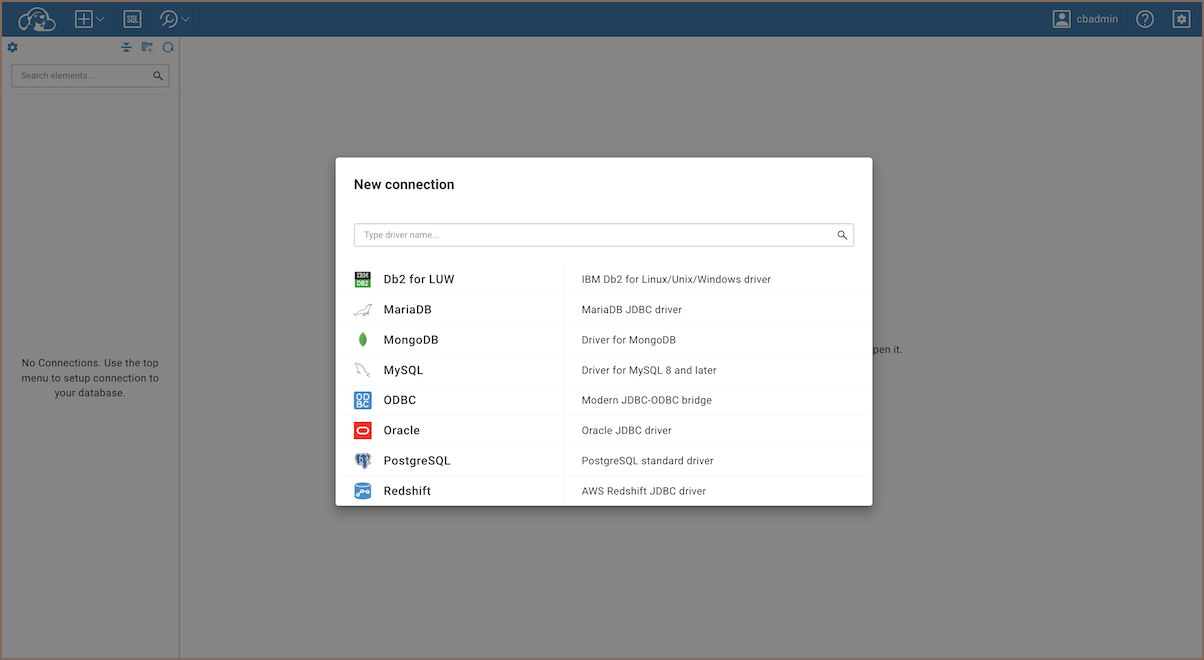
Select the appropriate driver from the available options.
Note
If no driver is available for your database, you may need to create a custom driver. By default, some drivers require downloading. If a driver is missing, you’ll see a warning message.
-
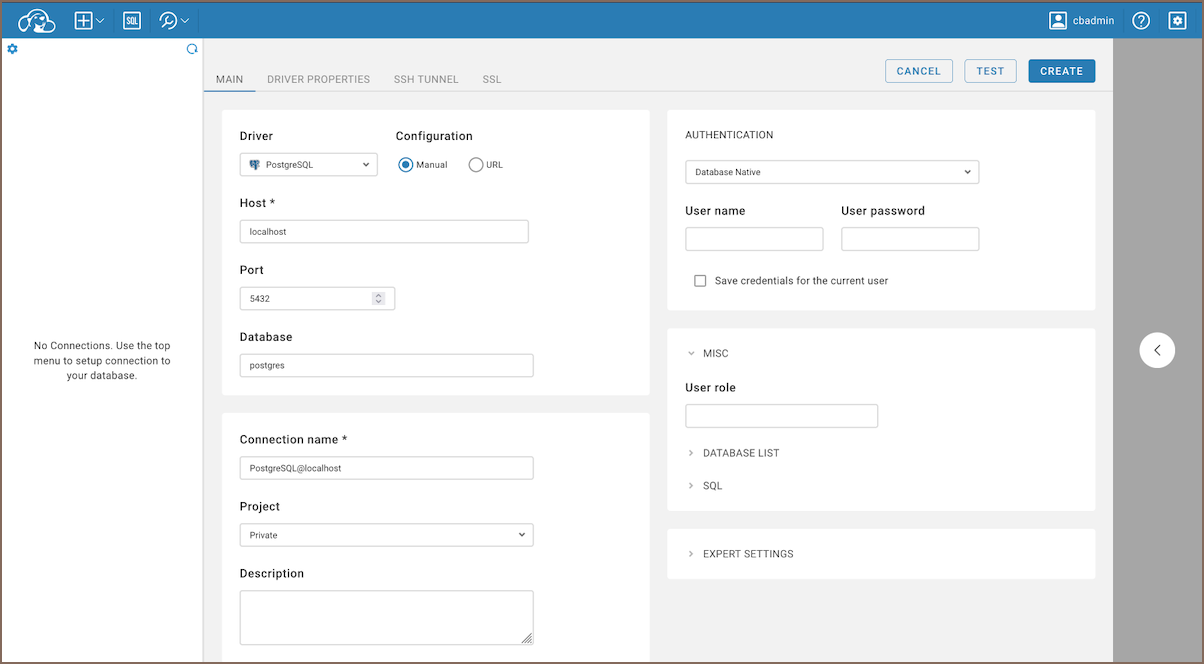
Enter all necessary details in the form fields provided. For detailed steps on filling out these fields, refer to the section below.
-
Test the connection (optional):
- Click the Test button to ensure the connection parameters are correct.
-
After confirming all details, click the Create button.
Access and modify connection
To edit the connection details, click the context button next to the connection name and choose Manage -> Edit Connection.

Use the Cloud Explorer
Cloud connections are set up through your cloud service provider and automatically populated in your navigator tree, based on configurations managed by the server administrator.
Info
For details on configuring and managing cloud connections, see the Cloud Explorer.
Configure connection settings
In the New connection wizard, on the Main tab, you need to set all primary connection settings.
Here's what you typically need to configure:
| Setting | Description |
|---|---|
| Host | The address of your database server   . . |
| Port | The port number used to connect. |
| Database | The name of the database you want to connect to. |
| Connection name | A name you choose for this connection. It shows up in the Database Navigator. |
| Project | Links the connection to a specific Project. You can choose between "Shared" and "Private". |
| Description | A short description of the connection. |
| Authentication | Choose the type of authentication the database requires. |
Private and shared connections
Each connection belongs to a project - either Private or Shared. Private connections are only visible to you. Shared connections are managed by the administrator and accessible to multiple users or teams.
The project type also affects how credentials are saved:
| Project | Option | Description |
|---|---|---|
| Private | Save credentials for the current user. | These credentials will be used to make automatic connection. |
| Shared | Save credentials for all users with access. | These credentials will be used to make automatic connection for all users having access. For more details, see Users and Teams. |
Note
Save credentials checkbox ignored when using Secret Providers.
Expert settings
| Setting | Description |
|---|---|
| Keep alive (in seconds) | Sets the interval in seconds for sending signals to keep the connection active. Set to 0 to disable. |
| Auto commit | Automatically commits changes during a transaction if enabled. For more information, see Auto and Manual commit |
Note
The number and type of connection properties depend on the driver.
Additional settings
When setting up a new connection, you may need to configure additional options:
| Additional tab | Description |
|---|---|
| Driver Properties | Each driver has its own set of additional properties. |
| SSH Tunnel | Configure an SSH tunnel if your database requires a secure connection. |
| SSL | Enable and configure SSL if your connection requires encryption. |
Secure Storage with Secret Providers
Note
This feature is available in Enterprise edition only.
CloudBeaver supports various cloud-based secret providers to retrieve database credentials securely. For detailed setup instructions, see Secret Providers.
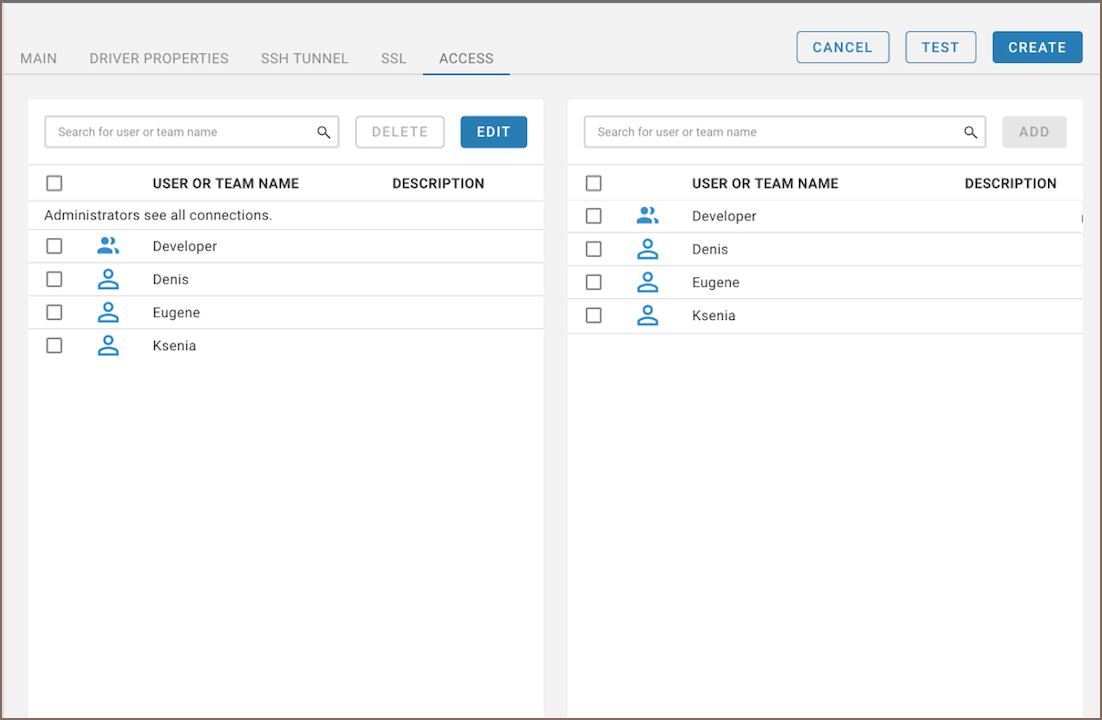
Manage access permissions
In the Community, Enterprise and AWS Editions, you can manage access permissions for a database:
- Initiate the creation of a new database connection as an administrator.
- Find the Project dropdown menu and select Shared project.
- Complete the necessary fields based on the selected type of credentials.
-
Go to Access tab, click Edit, check the box next to their names and click the Add button.
To manage access permissions for a database, ensure the Enable private connections setting is configured correctly in the Server configuration settings:
- If Enable private connections is turned on, switch the project mode to Shared from the dropdown menu of the Project settings to access the Access tab.
- If Enable private connections is turned off, the Access tab is available by default.
Note
For Private projects, credentials saved during connection creating or database login are stored permanently for the current user. For Shared projects, credentials saved while creating a connection are available to all users with access, but if saved during login, they are retained only for the current session.
Use pre-configured connections
You can pre-configure database connections (datasources) in data-sources.json before the server starts - useful when
you deploy the server repeatedly and don't want to create connections manually in the UI each time.
Info
For details, see Configuring server datasources.