

Data migration
Data Migration in Team Edition provides the functionality to transfer data between different databases or between tables within the same database.
Data migration process
Step 1 Define the data source
To initiate the data migration, you need to select your data source. Follow the steps below:
- Navigate to the Connections.
- Select one or multiple tables that you want to export.
- Right-click to open the context menu.
- Choose Export Data from the options.

Alternatively, you can export data from a custom SQL query. Execute the query and then choose Export Data from the results context menu.
Tip
You can start the migration through AI by sending a short request in AI chat. See Data transfer actions for supported commands.
Step 2 Define data transfer target type
After selecting the data source, the next step is to specify the type of destination for the data transfer. Choose Database type as the data transfer target and press Next.
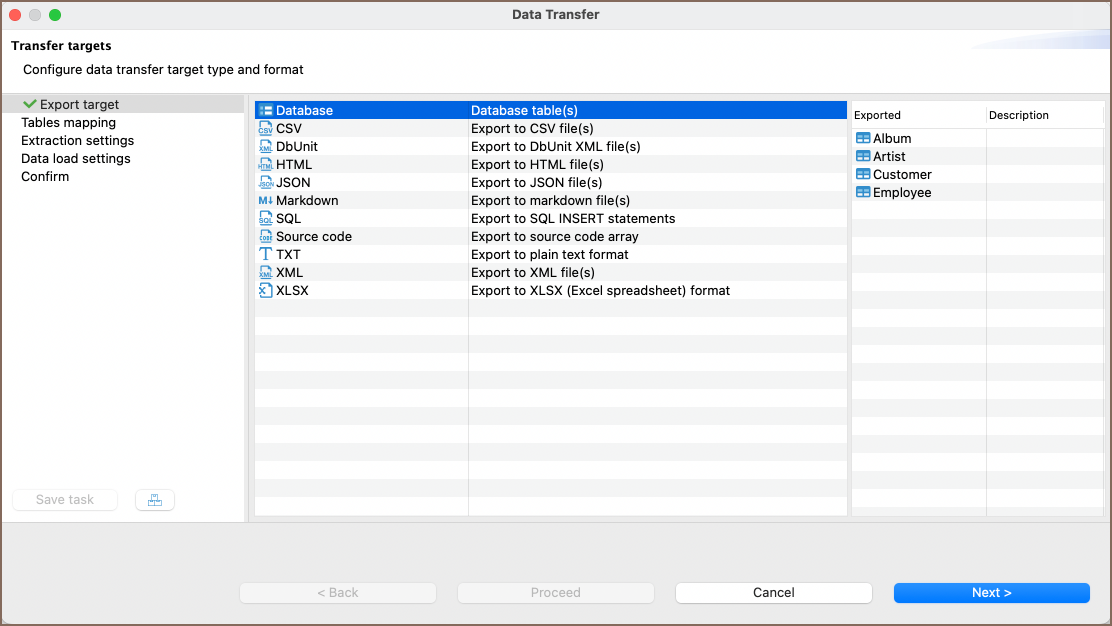
Step 3 Tables mapping
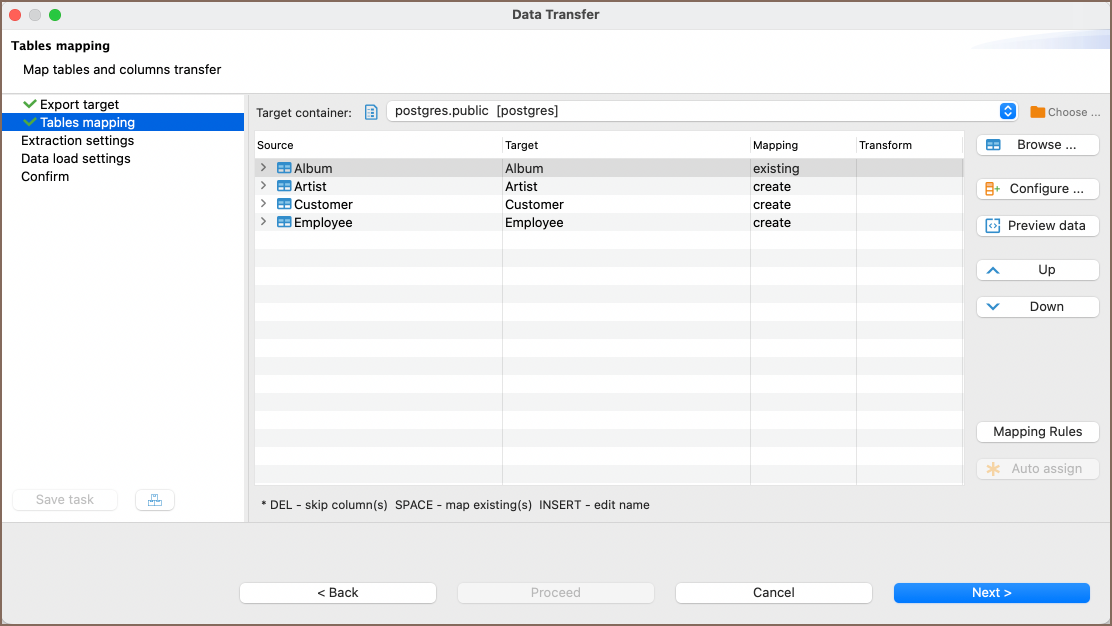
Once you have chosen Database as the transfer target type, the next step involves mapping data. This process includes specifying options, selecting the target container, and setting other configurations. Configure your data mapping settings and press Next to proceed to the next step.
Available options
| Icon | Option | Description |
|---|---|---|
 |
Customize | Opens additional settings. For details, see the Configure section. |
 |
Preview data | Shows a preview of the data to be transferred. |
 |
Smart mapping | Automatically maps source tables and columns to target names and types using AI. It analyzes sample data and schema structure, then suggests how to name the new tables and columns in the target database. In the Mapping Rules, you can choose how AI matches columns. |
 |
Mapping Rules | Choose how new tables and column names are transformed when transferring data. For details, see Mapping Rules section. |
Note
Smart mapping is available only when AI is enabled. For setup instructions, see AI Assistant setup.
Fields:
| Option | Description |
|---|---|
| Target container | Defines the database or schema for the data transfer. For more details, see the Target Container section. |
| Source | Displays the names of selected tables and their columns. |
| Target | Shows the names of destination tables. |
| Mapping | Shows the mapping state for each table and column. For more details, see the Mapping section. |
Target container and target table
Specify target container
Use the Target container selector at the top of the Tables mapping page to choose the database or schema where the data will be transferred. Select Choose to browse for a target container.
Define a target table

You can specify the target table where the data will be transferred in multiple ways:
-
Manual Entry: Click on a cell in the Target column and manually enter the name of the table where you wish to transfer the data.
-
Drop-down list: Use the drop-down list next to the Target column to choose among the following options:
- Pre-existing table names.
- Skip: Skips the data transfer for this table.
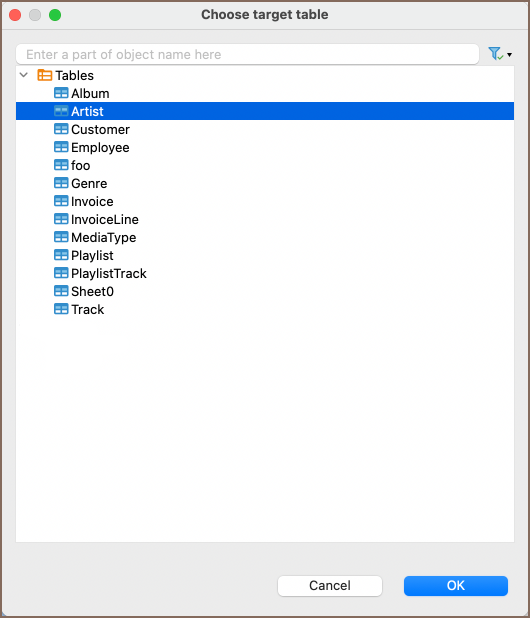
- Browse: Opens the Choose Target Table window
-
Browse button: Click the Target cell for the desired Source row, then click the three dots button (
 ).
).
Mapping
Use the Target column to choose where Team Edition transfers each table. The icon in the Mapping column shows the mapping state; it isn't an editor.

| Mapping state | How Team Edition sets the state |
|---|---|
| Create | Sets this state when the target name doesn't match a table in the target container. Team Edition creates the table during the transfer. |
| Skip | Excludes the table from the transfer. |
| Existing | Sets this state when the target name matches an existing writable table. Team Edition transfers data to that table. |
| Recreate | Drops the selected target table and creates it again. Existing data, keys, indexes, and other table objects can be lost. |
To map a table to an existing target, select the table from the Target drop-down list or choose Browse. To create a new table, enter a target name that doesn't exist in the target container. Team Edition resolves the mapping state from the selected target.
To skip a table, clear its checkbox in the mapping list. To recreate an existing table, select it and enable Drop and create the table in the bottom controls. This option is available only for a selected table with an Existing or Recreate mapping state.
Tip
If the cells are marked with  , it means that in the target table, there are no
columns with matching names, otherwise the names will be filled in automatically.
, it means that in the target table, there are no
columns with matching names, otherwise the names will be filled in automatically.
Transform column values
To transform column values during the transfer, select a column in the mapping list and enable Transform in the bottom controls. Choose one of the following options:

| Option | Description |
|---|---|
| Set to NULL | All values in the corresponding column are set to null. |
| Constant | Sets column value to a constant value. |
| Expression | Uses JEXL expressions to calculate the column's value. |
The transformer changes values during the transfer and doesn't change the source data. Configure additional settings after selecting Constant or Expression.
Migrate constraints
To transfer constraints together with the data, expand Migrate constraints on the Tables mapping page and select the constraint types to create:
- Primary keys create primary key constraints for newly created target tables.
- Foreign keys create foreign key constraints between transferred tables and tables found in the target schema.
Review the detected constraints in the mapping list. Use the mapping controls to create, reuse, or skip a constraint, and adjust the target table and columns for foreign keys when necessary.
Configure
Click Customize to open the Configure metadata structure window. The available settings are distributed across the following tabs:
Column mapping
By navigating to the Column mapping, you can explore detailed mapping between the source and target columns.
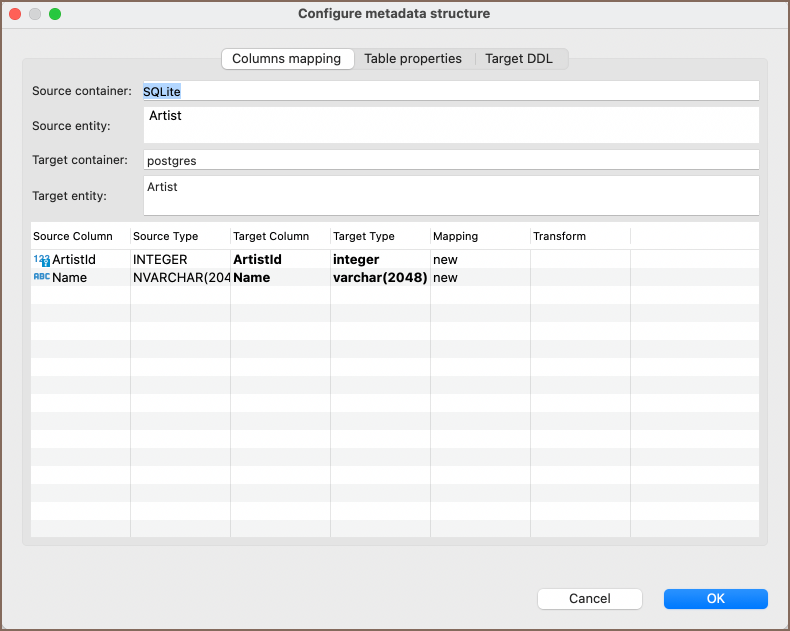
| Element | Description |
|---|---|
| Source Column | Contains names of columns existing in the selected source table. |
| Source Type | Lists the data types assigned to the columns in the selected source table. |
| Target Column | Contains names of columns in the target table where the data from the source column will be transferred. |
| Target Type | Lists the data types that will be assigned to the columns in the target table. |
| Mapping | Contains the list of actions to be applied to the data on data transfer. |
| Transform | Displays transformations for the data in a column during the transfer. |
Important
Data types that are supported in the source database may not be supported in the target, and vice versa. To set a data type for a target column, click the cell in the Target Type column and choose from the dropdown list.
Table properties
By selecting the Table properties tab, you can modify properties of the target table, such as:
| Property | Description |
|---|---|
| Tablespace | Specifies the tablespace for the target table. |
| Partition By | Sets the partitioning for the target table. |
| Comment | Allows you to add comments to the target table. |
Note
The availability of these settings may vary depending on the database you are using.
Target DDL
By selecting the Target DDL tab, you can view the SQL script that will be executed during the data transfer.
If you're exporting data to a new table or recreating an existing one, the tab will display the necessary SQL statements. If not, the DDL tab will remain empty.
Mapping Rules
Clicking the Mapping Rules button opens a window that provides options for customizing how new tables and column names are transformed during the data transfer.

In the window, the following settings are available:
| Option | Description |
|---|---|
| Name case | Sets the letter casing for table and column names. Choices include Default, Upper case, and Lower case. |
| Replace spaces | Determines how spaces in table and column names are handled. Options are: Do not replace, Replace with underscore, and Remove, convert to CamelCase. |
| Max data type length | Sets the maximum length for data types. |
| Save current changes to global settings | If checked, saves the current mapping rules to global settings. Otherwise, they will be saved at the data source settings level. |
| Global settings | Opens the global settings window for Names Mapping Rules. Alternatively, to open global settings, go to Window -> Preferences -> Connections -> Data Transfer |
| Choose mapping strategy | Defines how AI Custom Mapping matches columns between source and target tables. You can choose to match by Data types, Column names, or Data types and column names. This option is used when clicking the Smart mapping button. |
In addition to using the Global settings button, you can also access these settings by navigating to Window -> Preferences -> Connections -> Data Transfer.
Important
After modifying the Mapping Rules settings, you will be prompted to confirm your changes. Modifying the Mapping Rules may result in the loss of names that were already changed.
Keyboard shortcuts
The following keyboard shortcuts for easy navigation within the mapping table area of the Tables mapping tab are supported:
| Shortcut | Action |
|---|---|
| Up | Move one row up. |
| Down | Move one row down. |
| Right | Expand list of source table columns. |
| Left | Collapse list of source table columns. |
| Space | Auto-assigns the target. |
| Shift | Edit the selected name. |
| Del | Sets mapping type to skip. |
Step 4 Extraction settings
After setting up your table mappings, the next step is to define how the data will be extracted from the source. The Extraction settings tab offers various options to optimize this process. Configure these settings to suit your specific data transfer requirements and press Next.
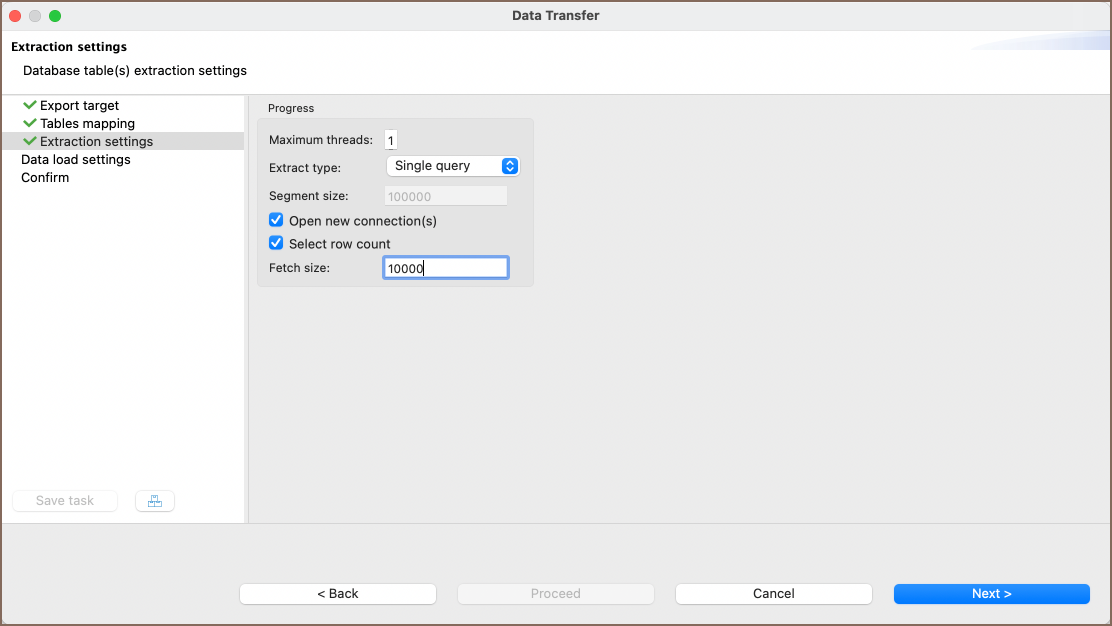
| Option | Description |
|---|---|
| Open new connection(s) | If checked, a new connection is established, ensuring data transfer does not affect other database operations. |
| Select row count | Enables a progress bar to display data migration status. |
| Maximum threads | Defines the number of threads to be used for data transfer. |
| Fetch size | Indicates the number of rows fetched per server round trip, affecting extraction performance. |
| Extract in batches | Extracts data in batches instead of a single query. |
| Segment size | Sets the size of each data segment when Extract in batches is selected. |
Step 5 Data load settings

After configuring the extraction settings, you'll need to specify how the data will be loaded into the target database. The Data load settings tab provides a range of options to control this part of the process. Adjust the settings according to your needs and then press Next.
Data load settings tab defines how the extracted data will be pushed to the target. The following options are available.
| Option | Description |
|---|---|
| Transfer auto-generated columns | Fill in or skip columns marked with the "autogenerated" status. Some databases accept values in such columns, while others will throw a syntax error. |
| Truncate target table(s) before load | Select this checkbox only if you want all the data to be cleared from the target table. Be very careful with this option! |
| Disable referential integrity checks during the transfer | Disabling constraints in the target table. This setting prevents database errors by temporarily disabling the constraints. However, please note that not all databases support this functionality. |
| Replace method | Read our guide on Data Import and Replace to learn more about the replacing method option. |
| Log INSERT queries | Records all INSERT queries in the Query Manager (disabled by default). This may slow data transfer and increase the size of the Query Manager database. |
| Open new connection(s) | Use this option to speed up data transfer. If selected, a new connection will be opened and the data transfer will not interfere with other calls to the database where data is being transferred to. |
| Use transactions | Uses transactions during the data transfer. Set the number of rows per transaction with Do Commit after row insert. |
| Do Commit after row insert | Performing a commit after a certain number of inserted rows. This setting specifies that a commit operation should be executed after a specified number of rows have been inserted into the table. |
| Use multi-row value insert | Use multi-row insert with extended values number for higher performance. Database-specific setting. |
| Skip bind values during insert | This option can drastically increase performance for some drivers like Redshift by skipping a process of binding values and setting them directly, but it opens up a vulnerability to SQL injections. Not recommended if you are not sure of imported file contents. |
| Disable batches | Select this checkbox if you want to disable the use of batch imports. The import will be made row by row. Enabling this function will show all import errors, but make the import process slower. |
| Ignore duplicate rows errors | Ignores duplicate-row errors and continues the transfer. This option is available when Disable batches is selected and Use bulk load is disabled. |
| Use bulk load | Bypasses transaction settings and loads the entire dataset with a database-native tool. The option is available only when the target database supports bulk loading. |
| Open table editor on finish | If selected, the table editor is to be opened when data transfer is finished. |
| Show finish message | If selected, a notification message will be shown when the transfer is finished. |
| Send results by E-Mail | Sends data transfer results by E-Mail on finish. Read our guide to using email to transfer data to learn more. |
| Send results to Slack | Sends data transfer results to Slack on finish. For information on configuring Slack profiles and sending results, see Sending Data Transfer results to Slack. |
Tip
Use Bulk load for large datasets. It uses the database’s native bulk import mechanism instead of regular
INSERT statements, which can significantly reduce load time. For example, when importing 10 million rows with default
transaction settings, bulk load completed in ~23 seconds, while standard inserts took more than 2 minutes.
Step 6 Confirm
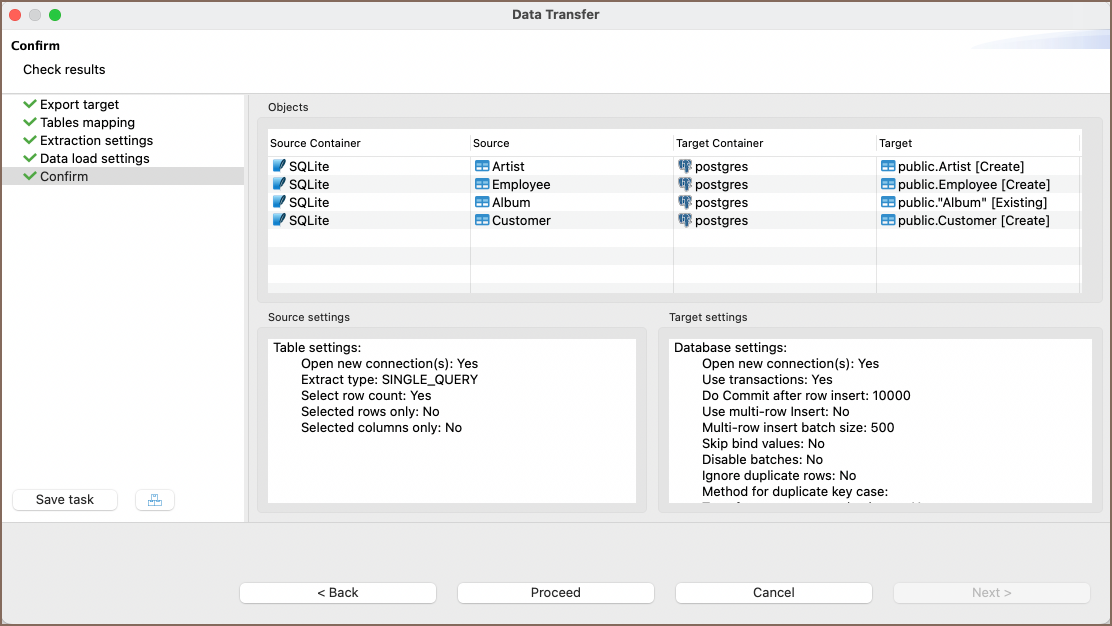
The final step before initiating the data transfer is the Confirm tab. This tab provides a summary of all configurations set up in the previous steps. It serves as a last review to ensure all settings are correct.
Here is a table summarizing the configurations:
| Option | Description |
|---|---|
| Source Container | Displays the source container from which data will be pulled. |
| Source | Shows the specific source within the container. |
| Target Container | Displays the target container to which data will be pushed. |
| Target | Shows the specific target within the container. |
| Source Settings | Summarizes settings related to data extraction from the source. |
| Target Settings | Summarizes settings related to data loading into the target. |
Review the settings and click Finish to start the data transfer. Use Back if you need to change any configuration.
Tip
You can save these configurations for future use and create a task related to the data transfer operation by selecting Save task. This option consolidates your settings into a reusable task.
If the wizard shows Proceed on an earlier page, select it to continue through the remaining configuration pages. The transfer starts after you select Finish on the final page.
Step 7 Data transfer completion notification
If there are no errors, you will see a notification window indicating the successful completion of the transfer task. You can continue working with your database during the transfer process, as it will be performed in the background.