

Data compare
Team Edition lets you compare tables and query results to spot differences, track changes, and generate SQL scripts to sync your data.
You can compare:
- Two tables - select a pair and compare them directly.
- Multiple tables - select several tables at once and assign each a target to compare against.
- Query results - compare the output of a
SELECTquery, run fresh or reuse the rows already loaded in a result set.
Info
You can compare objects from the same or different databases, or even between different Relational Database Management Systems (RDBMS), such as PostgreSQL and MySQL.
How it works
- Start a comparison - select your tables or queries
- Manage compared objects - add pairs, assign source and target
- Map columns - match columns between source and target
- Configure keys - set which columns identify each row
- Adjust settings - set limits, output format, and export options
- View results - explore differences and export the SQL diff
Start a comparison
How you start Data Compare decides what you compare and whether Team Edition reads the data fresh or reuses rows you already have. Pick the scenario that matches your goal:
| Goal | Where to start | What gets compared |
|---|---|---|
| Compare two tables | Connections | Data is read fresh when the compare runs |
| Compare fresh query results | SQL Editor | The query runs when the compare starts |
| Compare results you already ran | Data Editor result set | The rows already loaded in the grid, no re-run |
Compare two tables
Start from the Connections.
Tip
You can select more than two objects.
-
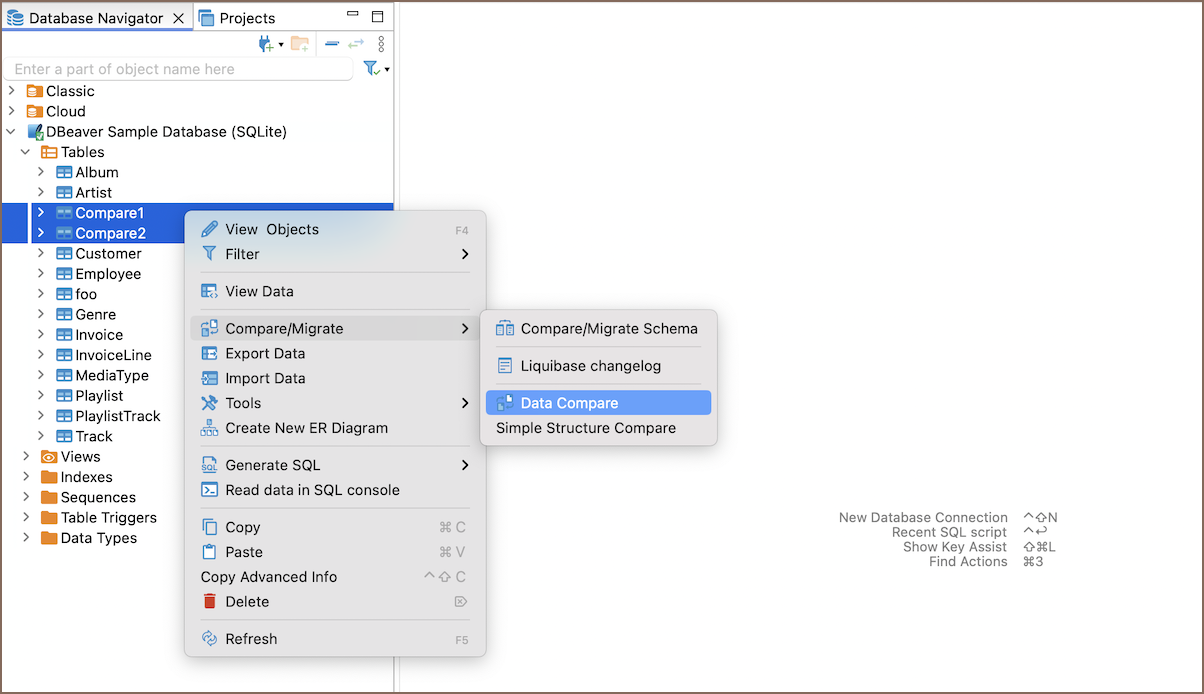
Select the tables, open the context menu, and go to Compare/Migrate.
-
Choose an option:
- Data Compare - opens the wizard with the selected tables as source. You then assign a target table or query for each source.
-
Data Compare between Selection - opens the wizard with the two selected tables prefilled as a source-target pair.
Note
Data Compare between Selection is available only when you select exactly two objects.
Compare fresh query results
Start from the SQL Editor when you want the query to run as part of the comparison.
-
Write a
SELECTquery.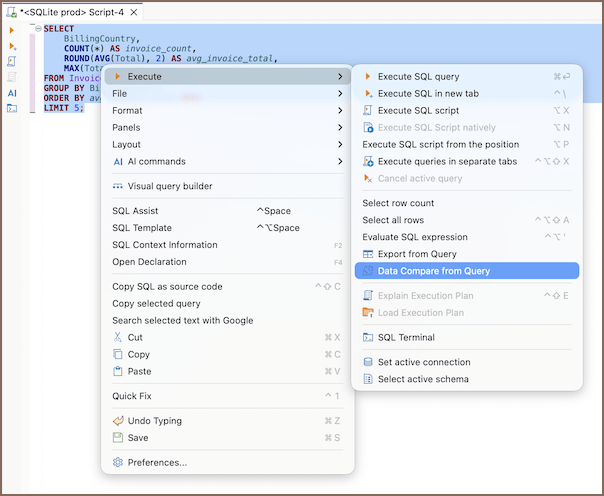
-
Select the query, open the context menu, and choose Execute -> Data Compare from query.
The query runs when the compare starts, so you always compare current data. You can select up to two queries at once - each one comes in as a separate source, and you assign a target for each.
Tip
You can also start the compare through AI by sending a short request in AI chat. See Data transfer actions for supported commands.
Compare results you already ran
Start from a result set in the Data Editor when you've already run a query and want to compare those exact rows without running anything again. This is handy for checking data before and after a change, or for lining up two queries you've already executed.
- Right-click anywhere in the result grid.
- Point to Data Compare to....
-
Do one of the following:
- Select Choose... to open the wizard with the result set as source. You then pick a target table or query.
- If another result tab is open in the same SQL Editor, select it from the submenu to compare the two result sets directly. Both sides use their already-loaded rows, and the wizard opens with source and target set.
Warning
The comparison uses only the rows already fetched into the grid. If the result set loads lazily and you haven't scrolled to the end, the unfetched rows are left out. Load all rows first when you need a complete comparison.
Note
Data Compare started this way uses the rows already loaded in the grid, not a fresh run of the query. If you save the comparison as a task, the task stores the query itself, so the next run executes it fresh instead of reusing the cached rows.
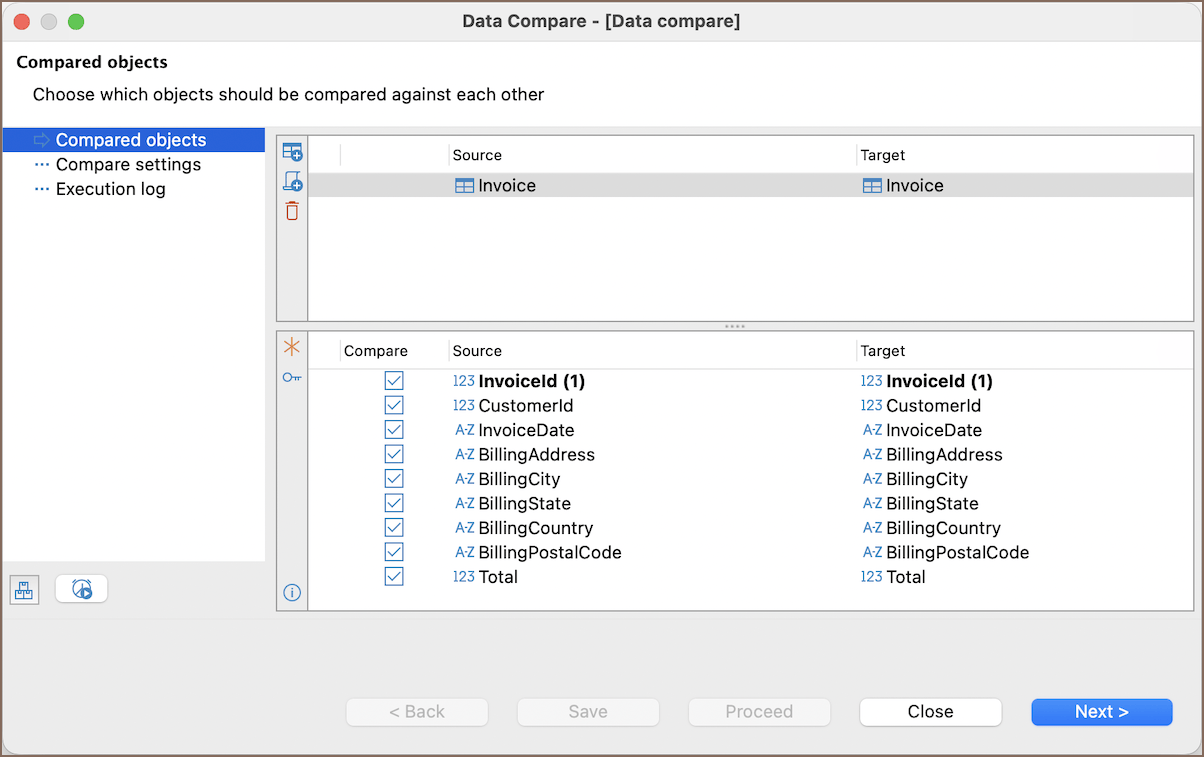
Once you start the comparison, the Data Compare wizard opens.
Manage compared objects
Use the Compared objects page to set up what you compare. Here you add and remove pairs, assign source and target, and configure column mapping and key columns for the selected pair.
Tip
The wizard is prefilled based on how you start it. Data Compare between Selection prefills the source and target. Data Compare prefills only source. You then choose a target for each source.
Add a source and assign a target
-
On the Compared objects page, click one of the toolbar buttons:
- click Add table(s) as a source button (
 ) to add one or more objects as source
 - click Add query as a source button (
 ) to add an SQL query result as source
- click Add table(s) as a source button (
-
For each added source, assign a target:
- Click Browse... in the target column, then pick a table, or choose a query (depending on what you want to compare)
Tip
If you add multiple source objects, the wizard creates multiple pairs. Assign a target for each source row.
Remove a pair
Select a row in the list, then click Remove selected pair button ( ).
).
Change source or target
Use the context menu on a cell in the source or target column:
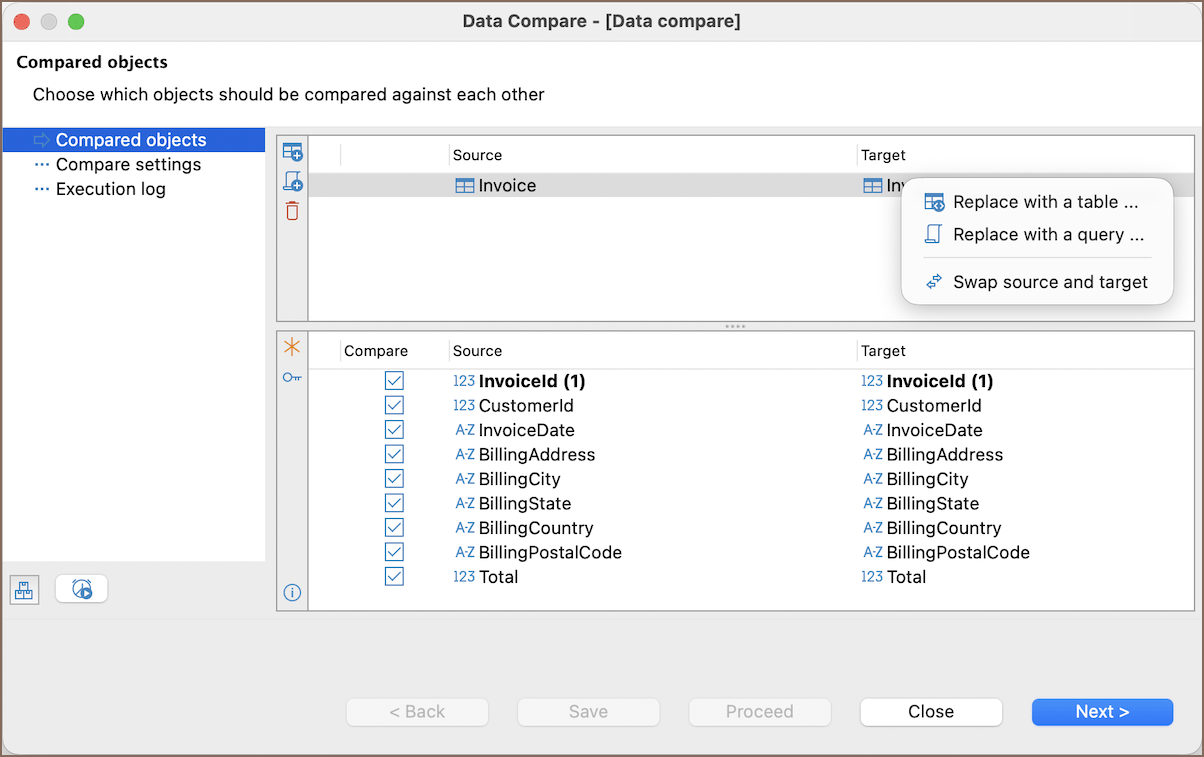
- Replace with a table: replace the current side with another table
- Replace with a query: replace the current side with an SQL query result
- Swap source and target: swap the pair
Tip
You can also replace a table or query by double-clicking the source or target cell.
Column mapping
Use column mapping to control which columns are compared, and how source columns match target columns. This is useful when objects have different column names, order, or structure.
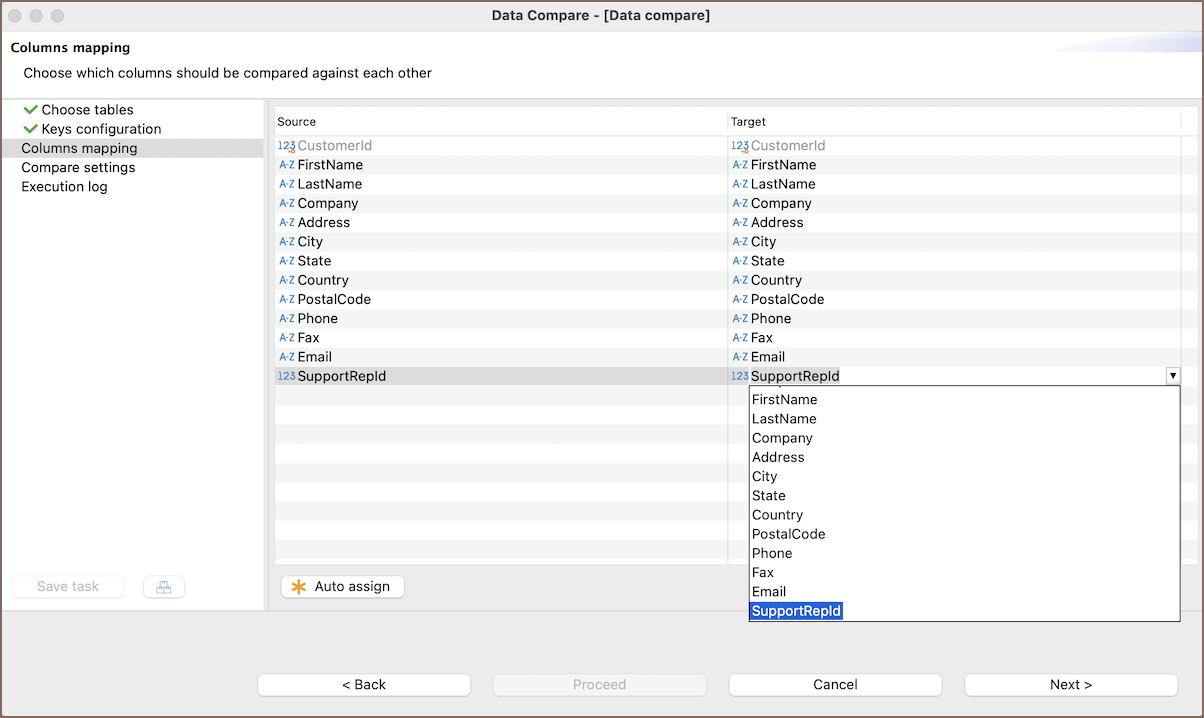
- In the top list, select the source-target pair you want to configure. The column list below updates for that pair.
-
In the bottom list, review the mappings:
- use the Compare checkbox to include or exclude a column from comparison
- open the Target cell dropdown to map the source column to a different target column
- if a column has no match on the other side, it’s shown as
<unspecified>
-
(Optional) click Auto assign columns button (
 ) to match columns automatically.
Note
Key columns are handled separately. They are used to match rows, not as regular mapped columns.
Keys configuration
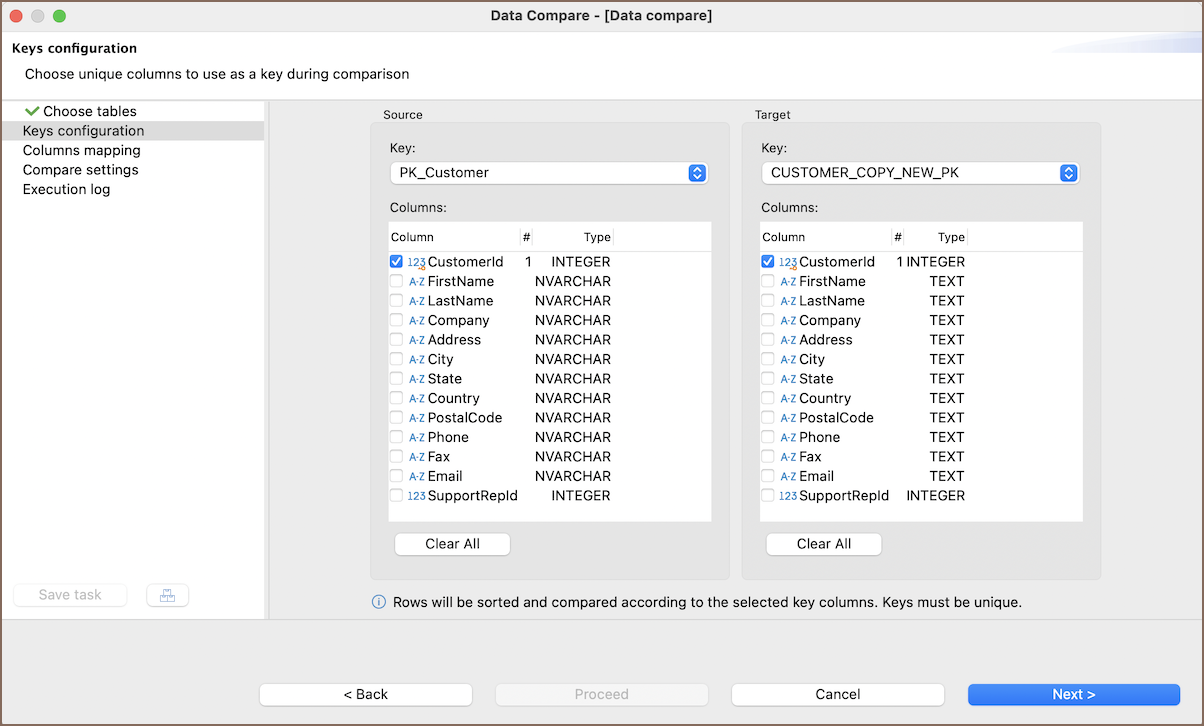
Keys are used to match rows between source and target. Rows are sorted and compared by the selected key columns, so keys must uniquely identify each row.
- In the top list, select the source-target pair you want to configure.
- Click Choose constraints button (
 ). The Configure constraints dialog opens.
 - In the dialog, select one or more key columns for source and target, then click OK.
Note
The number of selected key columns must be the same on both sides.
Important
Make sure the selected key columns are unique, or the comparison results may be incorrect.
Composite keys
When you select multiple columns, they form a composite key. Composite keys uniquely identify rows based on a combination of values across the selected columns.
Tip
Select columns for composite keys that, together, uniquely identify each row. Avoid columns with duplicate or null values, as they may impact comparison accuracy.
Compare settings
On the final page of the Data Compare wizard, configure settings to tailor the data comparison to your needs:
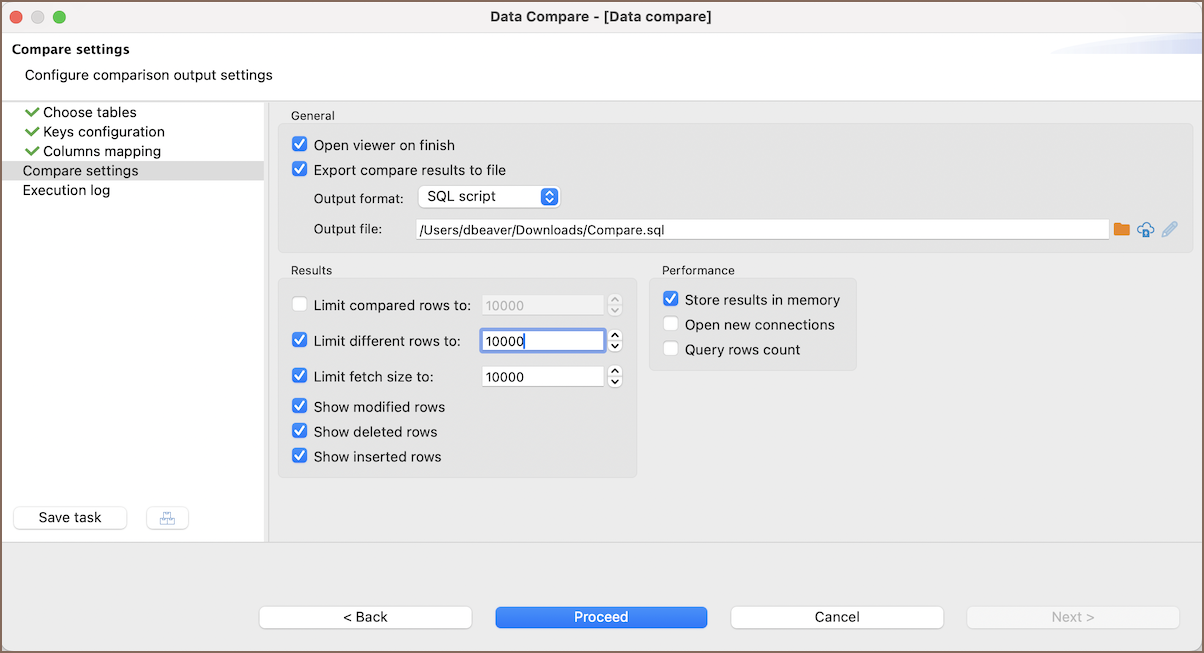
| Setting | Description |
|---|---|
| Open viewer on finish | Opens the compare viewer for a visual overview of the differences once the comparison is complete. |
| Export compare results to file | Exports the SQL script diff to a file. You can choose the output format and specify the output file path. |
| Apply changes to | Chooses which table the exported script updates. Pick Source table or Target table to define where the diff is applied. |
| Output order | Controls how changes are sorted in the exported result. Default keeps the comparison order. By type groups inserts, updates, then deletes. |
| Output format | Chooses how the results are written to the file. You can export an SQL script, HTML table, or Daff (Data Diff). |
| Output file | Sets the path and file name where Team Edition will save the exported diff. |
| Limit compared rows to | Limits how many rows must be compared against each other before ending the comparison. |
| Limit different rows to | Limits how many rows must be differ between each other before ending the comparison. |
| Limit fetch size to | Determines how many rows should be fetched at once, which helps manage memory and performance during comparison. |
| Show modified rows | Determines whether modified rows should be included in the diff or not, allowing you to track changes in the data. |
| Show deleted rows | Determines whether deleted rows should be included in the diff or not, providing insight into data that has been removed from the database. |
| Show inserted rows | Determines whether newly inserted rows should be included in the diff or not, allowing you to see additions to the database. |
| Store results in memory | Stores results in memory for further processing. Note that Team Edition might run out of memory when comparing large tables if this option is enabled. When disabled, results will be stored in a temporary database. |
| Open new connections | Opens new physical connections for data reading, which can help manage resources and ensure the stability of data comparison operations. |
| Query rows count | Queries row count before performing compare. This lets you track the progress of the comparison but may cause performance faults in some cases. |
| Save | Opens the Create Task window to assist in creating a task during the compare process. This window provides options and settings for creating and configuring a task related to the compare operation. |
Tip
You can export file to a remote file system via Cloud Storage using the
Browser remote file system button  .
.
Execution log
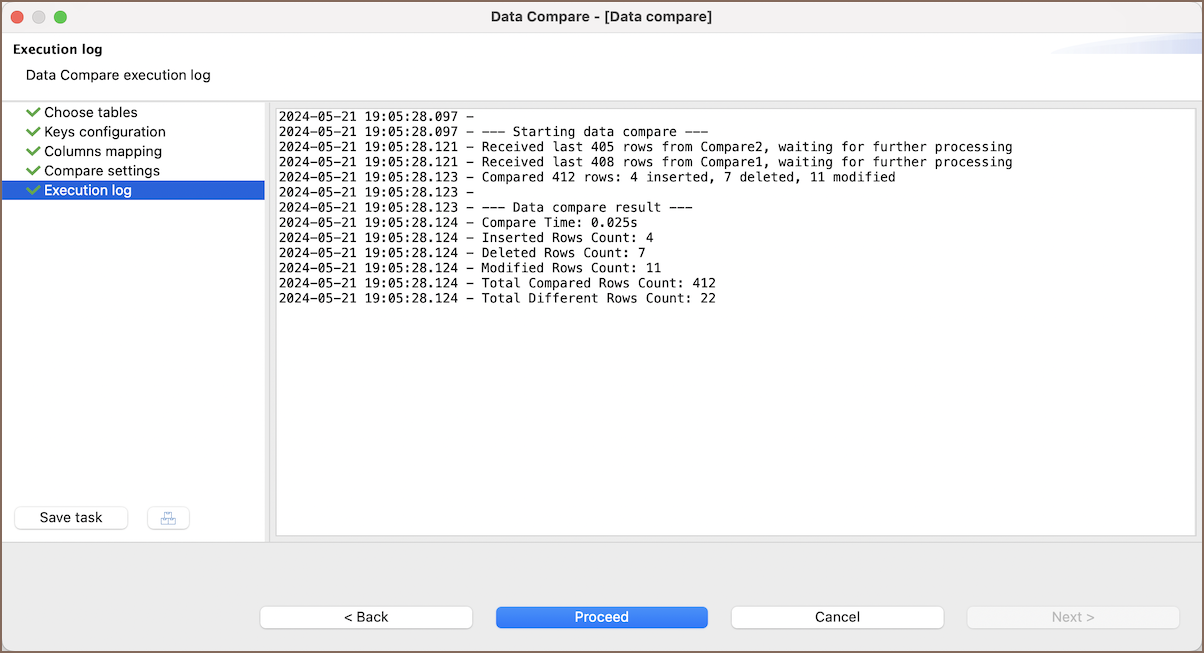
Once you have configured all settings and clicked Proceed, the Data Compare wizard will perform the comparison operation:
- an Execution Log window will display the progress and outcome of the comparison process.
- simultaneously, a separate window will open showing the comparison results. This window provides a detailed view of differences between the datasets based on the specified settings
Viewing the results
After the comparison process is complete, you can view the results in the viewer. It highlights the differences between the datasets in detail, with each row that shows a discrepancy being clearly marked.
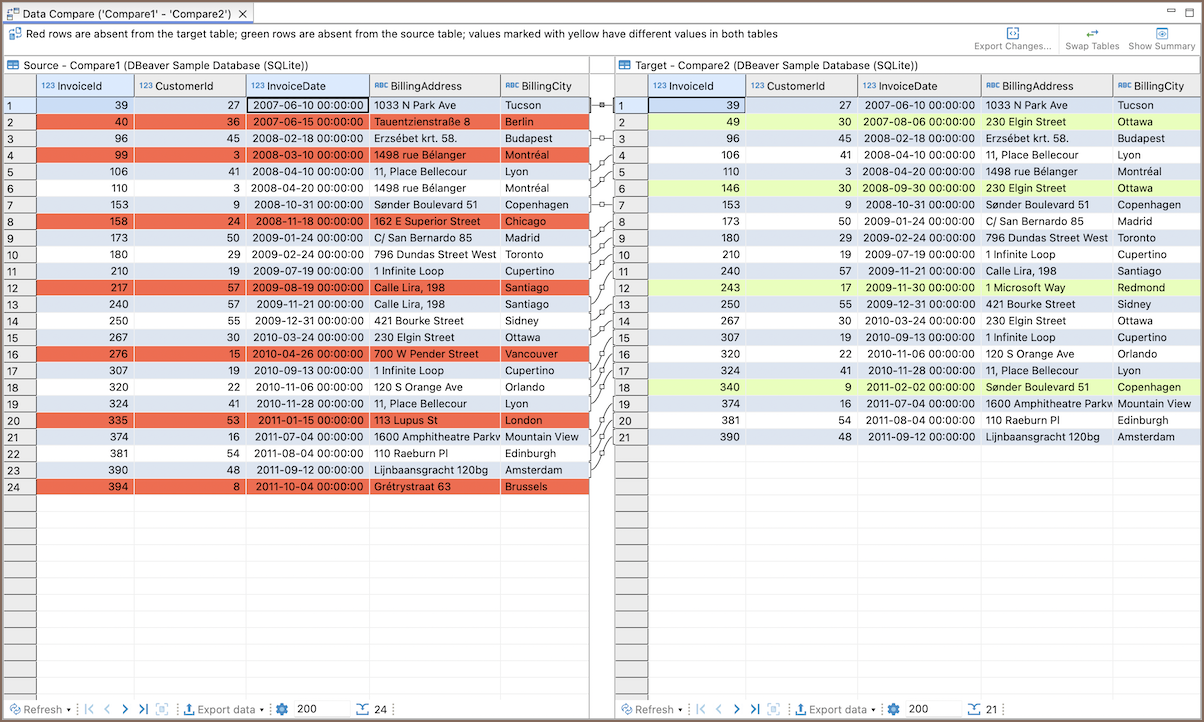
Note
A complete visual preview of the results is available only when Data Compare is launched through the wizard. If launched as part of a task, the visual editor will not open. Instead, only statistics will be recorded in the execution log.
The viewer not only displays the differences but also provides tools to manage and interpret these differences effectively.
| Feature | Button image | Description |
|---|---|---|
| Analyze with AI |  |
Analyzes changes and provides recommendations using AI. |
| Export changes |  |
The results of the Data Compare can be exported as an SQL script, which includes DELETE, INSERT, and UPDATE statements to make the data in the second table match the first. Alternatively, you can export the results in an HTML format as a table for easy viewing and sharing. |
| Swap tables |  |
The Swap tables button allows you to switch the positions of the source and target data panels within the viewer. |
| Show summary |  |
By clicking the Show Summary button, you can access a statistical summary and analysis of the differences found between the datasets. This summary provides a quick overview of the total changes, including the number of modified, deleted, and inserted rows. |
Tip
You can also export the comparison results table through Export data button
 in the bottom toolbar
or copy rows or individual values that differ.
in the bottom toolbar
or copy rows or individual values that differ.
Troubleshooting
If the Next button is greyed out, there's a configuration error in the Compared objects page. Look for a
warning icon ( ) next to a pair in the source-target list and
hover over it to see the error details.
) next to a pair in the source-target list and
hover over it to see the error details.
No key columns are chosen
No key columns are configured for the pair. Without keys, Team Edition can't match rows between source and target.
- Select the affected pair in the top list
- Click Choose constraints button () and select at least one key
- Click OK - the warning disappears and Next becomes active.
No target specified
The source was added but no target is assigned yet.
- Find the row with the warning icon.
- Click Browse... in the Target column and pick a table or query.
Tip
If you added multiple sources at once, each one needs its own target.