

AWS SAML database access via Okta
Team Edition supports database connections through AWS SAML with Okta authentication. This guide walks you through the setup. Before you start, make sure you meet the prerequisites below.
Prerequisites
- AWS IAM configuration: An active AWS account with IAM enabled, plus permissions to create and manage identity providers and roles.
- Okta setup: An Okta account with permissions to configure applications.
- Team Edition administrative access: Administrative privileges in Team Edition.
This method doesn't use proxy access keys or secret keys, so you don't need to generate static keys in AWS.
Configuration steps
-
Log in to Team Edition as an Administrator.
-
Enable AWS services and AWS SAML provider:
- Navigate to Settings -> Administration -> Server Configuration and select the checkboxes for both Cloud (AWS) and AWS SAML.

-
Create a blank Identity Provider:
- Go to Settings -> Administration -> Identity Providers.
- Click on the + Add button to create a draft of a new identity provider.
- At first, fill in only the fields needed to generate the Sign-in/Sign-out URLs, ACS and Entity ID links. You'll complete the rest later.
- After filling in the fields, click on the Create button to complete the blank identity provider configuration.
Info
For instructions on configuring AWS Regions, see AWS Settings.
-
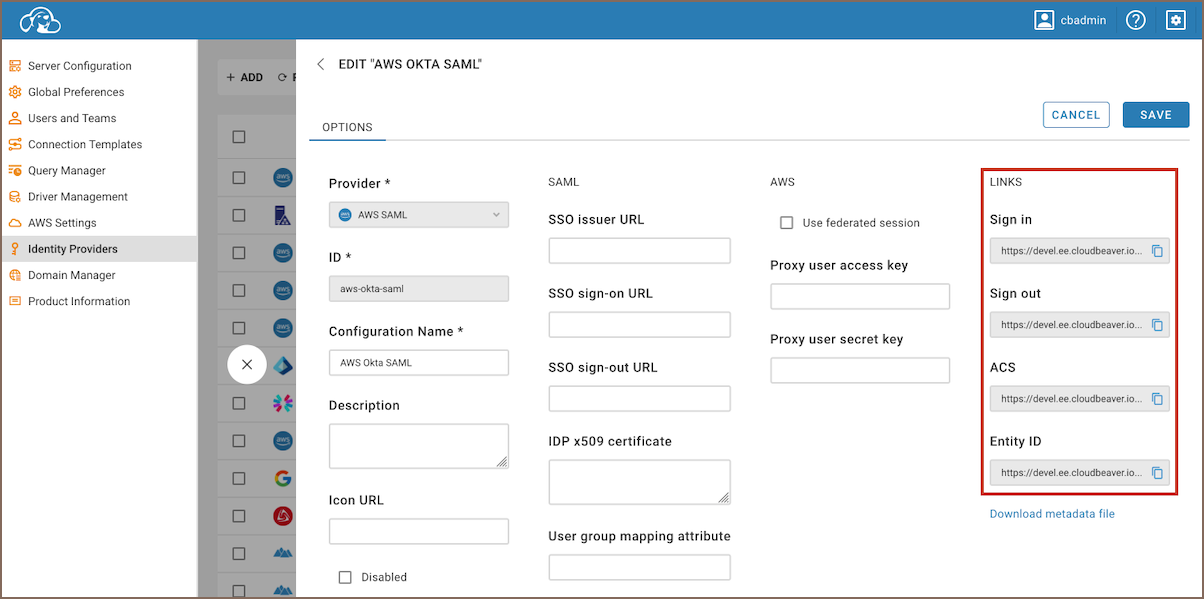
Copy links:
- Enter the newly created identity provider.
-
Copy the Sign in, Sign out, ACS and Entity ID links.
-
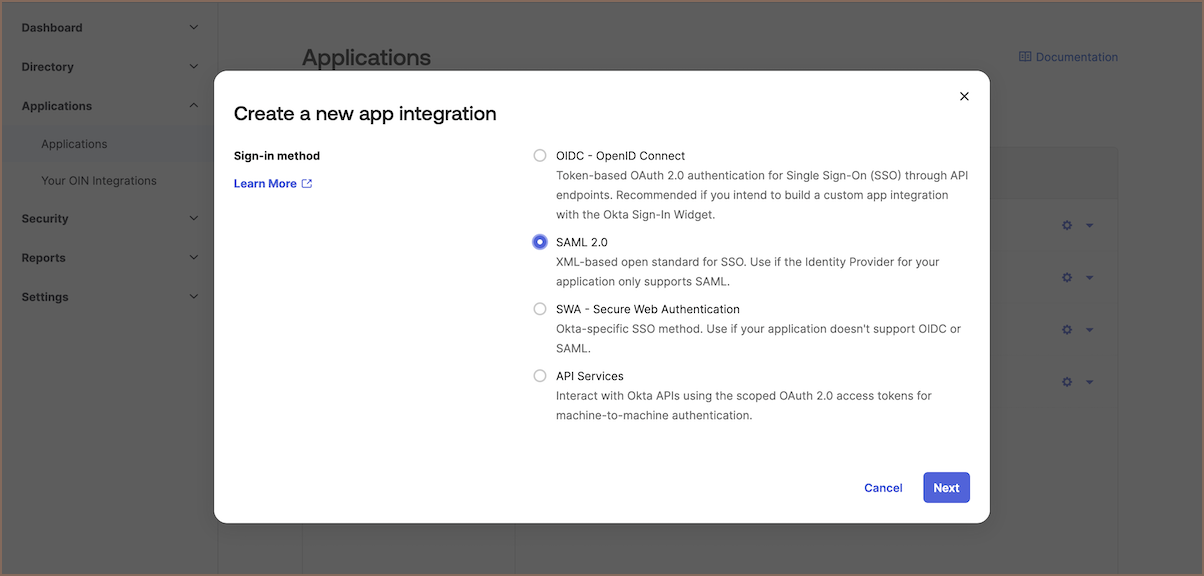
Create SAML 2.0 application in Okta:
- Create a SAML 2.0 application in Okta. For detailed steps, see the official Okta documentation on application creation.
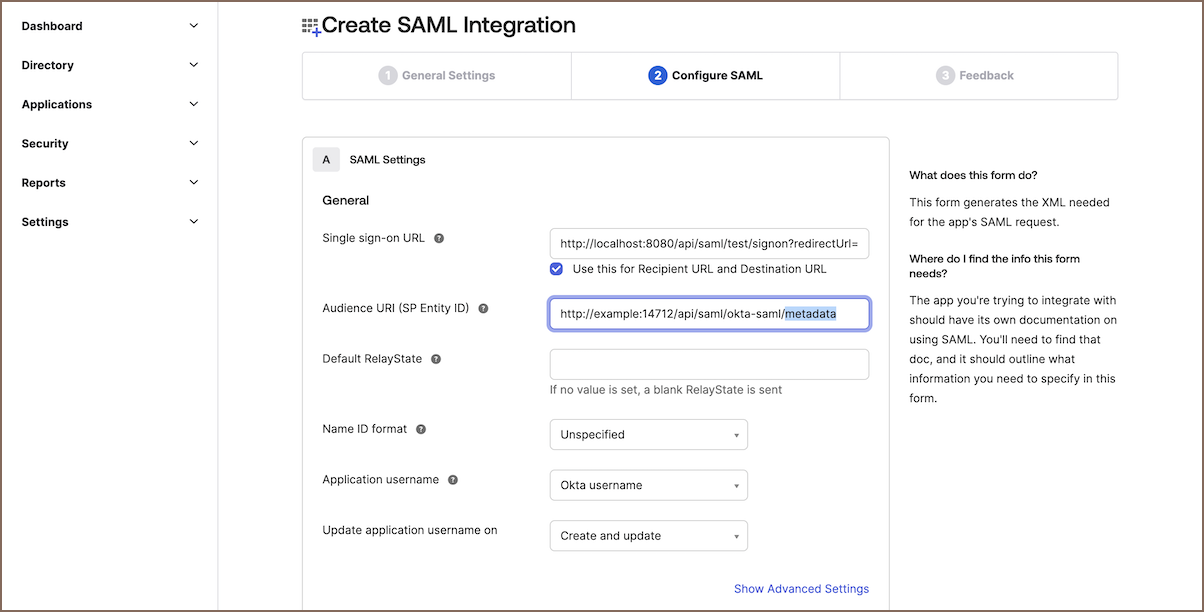
- Under Single Sign-on URL, paste the copied from Team Edition application Sign in link.
- Locate the Audience URI (SP Entity ID) and paste the Entity ID link.
- In the same section, locate the Show Advanced Settings button and click to open additional settings.
- Find Other Requestable SSO URIs and click the Add Another + button. Paste the ACS link and enter
0in the Index field. - Insert
http://www.okta.com/${org.externalKey}into the SAML User ID field. This is your provider ID value, which is automatically populated.
- Find Other Requestable SSO URIs and click the Add Another + button. Paste the ACS link and enter
- Click Next and then Finish to finalize these configurations.
-
Configure SAML settings in Team Edition:
- Access Settings -> Administration -> Identity Providers in Team Edition.
- Click on the identity provider that was set up for SAML integration.
-
Retrieve SAML configuration URLs from Okta:
- In Okta, navigate to the Sign On settings of your SAML application.
- Expand the Hide details section to view the necessary URLs.
-
Enter SAML details into Team Edition:
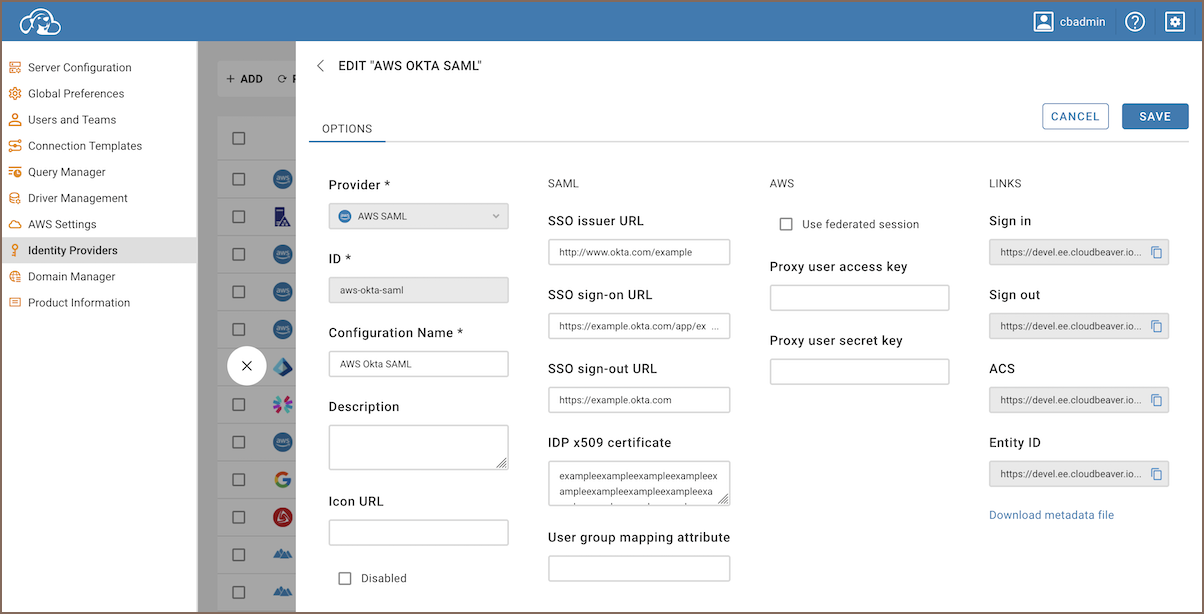
- Copy the SSO sign-on URL, SSO sign-out URL, and the Issuer URL from Okta.
- Paste these URLs into the corresponding fields in Team Edition's identity provider settings.
- Upload the IDP x509 certificate, which can be downloaded from Okta, into the respective field
in Team Edition.
- Complete additional fields
Field Name Description Description (Optional) Provide a brief description of the identity provider. Icon URL (Optional) Enter the URL of an icon to represent this identity provider in Team Edition. User group mapping attribute (Optional) Specify the attribute that will be used for mapping user groups between Team Edition and the identity provider. -
After entering all necessary information, save the settings to finalize the configuration of your SAML identity provider.
-
Add users to application in Okta:
-
In your new Okta application, assign people or groups. For detailed steps, see the official Okta documentation on assigning applications to users.
-
Add Identity Provider in AWS IAM:
-
Add a SAML identity provider in AWS IAM. This lets AWS authenticate users managed by Okta. For full instructions, see the official AWS documentation on identity providers.
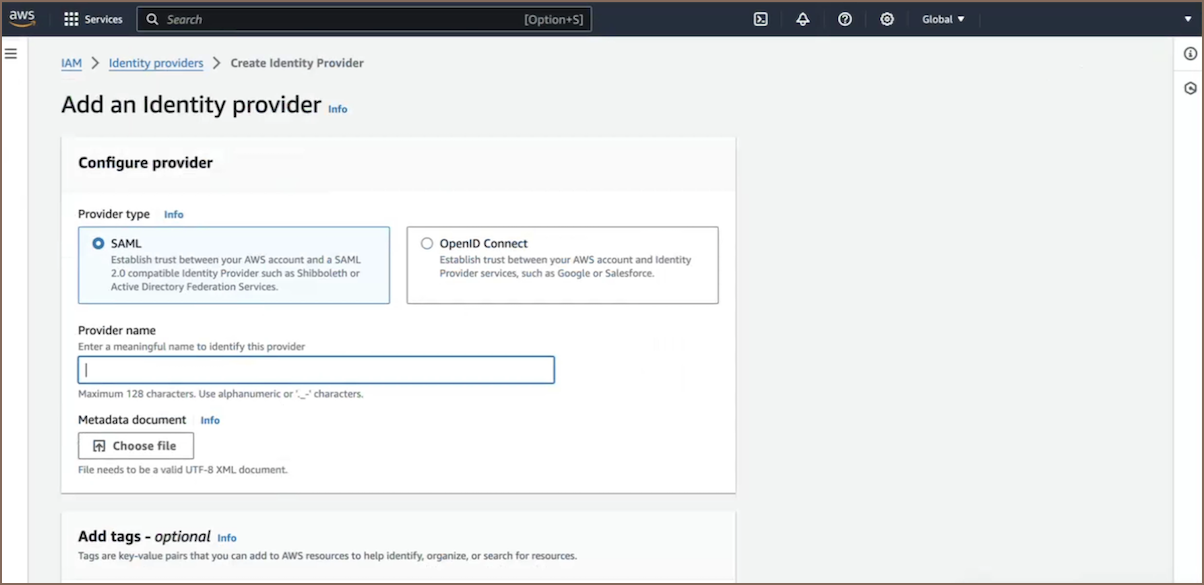
Hint to obtain the Metadata document
- Navigate to Okta and select your application under Applications.
- Proceed to the Sign On tab, locate the SAML 2.0 section, and click on the Metadata URL.
- Then, paste this URL into a new browser tab to open the XML content. Copy the XML content displayed in your browser into a new file.
-
Configure a role for SAML 2.0 federation:
-
Configure an AWS role for SAML. This role grants permissions based on the identity Okta authenticates. For a detailed walkthrough, see the official AWS documentation on creating roles for SAML 2.0 federation.
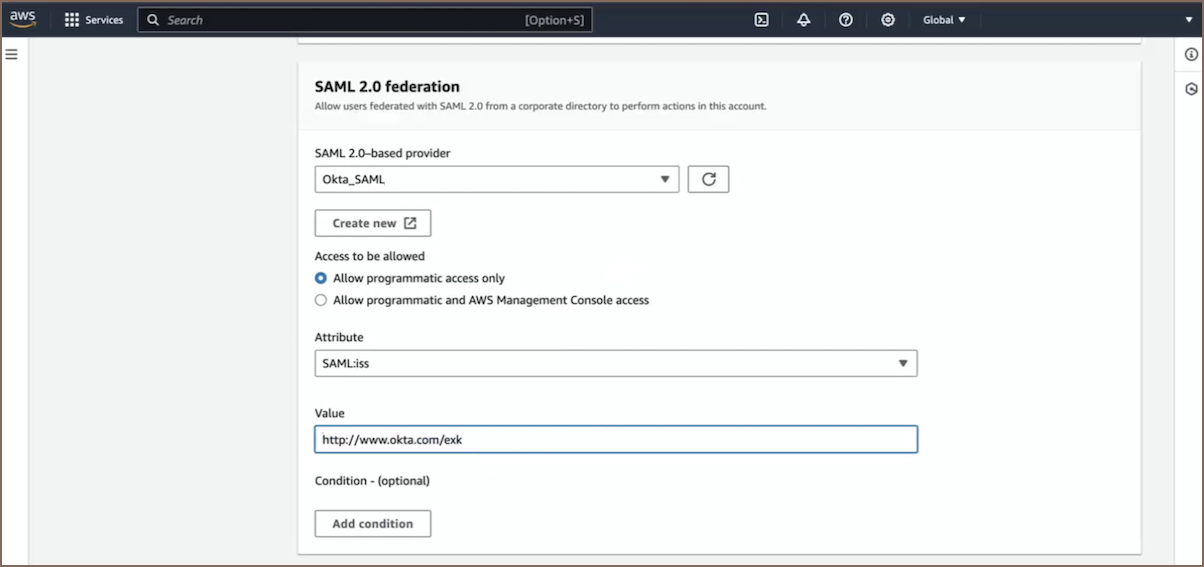
Hints for filling fields on the initial page when creating a role
- Attribute: You can choose
SAML:iss. - Value: To find Issuer, navigate to Okta and select your application under Applications. Then proceed to the Sign On tab, locate the SAML 2.0 section, and there you will find the Issuer URL to copy.
- Attribute: You can choose
-
Configure SAML attributes in Okta for AWS:
To manage sessions and permissions correctly during SAML authentication with AWS, configure these SAML attributes in Okta:
- Steps to configure SAML attributes:
- Go to Applications in Okta, select your application, and edit the SAML Settings under General.
- Scroll down to find the SAML Settings section and click Edit to modify the configurations.
- After entering the edit mode, proceed to the Configure SAML section.
- Locate and fill in the Attribute statements (Optional) settings.
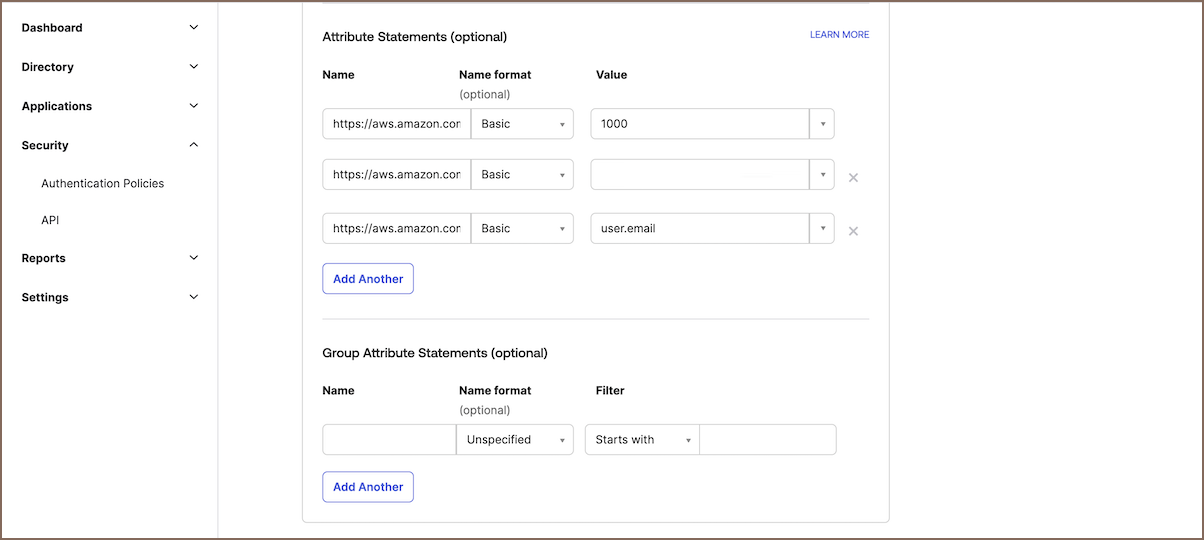
Attribute Name Name Format Value Example Notes https://aws.amazon.com/SAML/Attributes/SessionDurationBasic 3600Set in seconds, range: 900 to 43200 seconds. https://aws.amazon.com/SAML/Attributes/RoleBasic arn:aws:iam::123456789012:role/SAMLRole,arn:aws:iam::123456789012:saml-provider/OktaFormat: {roleArn},{identityProviderArn}.https://aws.amazon.com/SAML/Attributes/RoleSessionNameBasic user.emailUse a unique identifier like user.emailoruser.id.Note
In the Value for the Role attribute, ensure the ARNs are correctly copied from AWS IAM. The
roleArnis the ARN for the role created for SAML integration, andidentityProviderArnis the ARN for the identity provider (Okta) configured in AWS IAM.Info
Set a default role and AWS session lifetime in the SAML configuration for consistent permissions, or customize via attribute mapping for user-specific roles. See documentation for details.
-
Now you can log in through the newly created Federated authentication method in Team Edition, using the Configuration name you assigned during the setup.
-
Verify the integration of AWS SAML and Okta
- Once logged in, click on your username in Team Edition and navigate to the User Info tab.
- You should see two AUTH tokens. If both are there, the AWS OpenID and Okta integration worked and Team Edition has the credentials it needs.
-
Following successful login, you can access the databases listed in Cloud Explorer that are integrated with your AWS account.
Troubleshooting
SAML login fails with an authorization error
If you've configured AWS session tags, login can fail with an error that doesn't point to the real cause. You might see something like this in the logs:
software.amazon.awssdk.services.sts.model.StsException: Not authorized to perform sts:AssumeRoleWithSAML (Service: Sts, Status Code: 403)
The message blames sts:AssumeRoleWithSAML, but the real problem is usually a missing sts:TagSession permission.
When your role passes session tags, AssumeRoleWithSAML needs sts:TagSession as well. Without it, AWS rejects the
request and returns this misleading error.
To fix it, add sts:TagSession to the role's trust relationship:
{
    "Version": "2012-10-17",
    "Statement": [
        {
            "Effect": "Allow",
            "Principal": {
                "Federated": "{SAML_IDENTITY_PROVIDER_ARN}"
            },
            "Action": [
                "sts:AssumeRoleWithSAML",
                "sts:TagSession"
            ],
            "Condition": {
                "StringEquals": {
                    "SAML:aud": "{SAML_APPLICATION_AUD}"
                }
            }
        }
    ]
}
Note
Session tags are custom attributes (for example, a user's department) that you set in AWS to control
access. You only need sts:TagSession when your role passes them. A plain SAML setup without session tags works
with sts:AssumeRoleWithSAML alone.