

Local client configuration
This article shows you how to configure a local database client for Team Edition.
A local client is a set of command-line tools that ship with your database, such as mysqldump and mysql for MySQL,
or pg_dump, pg_dumpall, and psql for PostgreSQL. They're usually installed with the database server, but you can
also install them separately.
Team Edition uses a JDBC driver for everyday tasks like browsing data, running queries, and editing tables, so a local client isn't required. You only need one when using native tools, such as backup and restore or running SQL scripts through the native client. If you start one of those tools without a client configured, Team Edition reports that the local client is not specified for the connection.
Tip
"Local" means the client runs on your machine, not that the database is local. These tools work with remote databases too, as long as the client version is compatible with the server.
Before you start:
- Windows users have it easier, since many local clients ship with the software.
- On macOS and Linux, the client never ships with Team Edition. If it isn't detected, install it or point Team Edition to it by hand. See Find the installation path.
Add a client home
- Create a new connection and pick your database, for example MySQL. The Connect to a database wizard opens.
-
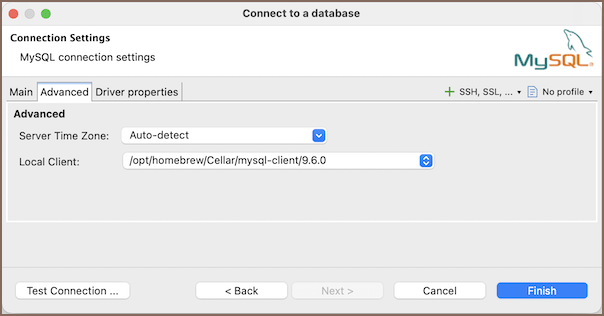
Open the Advanced tab.
-
Open the Local Client dropdown. If Team Edition detected a client, it's selected automatically. Otherwise, choose Browse... at the bottom of the list.
-
In the Database Client Homes dialog, select Add Home, choose the client's installation folder, and select OK. On macOS, press Command+Shift+G in the file dialog to paste a path directly.
Tip
Don't know the path? Find it first in Find the installation path below.
Important
Point to the installation folder that contains
bin, not tobinitself or to an executable. For example, use/opt/homebrew/Cellar/mysql-client/9.6.0, not/opt/homebrew/Cellar/mysql-client/9.6.0/bin/mysqldump. -
Check that the Local Client dropdown now shows the client you added, then select Finish to create the connection.
Tip
You can also change the client later for an existing connection: select it, open Edit Connection (or press F4), and find the same client selector.
Find the installation path
Team Edition looks for clients automatically, so you often won't need this. If a client isn't detected, find its installation folder here, then add it using the steps above.
Windows
- Open Command Prompt.
-
Use
where /Rto search the drive. For MySQL, search formysqldump.exe. For PostgreSQL, search forpg_dump.exe:Scanning the whole drive can take a few minutes.
-
The command prints the full path. For example:
C:\Program Files\MySQL\MySQL Server 8.1\bin\mysqldump.exe
Tip
You can also find it visually. In File Explorer, open the database's program folder under C:\Program Files
and check its bin folder for mysqldump.exe or pg_dump.exe.
macOS and Linux
- Open your terminal.
-
Use the
findcommand to locate the client. For MySQL, search formysqldump. For PostgreSQL, search forpg_dump: -
The terminal prints the path. The location depends on your system:
- macOS:
/usr/local/mysql-8.1.0-macos13-arm64/bin/mysqldump - Linux:
/usr/bin/mysqldump, or something like/usr/lib/postgresql/16/bin/pg_dumpfor PostgreSQL
- macOS:
If the search returns nothing, the client isn't installed yet. On macOS, install it through Homebrew -
brew install libpq for PostgreSQL or brew install mysql-client for MySQL. Both are keg-only, so Homebrew doesn't
add them to your PATH. Run brew --prefix libpq to get the installation folder, then add it as a client home using
the steps above.