AI smart assistance
Note: This feature is available in Enterprise, Ultimate and Team editions only. For users of the Community edition to access AI smart completion feature, first install the required extension.
DBeaver offers the ability to construct SQL queries using natural language through our AI smart completion and AI Chat features. This capability is achieved through integrations with both OpenAI's GPT-3 language model and Azure OpenAI.
Note
DBeaver is not affiliated with OpenAI. Integration is achieved through the public API. - To utilize this feature, register with OpenAI and obtain a secret key. - Users of the DBeaver Community version need to install the GPT extension to enable this functionality.
Understanding the AI integration in DBeaver
With the AI smart completion feature, you can type queries in natural language and DBeaver will convert them into SQL statements. This tool simplifies writing complex queries by interpreting your input and automatically generating the correct SQL code.
The AI Chat feature provides a conversational interface, allowing you to communicate with the database in plain language. Type your queries conversationally, and AI Chat translates them into executable SQL, streamlining your database interactions.
Initial setup
To activate the AI features in DBeaver, configure the API token:
-
Navigate to Window -> Preferences -> General -> AI (GPT.md).
-
Ensure the Enable smart completion option is activated. This option is typically enabled by default in the PRO versions.
-
In the API token field, input your AI secret key.
-
Save the changes. See the Basic configuration for secret key details.
For instructions on utilizing the AI features, visit the AI Smart completion usage and AI Chat usage sections.
Data privacy
We prioritize data safety and user privacy. In this section, we outline how data is managed and the measures taken to protect user privacy when using the AI features.
To enable the AI features capabilities, table and column names from the current database schema are transmitted to OpenAI. This step is crucial for accurately translating user requests into SQL queries. Key considerations regarding data privacy are as follows:
- No Table Data: Only metadata like table and column names are shared with OpenAI. Actual table data is not transmitted.
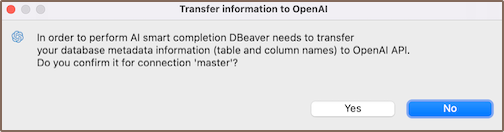
- User Consent: On the first use of AI completion for a specific connection, DBeaver will prompt for your confirmation to send metadata. This confirmation is mandatory to use the feature.
- Log Transparency: The entire request can be logged for your review. To enable this, navigate to Preferences and check the Write GPT queries to debug log option.
- Selective Metadata Sharing: If you prefer not to share information about certain tables, adjust the tables in scope using the Scope field.
- Disabling AI: PRO version users can turn off the AI feature, while Community Edition users can avoid it by not installing the AI plugin.
- Azure OpenAI privacy: If you use Azure OpenAI, be aware that it operates under its own privacy policy. It's recommended to review their terms before using.
AI settings and customization
To utilize the AI-enhanced functionalities within DBeaver, certain configurations and setup processes are required. This section offers a comprehensive guide on initial setup, advanced configurations for PRO users, and customization options to tailor the AI integration according to specific preferences.
Basic configuration
By default, AI features are ready to use. To start, you need to specify the service credentials based on the AI service you choose: OpenAI or Azure AI.
Credentials for OpenAI
-
Sign up on the OpenAI platform.
-
Navigate to the API Keys section and generate a new secret key.
-
Insert this key into DBeaver's API token setting.
Credentials for Azure AI
-
Sign up on the Azure platform.
-
Navigate to the Azure Portal and create a new AI service under the AI + Machine Learning section.
-
Generate and copy the credentials for the newly created service.
-
Insert these credentials into DBeaver's Engine Settings.
Preferences
For specific requirements or troubleshooting, you might want to adjust some of the following settings:
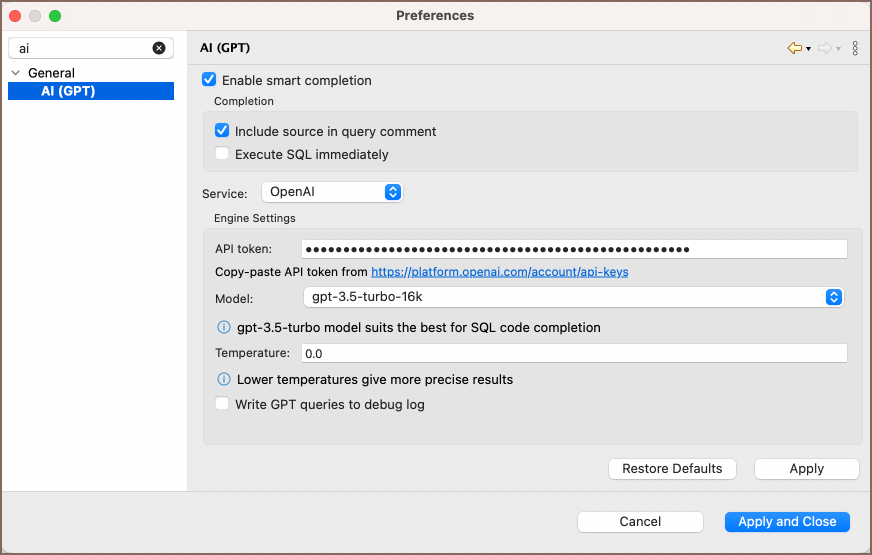
- Navigate to Window -> Preferences -> General -> AI (GPT.md) to access these settings.
| Setting | Description |
|---|---|
| Enable smart completion | Displays the AI features in the SQL Editor. |
| Include source in query comment | Shows your original request above the AI-generated query in the SQL Editor. |
| Execute SQL immediately | Runs the translated SQL query immediately after generation. |
| API token | Input your secret key from the OpenAI platform. |
| Model | Choose the AI model (recommended: gpt-3.5-turbo for SQL). |
| Temperature | Control AI's creativity from 0.0 (more precise) to 0.9 (more diverse). Note that higher temperature can lead to less predictable results. |
| Write GPT queries to debug log | Logs your AI requests. |
PRO version exclusive settings
For users of the Enterprise, Ultimate and Team editions, additional configurations are available:
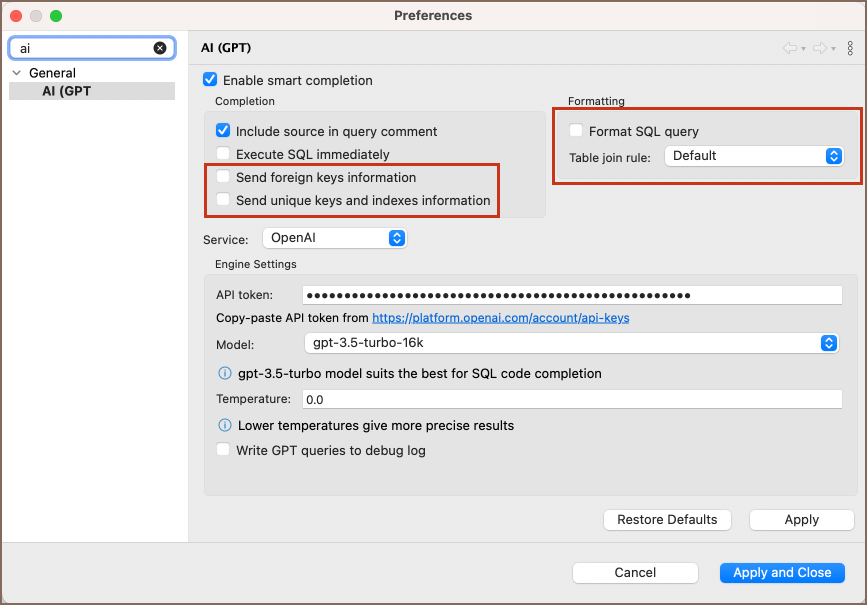
| Setting | Description |
|---|---|
| Send foreign keys information | Helps AI understand table relationships. |
| Send unique keys and indexes information | Assists AI in crafting complex queries. |
| Format SQL query | Adds formatting to the generated SQL. |
| Table join rule | Choose between explicit JOIN or JOIN with sub-queries. |
There is also an option to switch the Service from OpenAI to Azure OpenAI. Azure provides a set of distinct settings:

| Setting | Description |
|---|---|
| Endpoint | Configure a custom endpoint URL for Azure OpenAPI interactions. |
| API version | Select the version of the API you wish to use. |
| Deployment | Specify the deployment name chosen during model deployment. |
| Context size | Choose the context size between 2048 and 32768. A larger number allows the AI to use more data for better answers but may slow down response time. Choose based on your balance of accuracy and speed. |
Utilizing AI capabilities in DBeaver
AI Chat usage
Note: This feature is available in Enterprise, Ultimate and Team editions only.
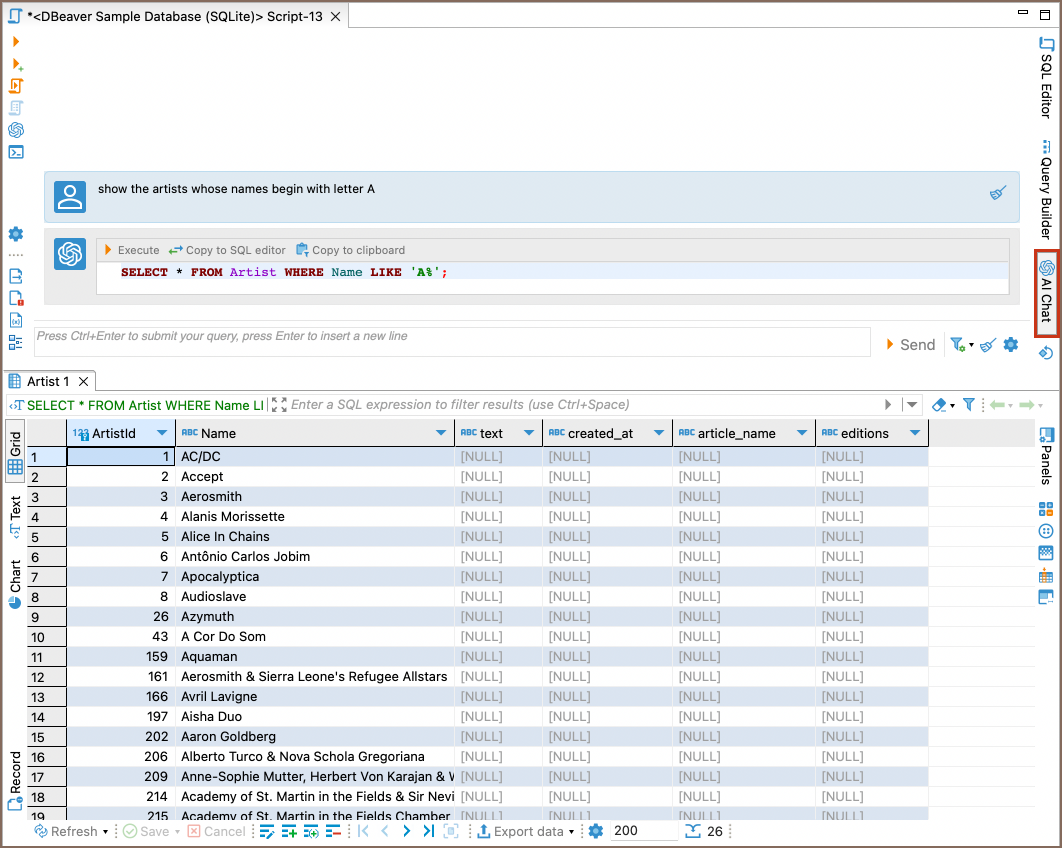
To utilize the AI Chat feature in DBeaver:
-
Launch the SQL Editor.
-
Click on the AI Chat tab
 , located on the right toolbar of the SQL Editor.
 -
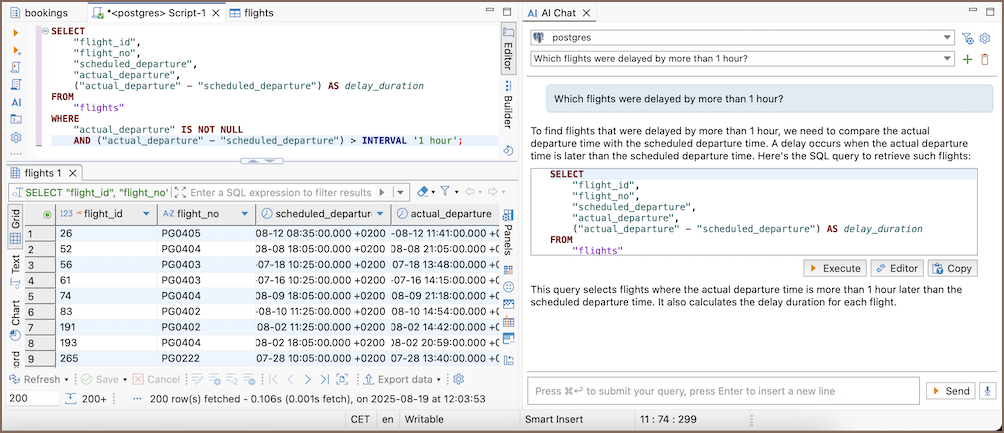
In the chat window that opens, input your request in natural language.
-
Press the Send button to get the SQL translation.
-
To execute the SQL query generated by AI, click the Execute SQL query button.
Note
The AI Chat logs your query history, enabling you to reference and expand on prior inputs. Each new or edited entry prompts the AI to generate a revised SQL query.
Resetting query context
To initiate a new conversation or alter the query context in the AI Chat select the Clear history option in the context menu of the Send button.
![]()
Defining the scope in AI Chat
For enhanced precision, especially in databases with extensive schemas, you can specify database objects in the Scope field to narrow down the context.
-
In the AI Chat interface, click on the arrow button near the Send button to open the context menu.
-
Choose Change scope to specify the area of your database that the AI should concentrate on.
-
You can choose from:
- Current Schema: Focuses the AI on the schema you are currently using.
- Current Database: Limits the AI to the database currently selected.
- Connection: Sets the AI to consider all schemas within the current database connection.
- Custom: Allows you to define a more specific scope, such as a particular table or schema.
AI smart completion usage
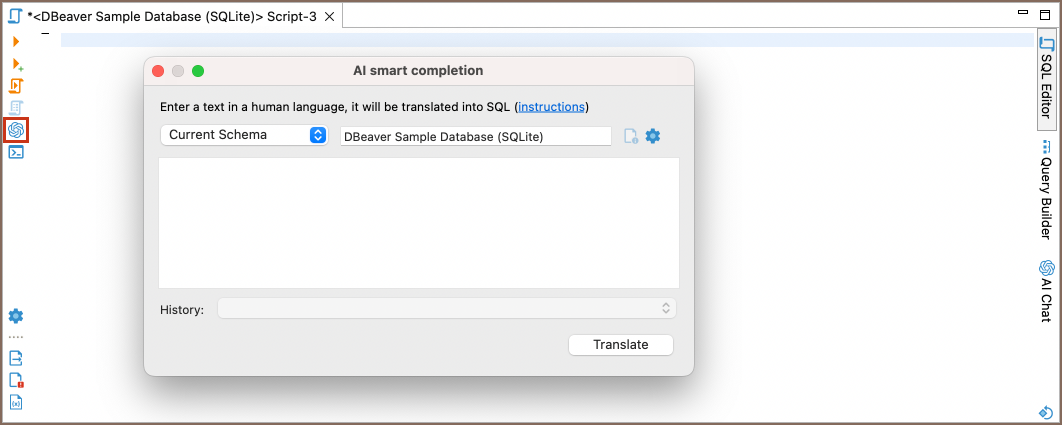
To interact with databases using the AI Smart completion feature:
-
Launch the SQL Editor.
-
Click on the GPT Chat smart completion icon
 located in the left toolbar of the SQL Editor.
Note
The toolbar is customizable. For further information, refer to Toolbar Customization article.
-
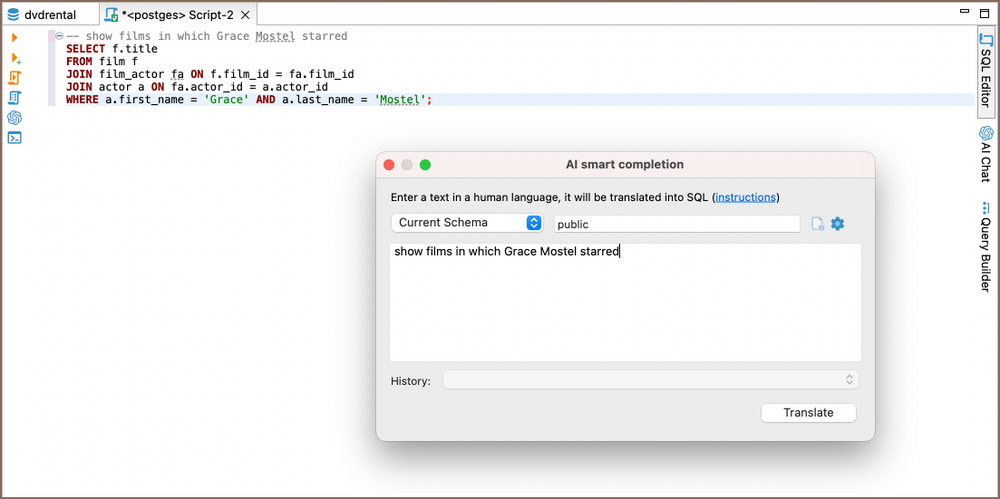
Input your natural language request in the AI smart completion window.
-
Click Translate to obtain the SQL query.
For enhanced precision, especially in databases with extensive schemas, you can specify database objects in the Scope field to narrow down the context.
Defining the scope
To enhance the precision of AI-assisted SQL queries, especially in extensive database schemas, setting the scope is key. This action narrows down the AI's focus, ensuring it generates more relevant queries.
- In the AI Smart completion interface, navigate to the Scope field:
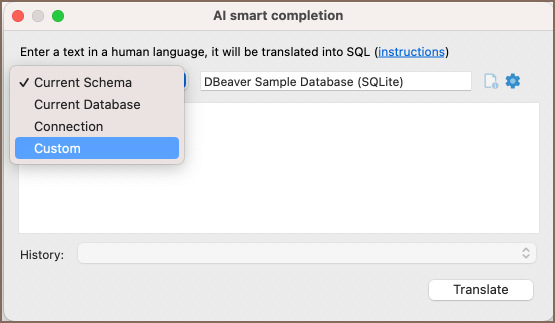
- You can choose from:
- Current Schema: Focuses the AI on the schema you are currently using.
- Current Database: Limits the AI to the database currently selected.
- Connection: Sets the AI to consider all schemas within the current database connection.
- Custom: Allows you to define a more specific scope, such as a particular table or schema.
Accessing query history
Query history allows you to review previous requests. In the PRO version, this includes history from past sessions, offering a track record of your SQL queries and AI interactions.
Disabling AI features
To hide the GPT smart completion and AI Chat icons in the SQL Editor:
- Navigate to Window -> Preferences -> General -> AI (GPT.md).
- Deselect Enable smart completion.
For users with PRO versions wanting to permanently disable this feature:
- Use the system variable by setting
DBEAVER_AI_DISABLEDtotrue. - Or, add
Dai.disabled=trueto thedbeaver.inifile.
Note
Once this feature is permanently disabled in PRO versions, it cannot be re-enabled via Preferences.
Best practices for question formulation
When using AI to generate SQL queries, it's essential to provide clear and specific input. Here's how to optimize your questions:
- Language: While AI supports multiple languages, it's recommended to use English for best results.
- Database knowledge: Familiarity with your database structure enhances the accuracy of generated queries.
- Iterative refinement: Start with a general request and refine iteratively. As you provide more specific details, the AI's output will become more relevant.
- Explicit details: If you know certain tables or columns that should be part of the query, include them in your request for better accuracy.
For instance, if you're using the DBeaver sample SQLite database, you might phrase your request as:
Example 1: "List all customers from Italy"
Resulting SQL:
Example 2: "montre les clients de France"
Example 3: "show customers who purchased blues tracks, use joins"
SELECT c.FirstName, c.LastName, t.Name, g.Name
FROM Customer c
         JOIN Invoice i ON c.CustomerId = i.CustomerId
         JOIN InvoiceLine il ON i.InvoiceId = il.InvoiceId
         JOIN Track t ON il.TrackId = t.TrackId
         JOIN Genre g ON t.GenreId = g.GenreId
WHERE g.Name = 'Blues'
ORDER BY c.LastName, c.FirstName;
Example 4: "get names of customers who purchased blues tracks, use joins"
SELECT DISTINCT c.FirstName, c.LastName
FROM Customer c
         JOIN Invoice i ON c.CustomerId = i.CustomerId
         JOIN InvoiceLine il ON i.InvoiceId = il.InvoiceId
         JOIN Track t ON il.TrackId = t.TrackId
         JOIN Genre g ON t.GenreId = g.GenreId
WHERE g.Name = 'Blues';
Installing the GPT extension
For users of the DBeaver Community version, the GPT extension requires manual installation.
Follow these steps to install the GPT extension in the Community version:
-
Navigate to Help from the main menu and select Install New Software.
-
Within the installation dialog, locate the Work with dropdown. Choose DBeaver AI (GPT.md) integration from the list:
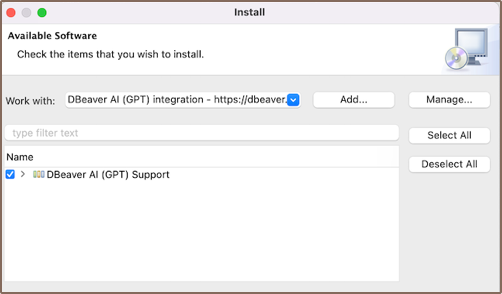
-
Check the box next to AI (GPT.md) Support. Click Next and proceed through the installation prompts.
-
A Trust Artifacts window will appear. Ensure you select all the artifacts listed and click on Trust Selected.
-
Once the installation is complete, restart DBeaver.
After restarting, launch the SQL editor. On the left toolbar, you should now see the GPT Chat
icon .